This is the third blog in an ongoing series on Azure Data Factory. I recommend you start with the following blogs before continuing:
In the first blog in this series I talked about working through a use case. Over the next 3 blogs we will look at 3 different methods for migrating data to Azure Blob storage.
-
-
- Using the Azure Data Factory Copy Data Wizard. (on table)
- Using BIML and SSIS (entire database – SSIS)
- Using Azure Data Factory and PowerShell (entire database – ADF)
-
The reason I have included the latter 2 versions is because if you just want to load an entire database in the blob storage it can be quicker to use one of these methods as a one off or on a scheduled basis. Hand writing all the JSON required for each move table from on premise to blob storage is very time consuming. Depending on whether you need to do a one off upload or something on a schedule options 2 and 3 might help.
Our original use case from an introduction to Azure Data Factory:
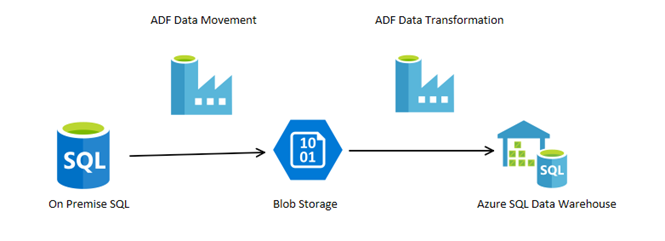
Let’s imagine a process where you have an on premise SQL server box, you want to move multiple tables to blob storage, from there you then want to issue a stored procedure which will consume that data in to an Azure SQL data warehouse via PolyBase – As illustrated in the image below.

Linked services:
On-premise SQL database
Azure BLOB storage
Azure SQL data warehouse
Datasets:
Table in On-premise SQL database
The blob container
The stored procedure
Pipelines:
Pipeline to move data from SQL database to blob storage
Pipeline to issue stored procedure
In the blog we will tackle the first part:

Copying data:
We are going to start looking in a bit more in detail at the Azure Data Factories (ADF) copy data task (CD). CD is still in preview (at the time of writing [01/2007]). Prior to the inclusion of the copy data wizard, you had to manually configure ADF artefacts and write most of the JSON for linked services, datasets and pipeline by hand. The copy data task is a wizard for generating a data movement activity pipeline, complete with datasets and linked services.
To get started connect to azure and navigate to your existing Azure data factory (if you do not have an existing ADF you can follow how to create one here).

To begin setting up a copy data pipeline click on the “copy data (PREVIEW)” option in the ADF panel in Azure. Once you have selected “Copy data” you will be taken to the new ADF interface. Datafactory.azure.com enables the creation and monitoring of ADF pipelines.
The general process for creating an ADF pipeline process (prior to the copy data task) was
-
-
- Create an ADF
- Create a linked service/s
- Create a gateway as needed
- Create you input and output datasets
- Create a pipeline
- Monitor the pipeline
-
When using the ADF copy data the process is slightly flipped
-
-
- Create an ADF
- Configure the properties for the pipeline
- Create a gateway
- Configure the linked service/s
- Configure the datasets
- Deploy all configurations
- Monitor the pipeline.
-
The main difference here is that you do not deploy anything until it has all been configured, you have the added advantage that it is somewhat cumbersome to do this manually. At present, the copy data task is very narrow in its functionality. If your intention is to build a more advanced pipeline will either need to generate a move task and tweak it or create it all manually.
Copy data has many short comings, for our example the most prevalent is that a movement to blob storage only has the option to sink data to a folder and not multiple folders. Option 3 in our list of methods for migration aims to get around this limitation using PowerShell
Configure Pipeline properties:
Once you have selected “copy data” you will be launched in to datafactory.azure.com, the new fresher looking environment. The copy data task is a 4 stop process which will guide you through the creation of a data movement pipeline (I want to highlight that this is only used for data movement and not transformation). This is a great way to get you started with ADF without having to understand the json or trickier elements such as data slices and scheduling, although we will touch on scheduling as it is quite tricky.

(image 1 – Configure Properties)
The first screen is you will see are the properties of the pipeline you’re creating. It is here you will configure the frequency and schedule of the pipeline. A pipeline is a group of logically related activities.
-
-
- Task name – This is important and will be used as a prefix for the names of datasets and data stores.
- Task description –
- Task schedule – See below for a more in depth analysis.
- Start time – This date is in UTC / End time – This data is also in UTC
-
For quick conversions to your time zone, I recommend worldtimebuddy.
More on schedules:
The Microsoft page about scheduling is incredibly deep and takes a lot of effort to fully digest and understand. I will attempt to impart my understanding of pipeline scheduling in to a brief list of key points. You can read more here. I would recommend that you do read this site as there is a lot of good examples. The key points from this document are:
-
-
- A schedule can be one-off or between dates
- It can run on a scheduled basis Minute, hourly, daily or weekly. Every 15 minutes is the minimum.
This forms what is known as a tumbling window. Microsoft defines a tumbling window as “A series of fixed-size, non-overlapping, contiguous time intervals”. Tumbling windows are also known as activity windows. - A pipeline schedule’s interval needs to be the same as a datasets availability – However, it does not need to run at the same time.
-
For our example we will use frequency of “Daily” and an interval of “1”, this will run our pipeline every day. To write this in JSON and not through the wizard you would use the following JSON as part of your pipeline.
“scheduler”: {
“frequency”: “Daily”,
“interval”: 1
}
To create a pipeline which will run undefinably you can set the end date time to “12/31/2099 12:00am” which while this is not infinite, the date will outlive ADF. Start date time will default to the time you have created the pipeline (n.b. these dates are expressed in US format MM/DD/YYYY).
Creating linked services (Source data store):
The next screen is the configuration of the linked sources. ADF is still new and the terminology is somewhat confusing. Depending on tool you’re using and sometimes the screen you’re looking at, ADF will mix up the names for key parts, anywhere you see the term “data store” assume it is referring to a linked service.

For our example we will use the SQL Server option (bottom right of the above image).

(Image – SQL Server linked service configuration screen)
You should now be able to configure the connection details (via a gateway) to you SQL server database.
-
- Connection Name – You can refer to the Adatis naming standard as a reference
LS – Linked service
MSQL – Microsoft SQL Server
Person – Table being exported. - Gateway – Select an existing or create a new gateway (see below)
- Server name – For my example I am using my local server with the default instance “.” local would also work. If you’re connecting to a named instance this will need to be serverInstanceName
- Database Name – Which database you want to connect to
- Credential encryption – You have the option to save a credential in Azure or use authentication through the browser.
For simplicity I am using the latter. For production, use the former. - Authentication type – How to connect to SQL Server, Windows or SQL login.
- User name
- Password
- Connection Name – You can refer to the Adatis naming standard as a reference
Creating and configuring a gateway:
In our example we will be connecting to a local version of SQL Server, to connect and read data we will need to create an ADF gateway connection and also install our gateway on the server which has our database (or at least connection to that database). You have a few options to create the gateway, but before you can configure any of these you will need to download and install the gateway. You can find the latest version of the gateway here. Once installed the gateway will be waiting for an access key.

(image – Microsoft gateway – Awaiting gateway key)
We have 3 options to create an ADF gateway and obtain the key the gateway is expecting.
-
- Copy Data configuration page (click create gateway)
This will build the gateway and add the name to your pipeline. You will need to take the access key it generates and add that to you installed gateway. - Add via author and deploy
Navigate to author and deploy on the main panel of ADF in Azure.
Click on “…More” and select New Data gateway, configure and deploy. This will return a key. Add the key to the gateway on your server. - Via PowerShell
Open a new PowerShell prompt and connect to Azure (Login-AzureRmAccount)
Replace the following with your Azure details – $ResourceGroup, $DataFactoryName and $Gateway
New-AzureRmDataFactoryGateway -ResourceGroupName $ResourceGroup -Name $Gateway -DataFactoryName $DataFactoryName -Description $Gateway
This will return a key. Add the key to the gateway on your server.
- Copy Data configuration page (click create gateway)

(image – A registered gateway)

(Image – main screen on a registered gateway)
Configuring linked services:
Select next to choose which table/s you wish to move.

(Image – ADF Copy – Select tables)
You can select one or more tables here. For our example we will be consuming the data using PolyBase. We want our data to sink to its own container in Azure. As such we cannot move multiple tables at once (at the time of writing this is limited to one sink container).

(Image – ADF data filter)
You will next be asked how you want to filter the data. Each time our data runs we are looking to move the whole table. If we were looking to do incremental loads, we could select a column which indicates which rows to import each hour. For our example select Filter: None. Next

(image – ADF destination Source)
Configuring the destination source:
On the next screen you will see the list of available sinks (where you can insert data). You will notice the list of sinks is far smaller than the list of sources – at present not all sources can be sinks.
For our example select Azure Blob storage

-
-
- Connection Name – Based on Adatis ADF naming standards
- LS_ Linked Service
- ABLB_ Blob storage
- Person – blob container data will sink to
- Account selection method – Manual/Azure list
- Azure subscription – Select you subscription
- Storage account name – Select your storage account
- Connection Name – Based on Adatis ADF naming standards
-

(Image – Selecting a blob container)
Select a folder for the file to sink to. I created a folder ahead of time called person.

(Image – ADF file format configuration screen)
Customise you output settings. For now we will just select the defaults to create a CSV.

Select finish to build your pipeline.

(image – ADF deployment completed screen)
As long as everything has worked you will see the screen above. Congratulations your pipeline has been deployed. To monitor the pipeline and see what has been created select the link “click here to monitor your pipeline”. You will be taken to a different screen in the ADF portal. We will have more on how to monitor ADF shortly.

Image – (ADF pipeline in datafactory.azure.com)
You can check data has moved successfully using Azure storage explorer. ASE is a great utility for browsing files in blob storage. You can download ASE here http://storageexplorer.com/

(image – Storage explorer)
I can see that my file is there and is populated as intended. Once a further 24 hours has passed this file will be over written.
So we have seen what we can do with the Copy data task in Azure. While it is fantastic at basic data movement functions, copy data does not offer much beyond that. I have listed the following pains and shortfalls which exit in ADF copy data at present .
Limitations of the copy data wizard:
There are quite a few limitations, some of these are nice to have, others are show stoppers.
-
-
- The CD action is limited to only a subset of the pipeline activities. As the name suggests you can only copy data, or move data. There is no transformation wizard.
- The menus are very temperamental and regularly do not work
- You cannot name a dataset – InputDataset-8tl was created in my example. This is not helpful
- The name of the pipeline is also not helpful.
- You cannot chain multiple activities together
- Each pipeline needs to created separately.
- You can only sink datasets to one blob container.
-
Now that we have our data in blob storage we can begin to look at the rest of our solution, where we will create an Azure SQL Data Warehouse, with external PolyBase tables. We will use stored procedures to persist the external tables in to ASDW.
In the next blog we will look at moving an entire database to Azure blob storage using SSIS and BIML.
Links
https://docs.microsoft.com/en-gb/azure/data-factory/data-factory-scheduling-and-execution
https://adatis.co.uk/Azure-Data-Factory-Suggested-naming-conventions-and-best-practices
Introduction to Data Wrangler in Microsoft Fabric
What is Data Wrangler? A key selling point of Microsoft Fabric is the Data Science
Jul
Autogen Power BI Model in Tabular Editor
In the realm of business intelligence, Power BI has emerged as a powerful tool for
Jul
Microsoft Healthcare Accelerator for Fabric
Microsoft released the Healthcare Data Solutions in Microsoft Fabric in Q1 2024. It was introduced
Jul
Unlock the Power of Colour: Make Your Power BI Reports Pop
Colour is a powerful visual tool that can enhance the appeal and readability of your
Jul
Python vs. PySpark: Navigating Data Analytics in Databricks – Part 2
Part 2: Exploring Advanced Functionalities in Databricks Welcome back to our Databricks journey! In this
May
GPT-4 with Vision vs Custom Vision in Anomaly Detection
Businesses today are generating data at an unprecedented rate. Automated processing of data is essential
May
Exploring DALL·E Capabilities
What is DALL·E? DALL·E is text-to-image generation system developed by OpenAI using deep learning methodologies.
May
Using Copilot Studio to Develop a HR Policy Bot
The next addition to Microsoft’s generative AI and large language model tools is Microsoft Copilot
Apr