Azure Data Factory V2 is the go-to service for moving large amounts of data within the Azure platform and, up until relatively recently, was focussed predominantly on control flow rather than data flow. Those familiar with SQL Server Integration Services will be aware of the difference however, to clarify, Control flow is used to orchestrate activities within a data pipeline whilst Data flow is used to physically move and transform the data.
In May 2019, the Azure Data Factory team released into public preview the Azure Data Factory Mapping Data Flows (MDF) functionality, which effectively moves ADF from being an orchestration tool into a fully fledged ETL tool. This new feature allows developers to configure data transformation logic using a no code, drag and drop approach and implements many of the transformation concepts that existed in SSIS. In fact, there exists an excellent comparison between SSIS, SQL and ADF MDF written by Kamil Nowinski available through this link which highlights how the three technologies matchup: https://sqlplayer.net/2018/12/azure-data-factory-v2-and-its-available-components-in-data-flows/. Points to note are that ADF does not have event handlers in the way SSIS does and also does not have an equivalent to the script component within Data Flows. It does have a custom activity which allows you to write C# within the control flow but currently you cannot write any custom code within a Mapping Data Flow.
Prior to the release of MDF, Data Factory could move data from one place to another with its copy activity however it could not modify the file in any meaningful way and would require external services such as SQL Data Warehouse or Data Lake Analytics (RIP) to be used to fill this gap. The copy activity performed the data movement using the Azure Integration Runtime which provided the compute power needed to complete the operation, so does that mean that Mapping Data Flows run on the same compute resource?
NO is the answer. In fact, your graphical data flow is converted into Scala and then compiled into a JAR library to be executed on a Databricks (Spark) cluster which is deployed and managed by Microsoft solely for running your data flow activities. This does mean that any pipelines that utilise MDF have a slight overhead to allow for the cluster to start-up and configure, however Microsoft are looking at ways to reduce this and there is no need for an ETL developer looking to build MDF’s to know anything about Databricks, Scala or Spark Clusters – although it will certainly help!
So, it’s in public preview so let’s get using it! This blog will walk through the process of creating a basic cleaning data flow that will populate a SQL Database table with the values from a delimited text file.
To begin, we need some data factory objects, anyone familiar with data factory will understand we need Linked Services and Datasets to connect to our data and create schemas, and Pipelines to give structure to the activities and create our control flow. In this example I have a small comma separated file that has some data quality issues such as,
- Leading and trailing white space
- Weird column names
- Non standardised NULL values
- Weak data types
The data flow we will create will address all of these issues before depositing the file into a SQL Database.
- First, we should create a linked service that connects to a blob store or data lake account where our dirty file is stored.
- We then need a dataset that sits on top of the Linked Service which allows us to locate and read the file using the specified parameters such as file path, column delimiter, row delimiter etc. Additionally, in this dataset we can import the schema of the file so that we have some column names available.
- Next, we can create a linked service that connects to our output SQL Database and also a dataset that points to the correct table again, importing the schema.
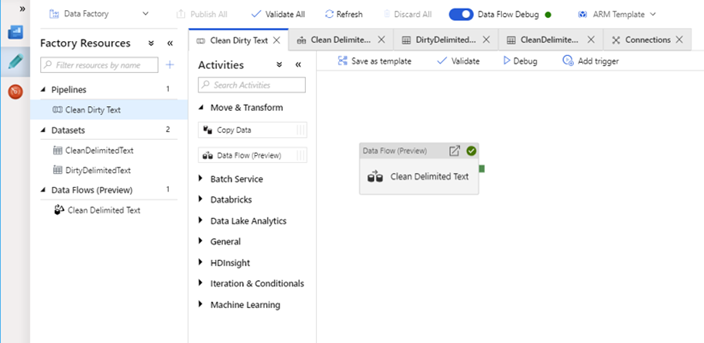
- After creating these objects we also need a pipeline to orchestrate the process and this will ultimately call our fancy new data flow. You only need a single activity in this pipeline which will be found under the “Move & Transform” heading and is called “Data Flow (Preview)”
At this point you should have something similar to the following with the exception of the data flow object under the Data Flows (Preview) tab:
NOTE: I have not gone into much detail about creating these objects as they will be familiar to most ADF developers. For pointers on how to create the above follow this link: https://docs.microsoft.com/en-us/azure/data-factory/quickstart-create-data-factory-portal
Now we can begin creating our Data Flow. Firstly, we will add the source and the sink to our data flow, this gives us our bookends as a clear starting point, and we can then play about with middle bit afterwards. Also, at this point, toggle the switch at the top of the Data Factory UI named “Data Flow Debug”, this will start a cluster up for you and avoid you having to wait later on
- Hover over the Data Flows (Preview) header and click on the ellipsis, choose “Add Data Flow” and this will take you into the Mapping Data Flow UI where you can begin creating you Data Flows. Remember to set a sensible name for your data flow in the general tab of the data flow UI.
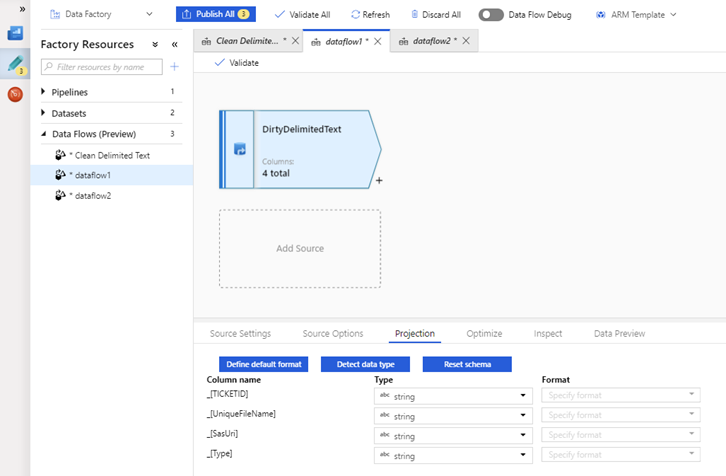
- Click “Add Source” and we can begin configuring the source activity of our data flow.
- Provide a clear name that identifies the source. This source is fed from a dataset so the names should closely match.
- Choose the dataset that is linked to your blob account and uncheck “Allow schema drift”. This is a useful option and allows for constantly changing sources files to be handled however we will cover that in a later blog.
- On the “Source Options” tab you can choose to add actions that occur after completion such as deleting or moving source files.
- On the “Projection” tab you can tailor your schema which is defined in the source dataset. My preference is to leave these all as strings to avoid any early typing errors as we will address these later in the flow.
- Finally, on the Optimize, Inspect and Data Preview tabs, all defaults can remain the same.
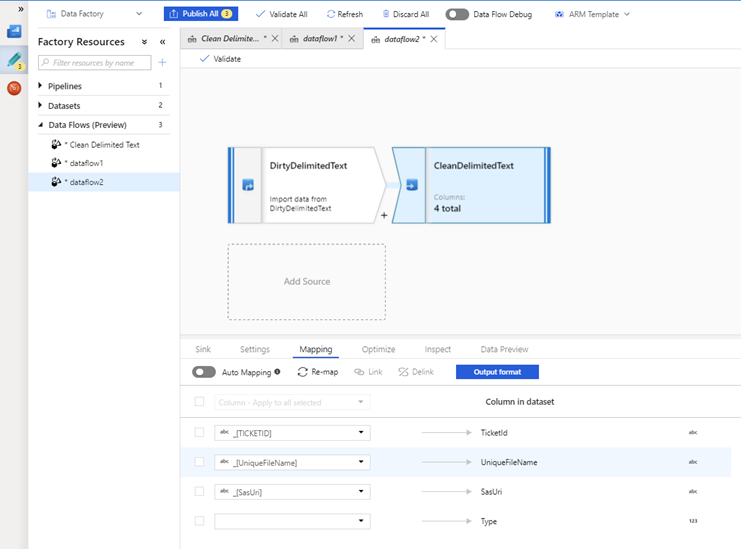
- Now click on the tiny + icon in the bottom right corner of the source activity and choose “Sink” from the drop-down list. Here we can configure the output of our flow which in this case will be a SQL Database.
-
- Specify the name, again relating it to your sink dataset, and choose the SQL Database dataset created earlier.
- On the “Settings” tab you can choose which methods can be used by ADF when working with your table. These can be any combination of Insertion, Deletion, Upserting or Updating. Also, you can define actions to occur in the database before loading the data such as recreating the entire table or truncating the existing table before loading into it.
- Finally, on the “Mapping” tab you can map columns from source to sink. Be aware that any columns that are not strings in your database will not be able to be mapped until the data typing has occurred.
Now we have a basic copy structure that does nothing clever yet but does connect our dirty source file up to our sink dataset. We can begin doing the actual transform.
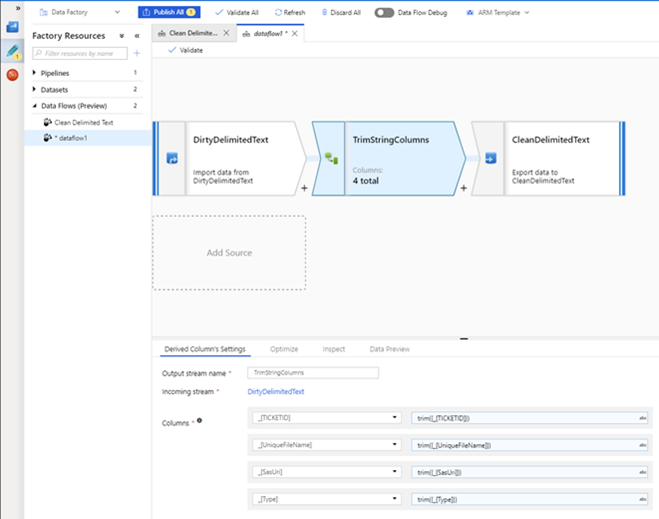
- The first transformation we will do will be to Trim white space from columns. Click on the + icon and choose “Derived Column”. Within the “Derived Column Settings” tab you should add each of the columns in your source dataset and then enter the following expression for each one in the expressions editor: trim({column name}). This expression will remove any whitespace from the columns value ensuring the database receives a clean value.
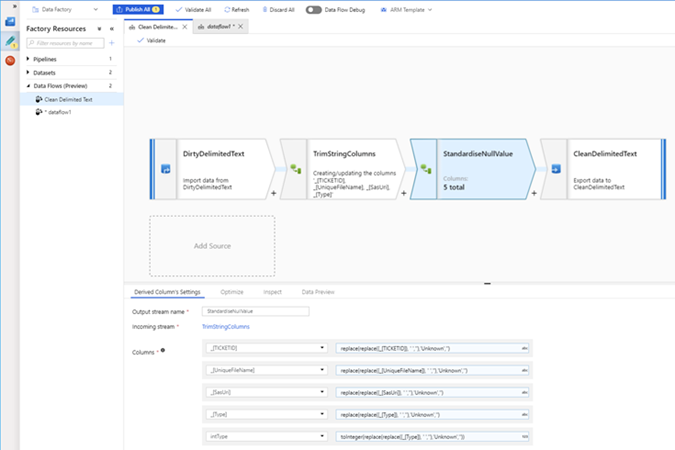
- Now we will standardise any NULL values and also transform any columns into their correct data types. To do this, click the + icon again and choose “Derived Column” again. Similar to the above step you can add an entry in the “Derived Column Settings” tab for each column, adding the below expression for each column: replace(replace({column name}, ‘ ‘,”),’Unknown’,”). This expression will replace any empty values with NULL and also any values where we have ‘Unknown’ will also get replaced with NULL so that we have some standardisation before loading into the database. Any NULL values already present will be untouched.
- In my dataset I need to change one column from its originating string data type into an int so that it can be dropped in the DB. Rather than doing this change in place, it is best to create a new column to do this so that you have an original column and the new column with the correct type.
-
- Whilst still in the expression editor, hover over any column name in the “OUTPUT SCHEMA” window that is visible on the left hand side and choose the + icon. This will allow you add a new column to you data flow and you can use any of the conversion functions (toInteger, toLong, toString, toDate, toBoolean etc) to coerce the value into its correct type.
At this point you should have four steps that resemble the below screenshot. Once your Data Flow Debug session is online you can debug the data flow and hopefully see the nice clean values pass through into the database. Throughout this process I recommend taking a peek at the Inspect and Data Preview tabs. The Inspect tabs give a bit more information about what steps are taking place on the data in that activity and the Data Preview will show you how the data will look, although the Debug session needs to be active for this to work. Finally, the optimize tab allows you to set the partitioning of the data using techniques such as Round Robin, HASH and range distribution although these are out of the scope of this blog.
Hopefully this brief tutorial has been helpful and allowed you to gain some early knowledge on Data Factory Mapping Data Flows meaning that you can go on to create Flows that are tailored to your needs and cover off a wider variety of scenarios. Any questions, thoughts or feedback, please catch me on twitter @MattTheHow.




Looks good. I am having issue though with data preview showing only nulls when the data set previews data fine. Do you know what might be wrong?
Hi! Great post.
I’m facing i kind of problem on data flow using the EXISTS input when my right and left tables use varchar with NULL values. The DataFlow doesn’t consider the NULL value in the conditions and insert data in my destination table even the data is already in there. Is there any way to haddle NULLs in EXISTS method?