Part 1
Introduction
Loading new members to a MDS entity will be a common requirement in all MDS implementations. In these blog posts I am going to walk you through building an SSIS package that performs the following processes:
- Load new members and attributes to several entities via staging tables
- Validate the MDS model that contains the entities
In part one we will load the MDS staging tables ready to take our new members and attributes into our MDS model. For a thorough understanding of the staging process in MDS please see the Master Data Services Team blog post on Importing Data by Using the Staging Process.
A pre-requisite is to have the AdventureWorks2008R2 database samples installed on the same instance of SQL Server as Master Data Services.
In MDS I have created a model named ‘Product’ with an entity of the same name. The product entity has the following attributes which are set to the default type and length unless specified:
- Name
- Code
- Model (Domain Attribute)
- Culture (Domain Attribute)
- Description (Text, 500)
We are going to load this entity with Product data from the AdventureWorks2008R2 database using a SSIS package.
In addition to this there are two further entities in the Product model:
- Culture
- Model
These entities have just the code and name attributes and are set to the default type and length.
The MDS model and Integration Services project source code can be downloaded from here – (You will need to create a login first).
Building The Solution
OK enough of the intro let’s get on and build the package.
Start a new Visual Studio Integration Services Project and save the default package to a more suitable name. I’ve called mine ‘LoadMDS.dtsx’.
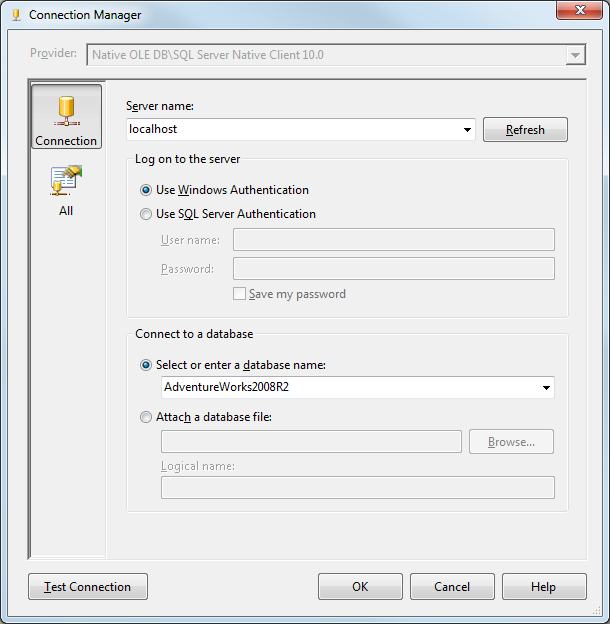
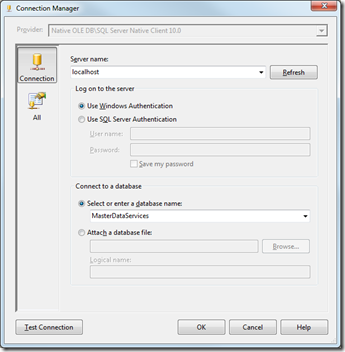
Create the following connection managers as shown below remembering to replace the Server and MDS database names.
Rename the connection managers to ‘AdventureWorks’ and ‘MasterDataServices’ respectively.
Now we need to create some variables so go ahead and create the variables shown in the table below:
We are now ready to put our first task into our package. This task will optionally clear the staging tables of all successfully loaded members, attributes and relationships prior to loading, based on the value of the blnClearStage parameter.
Add an Execute SQL Task to the control flow of your package and rename it – I’ve called mine ‘SQL – Clear Staging Tables’.
On the General tab set the connection to MasterDataServices and the SQL Statement as follows:
DECLARE @ModelName NVARCHAR(50) = ?
DECLARE @UserName  NVARCHAR(50) = ?
DECLARE @User_ID   INT

SET @User_ID =    (SELECT ID
                   FROM  mdm.tblUser u
                   WHERE u.UserName = @UserName )

IF ? = 1
    EXECUTE mdm.udpStagingClear @User_ID, 4, 1, @ModelName, DEFAULT
ELSE
    SELECT 1 AS A
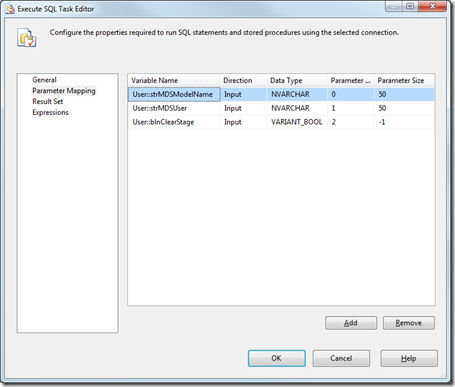
On the Parameter Mapping tab add the variables exactly as shown below:
Add a Data Flow task to the control flow of the package and connect it to the ‘SQL – Clear Staging Tables’ task with a success constraint. Rename the task to ‘DFL – Load Staging Tables’.
Add three further variables to our package as follows:
In the data flow of our package add an OLEDB data source task, set the connection to AdventureWorks and the Data Access Mode to SQL Command. Add the following SQL to the SQL command text window:
SELECT
    CAST(p.ProductID AS VARCHAR(10)) + pmx.CultureID            AS ProductCode
    ,p.Name
    ,p.ProductModelID
    ,pm.Name                                                    AS ProductModelName
    ,pmx.CultureID
    ,c.Name                                                     AS CultureName
    ,pd.Description
FROM Production.Product                                         p
  INNER JOIN Production.ProductModel                            pm
    ON p.ProductModelID = pm.ProductModelID
  INNER JOIN Production.ProductModelProductDescriptionCulture   pmx
    ON pm.ProductModelID = pmx.ProductModelID
  INNER JOIN Production.ProductDescription                      pd
    ON pmx.ProductDescriptionID = pd.ProductDescriptionID
  INNER JOIN Production.Culture                                 c
    ON pmx.CultureID = c.CultureID
Don’t worry if the formatting turns ugly, that’s just what happens. Press the Preview button and you will see that this query will return us the following columns to our data flow:
- ProductCode
- Name
- ProductModelID
- ProductModelName
- CultureID
- CultureName
- Description
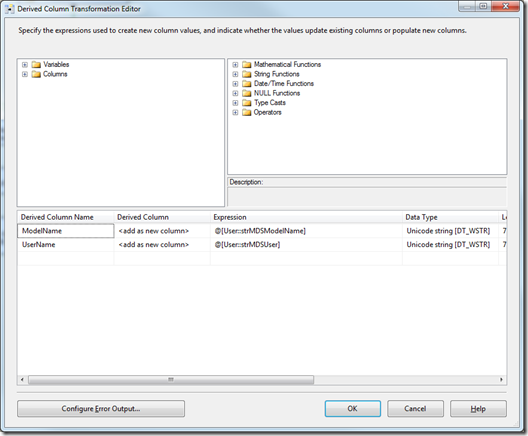
We need two more columns in our data flow and to get them we will use a Derived Column transformation task so drag one on to the data flow from the toolbox and connect it up to the data source. Add the columns as shown in the image below:
Next the data flow needs to be duplicated into multiple streams so that the different members and attributes can be loaded to the staging tables. This is achieved by adding a Multicast transformation task to our data flow. This task does not require any configuration. There will be six outputs from the Multicast task and these will be used to load the following:
- Product Members
- Model Members
- Culture Members
- Product Model Attributes
- Product Culture Attributes
- Product Description Attributes
Each of these outputs needs to be tailored as to whether they will be loading a member or an attribute and also which member or attribute they are loading. Add six Derived Column transformation tasks to the data flow and connect them to the Multicast transformation. At this point our data flow should look similar to the following:
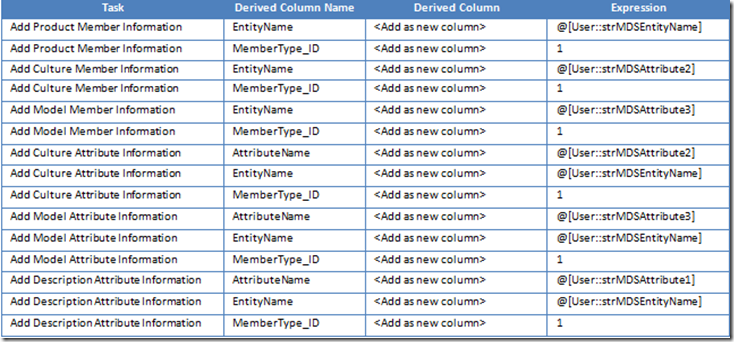
For each of the Derived Column transformations add the additional columns as specified below:
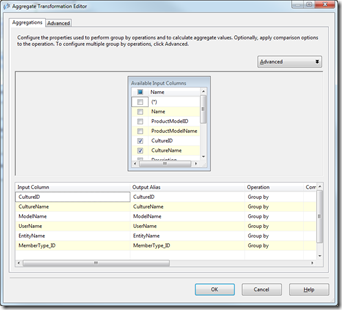
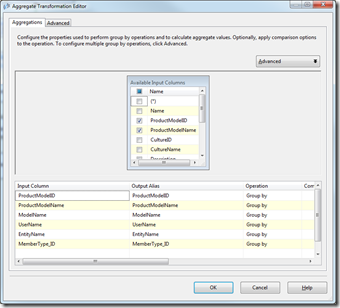
OK now we have got all the information we need in our data flows to start loading to the staging tables but before we do that there is one more thing to do. As we are loading new members to the Model and Culture entities as well as Product we need to ensure that we have only distinct values for our member codes to prevent staging errors. To achieve this we add and connect Aggregate transformation shapes to the data flows underneath the ‘Add Culture Member Information’ and ‘Add Model Member Information’ shapes. The images below show how to configure these aggregate transformation shapes:
Group By Culture Group By Model
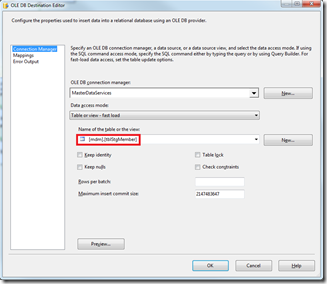
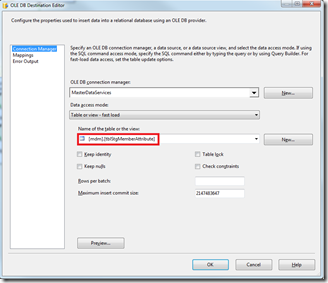
We are now ready to load the data to the MDS staging tables. Add six OLE DB destination shapes to the dataflow. Three of the destinations will be to load new entity members and the other three will be to load attributes for these new members. Configure the Connection Manager properties of the destinations as follows:
Members Attributes
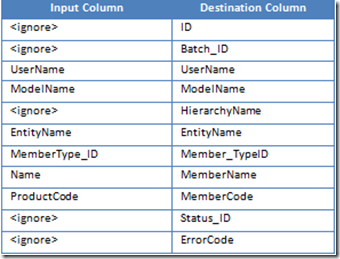
Connect the first destination shape to the ‘Add Product Member Information’ shape and configure it as a member destination. Click the Mappings tab and set the Input and Destination column mappings as shown below:
Connect the second destination shape to the ‘Group By Culture’ shape and configure it as a Member destination. The column mappings will be the same as above except for the MemberName and MemberCode columns and these will be set to CultureName and CultureID respectively.
Connect the third destination shape to the ‘Group By Model’ shape and configure it as a Member destination. The column mappings will be the same as above except for the MemberName and MemberCode columns and these will be set to ProductModelName and ProductModelID respectively.
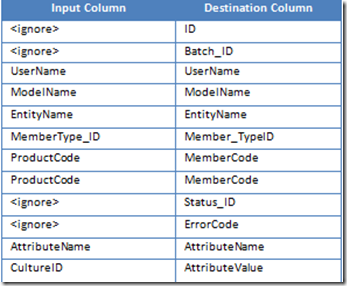
Connect the fourth destination shape to the ‘Add Culture Attribute Information’ shape and configure it as an Attribute destination. The column mappings will be as follows:
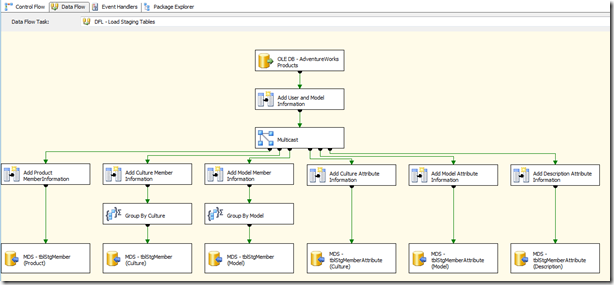
Configure the next two destinations as Attribute destinations and map the columns as the other Attribute destination replacing the AttributeValue mapping with ProductModelID and Description respectively. Now our completed dataflow should look similar to the following:
If you execute the package you will see that we have inserted 1764 Product member rows, 6 Culture member rows and 118 Model member rows into the mdm.tblStgMember table and 1764 attribute rows for each of the Culture, Model and Description attributes into the mdm.tblStgMemberAttribute table in your MDS database. It is worth noting that the data has now been staged only and we will not see it in our MDS entities yet.
OK that’s as far as we are going to go in part one. In part two we will extend the package to move the data from the staging tables into the MDS model and validate the newly inserted data.






I am not sure where you are getting your info, but good topic.
I needs to spend some time learning much more or understanding more.
Thanks for excellent info I was looking for this information for
my mission.
Wonderful items from you, man. I have understand your
stuff previous to and you are just extremely wonderful. I actually like what you
have received right here, certainly like what you are saying and the way in which through which you assert it.
You are making it entertaining and you continue to care for to stay it
wise. I can’t wait to read far more from you.
This is actually a tremendous site. https://blog.naver.com/thddl_638/221518236330