Continuing on from the previous blog on Getting Started with Azure Data Factory, we will look up setting up our first Azure Data Factory. We will do this in 3 different ways, using 3 different tools.
The three methods we will look at (in order) are:
1. Using the Azure portal
2. Using Visual studio with the add-in for ADF
3. Using PowerShell
Option 1 – Using Azure Portal.
This is the easy to set up, however not the easiest to work with once set up. I will go in to reasons why in later blogs. To begin setting up our new instance of ADF head over the the Azure portal and log in. You will find the Azure Portal at https://portal.azure.com/ . Please note that Azure is not free and you will either need to set up a free 1 month trial, already have an existing MSDN account or unfortunately spend some money.
Once logged in you can find the option to add an ADF instance on the left of your screen. Click the green plus and search for “Data Factory”. The icon below should appear, click on this to begin configuring your new instance of ADF.
If you’re new to Azure I suggest you read Microsoft guide to Azure, to familiarise yourself with terms such as “resource group” (You will find a good introduction here: https://docs.microsoft.com/en-us/azure/fundamentals-introduction-to-azure)
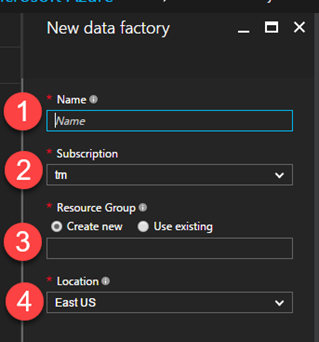
Once you have clicked to create a new ADF instance you will see the following blade (a blade is a sliding window in Azure). Give your ADF a name. The name of your ADF needs to be unique to Azure, “MyDataFactory” will not cut it unfortunately. We will have a naming guide which should help you decide on how to make your first ADF instance. I will be naming my instance AdatisADFExample. On the image above, the following numbers relate to the following elements.
- Give your instance a name (as explained above)
- Select your subscription (if you have multiple select which one you’re allowed to use. I generally select the one which has the most amount of money remaining.
- Choose to create a new resource group or use an existing. I would recommend that you create a new resource group to hold all of the artefacts required for this demo (ADF, ASDW, Blob storage)
- Select a location. ADF is not available in that many locations at present. You can pick East US, West US or north Europe. As I am in the UK I will select North Europe.
Finally select pin to dashboard and the select “create”. Congratulations! You have successfully created your first instance of Azure Data Factory. Feel free to skip to the next section if you do not wish to learn how to complete the same operation in Visual Studio and in PowerShell.
Option 2 – Using Visual Studio
Before starting you will need to have Visual Studio 2015 installed, I am currently using the community edition which is free and does everything I need it to (available at https://www.visualstudio.com/downloads/ [Accessed 22/01/2017]), you will also need the ADF add-in for visual studio. If you have problems installing the ADF add-in, check the installation guide as it does require the Azure SDK.
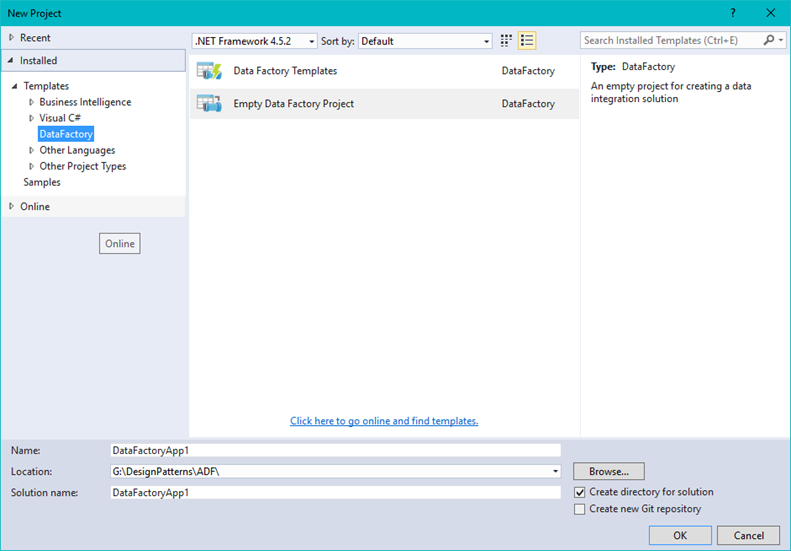
Once you have everything installed open Visual Studio and select a new project. You should see Data Factory on the left hand side if it has installed correctly. Once selected you should see the screen below. You have 2 options, create an empty ADF project or use a template.
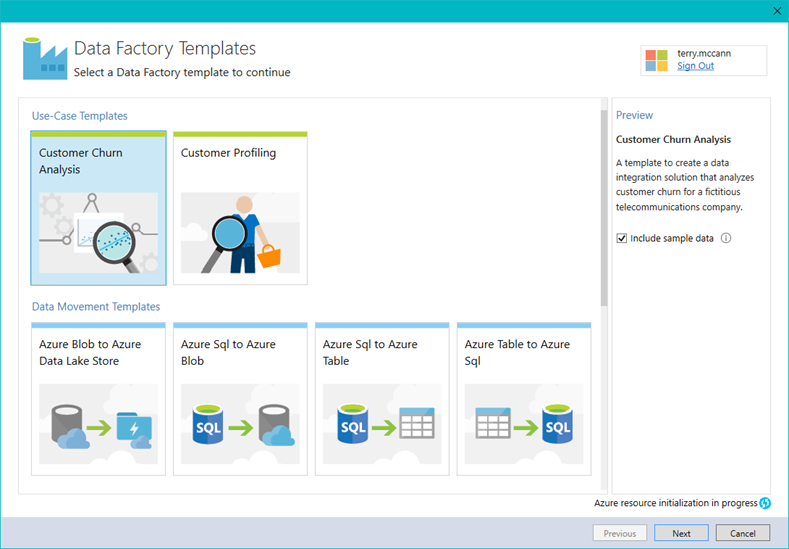
If you want to see how a project (other than this one) is created, select the template project and you will be able to pick one of eight sample solutions.
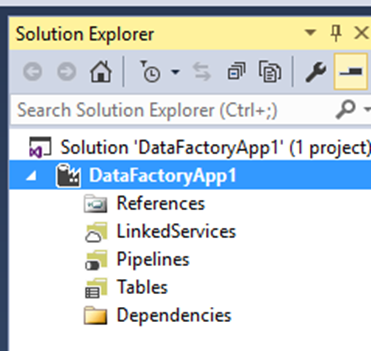
For the moment select an Empty Data Factory project. Give it a name and a location and hit OK. The visual studio project for ADF allows you to create everything you need and also to publish to Azure at the click of a button. If the solution explorer has not opened, you can enable this under the view menu. You should now be able to see the new ADF project in the solution explorer.
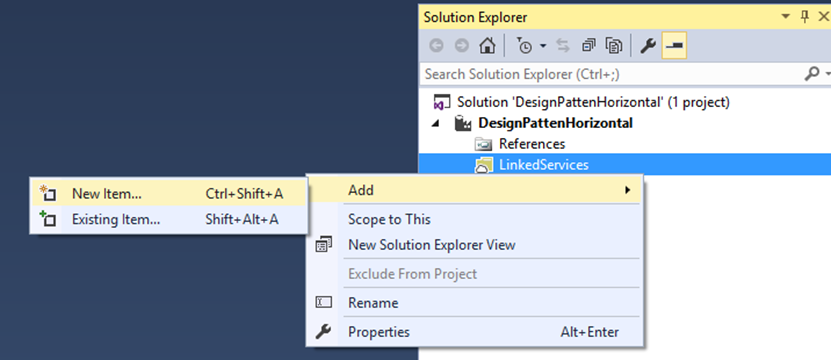
To use Visual studio to publish you will need at least one linked service, dataset or pipeline. For our example we will create a linked service to an Azure SQL Data Warehouse. Right click on the linked service in the solution explorer and select Add new item.
This does not necessarily need to exist at this point.
From here you will be asked to select which type of linked service you want to create. We will be connecting to an Azure SQL Data Warehouse, however as you can see there are a lot of options you can pick from, ranging from on premise SQL Database to Amazon Redshift. This list is frequently being updated and added too. For our example, select the Azure SQL Data Warehouse Linked service. Give the linked service a name (n.b. this a pain to change after, so if you can make it something meaningful this will help).
Once you have created a new linked service you will be presented with the JSON above. The only difference between each linked service is the structure and syntax of the JSON. $schema relates to what can and cannot be selected as part of that linked service. You can think of this as an XML schema. This comes in handy for intelllisense. You will want to change the name to something more indicative of what you’re doing. Configure the connection string and we are ready to continue.
Now that we have something to publish, we will first create an instance of ADF to publish to. Right click on the parent node in the solution (as below) and select “Publish”.
You will then see the following screen. You might need to change your account to the account you log in to Azure with if you do not see this screen.
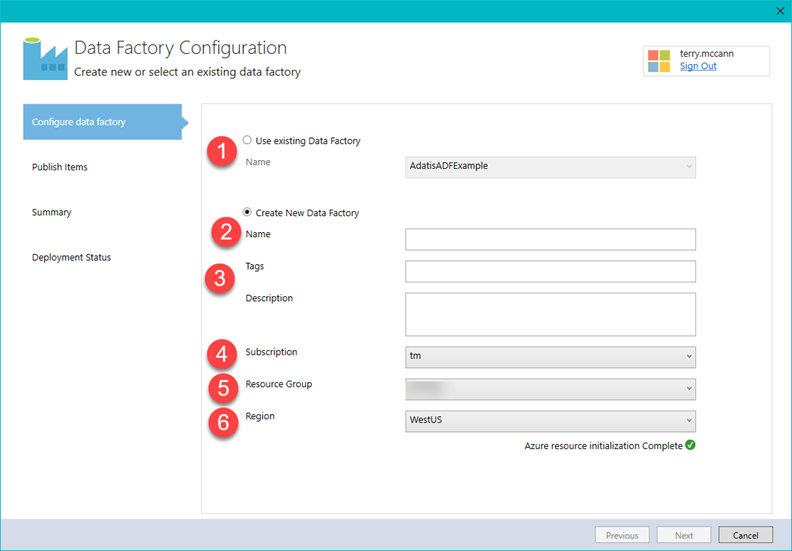
You now have the option to either publish to an existing ADF instance or create a new one. You will notice that Visual Studio has read my previously created ADF instance from Azure (1).
Select “Create New Data Factory”.
- Give it a name. For this instance I will call mine AdatisADFExample2
- You have the option to give your instance tags. If you intend to create a large amount of ADF instances then you can add a tag or two to help you later identify what each is doing.
- Give you ADF instance a description.
- Select which subscription to use
- Select a resource group – You cannot select to create a new one here, this needs to be done in the Azure portal, you can only select to use an existing RG
- Select a region.
Once populated, select next. If you have created additional elements such as linked services, datasets or pipelines these would appear on the next screen. Select Next and Next again. This will begin to process of creating you ADF instance. Unlike with our example in Azure, this will not automatically be pinned to your dashboard. To do this you will need to find the item in Azure and manually pin it to your dashboard. Save and close you visual studio solution.
Option 3 – Using PowerShell
The last option is possibly the easiest and like option 1 does not require anything to deploy. This is my personal preference. To create a new ADF instance all you need to do is open your PowerShell IDE and run the following PowerShell:
Import-Module AzureRM
Import-Module Azure
Login-AzureRmAccount
# Create a new ADF
New-AzureRmDataFactory -ResourceGroupName “blbstorage” -Name “AdatisADFExample3” -Location “NorthEurope”
AzureRm and Azure commandlets are required and can be installed by running Install-Module AzureRm and Install-Module Azure. Login-AzureRmAccount will prompt for you Azure log in details. Then New-AzureRmDataFactory will create a new ADF instance. For this example, I have named my instance AdatisADFExample3.
To remove and of the created instance you can also do this with PowerShell.
# Delete datafactory
Remove-AzureRmDataFactory -Name “AdatisADFExample3” -ResourceGroupName “blbstorage”
When I am developing, I will use PowerShell to build the new ADF instance, then once it has been created use Visual Studio to develop linked services, datasets and pipelines. Sometimes Azure can get caught in a loop when nothing will validate or deploy. When this happens use PowerShell to remove the ADF instance (and all created artefacts) then use Visual Studio to redeploy the entire solution. If you have made any changes in Azure directly, these will be lost.
So what have we created?
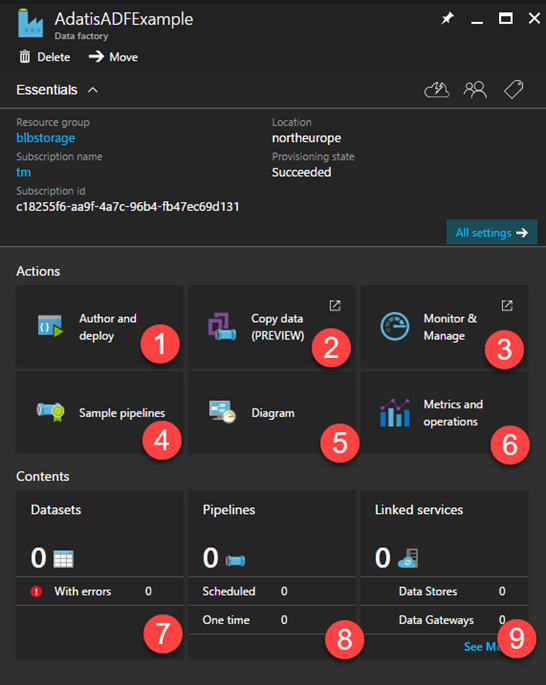
If you click on your new ADF instance you will see the following screen.
Core actions:
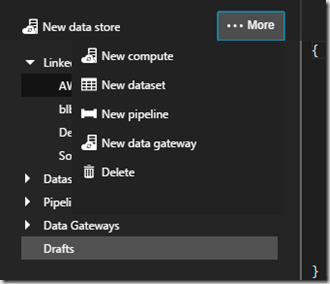
1. Author and deploy
A&D is the original way to create the main artefacts in ADF. As above you can also use Visual Studio and PowerShell.
New data store – Create a new linked services
New Compute – A new HD Insight cluster,
New dataset – A new dataset in a linked service
New pipeline – Create a new pipeline
New data gateway – Create a gateway (installed locally on a server)
Authoring and deploying via this environment is somewhat cumbersome. Everything you want to do in ADF needs to be written in JSON. A&D will auto generate most of what you need however the route to starting is not the easiest.
2. Copy data
Copy data (at the time of writing is still in preview) is a GUI on top of the Author and deploy function. It is a wizard based walk through which takes you through a copy task. Essentially this is the creation of a data movement activity pipeline, however Azure will build the linked services, datasets and pipelines as required. We will look at this for our movement of data from on premise SQL to Azure Blob.
3. Monitor and manage
Monitor pipelines through a graphical interface. This will take you to the new monitor dashboard. We will have a blog around monitoring pipelines later in this series.
4. Sample pipelines
Sample pipelines will create all the artefacts to get you started with an example ADF pipeline. This is great for beginners. There is also a load of templates in visual studio. You will need a preconfigured blob storage account and depending on your chosen example some additional Azure services.
5. Diagram
The somewhat defunct view. This has largely been replace by Monitor and manage.
6. Metrics and operations
Operational metrics. This gives you a high level view over what has succeeded and failed.
In this blog we looked setting up an Azure data factory in the Azure Portal, Visual Studio and with PowerShell. My personal preference is PowerShell with visual studio. Datasets, pipelines and linked services (7,8 & 9) will be what we will begin looking at in our next blog – Copying data from on premise SQL Server to Azure Blob storage with Azure Data Factory





Introduction to Data Wrangler in Microsoft Fabric
What is Data Wrangler? A key selling point of Microsoft Fabric is the Data Science
Jul
Autogen Power BI Model in Tabular Editor
In the realm of business intelligence, Power BI has emerged as a powerful tool for
Jul
Microsoft Healthcare Accelerator for Fabric
Microsoft released the Healthcare Data Solutions in Microsoft Fabric in Q1 2024. It was introduced
Jul
Unlock the Power of Colour: Make Your Power BI Reports Pop
Colour is a powerful visual tool that can enhance the appeal and readability of your
Jul
Python vs. PySpark: Navigating Data Analytics in Databricks – Part 2
Part 2: Exploring Advanced Functionalities in Databricks Welcome back to our Databricks journey! In this
May
GPT-4 with Vision vs Custom Vision in Anomaly Detection
Businesses today are generating data at an unprecedented rate. Automated processing of data is essential
May
Exploring DALL·E Capabilities
What is DALL·E? DALL·E is text-to-image generation system developed by OpenAI using deep learning methodologies.
May
Using Copilot Studio to Develop a HR Policy Bot
The next addition to Microsoft’s generative AI and large language model tools is Microsoft Copilot
Apr