
This blog will give some helpful tips for migrating data to Dynamics 365. Most of the tips are tool agnostic, but some will focus on using Azure Data Factory (ADF).
1. Learn how to navigate the Power Platform and Dynamics
Get a solid understanding of how to navigate the Power Platform. Investing some time at the beginning of a migration to familiarise yourself with the user interface (UI) will be hugely beneficial.
For example, understanding what is contained within each solution, how to view relationships, keys, column metadata and so on Will all come in handy when it comes to data migration.
Also, becoming familiar with Dynamics 365 and where to find different settings and tools will also stand you in good stead
2. Utilise Tools: XrmToolBox and LevelUp
XrmToolBox is the most essential tool to download when migrating data to Dynamics.
What is XrmToolBox?
XrmToolBox is a Windows application that connects to Microsoft Dataverse. Dynamics 365 Customer Engagement (CE) applications, like Dynamics 365 for Sales, Service or Talent also use Microsoft Dataverse as their foundational data service. XrmToolBox, provides tools to ease customisation, configuration and operation tasks for anything built on Microsoft Dataverse, including Dynamics 365 CE (formally CRM) and model-driven PowerApps. It is shipped with more than 30 tools to make administration, customisation or configuration tasks easier and less time consuming. And more than 100 other tools are available in the Tool Library.
XrmToolBox contained a whole host of useful tools that benefitted me, such as:
- Inspecting the metadate of columns,
- Access checking,
- Deleting data,
- Building fetch xml queries.
Another useful tool I would recommend is Level up. The Level up tool is a browser extension that helps you quickly perform advanced/hidden actions in Dynamics 365/Power Apps.

3. Query Dataverse using SQL
You can use Azure Active Directory authentication to connect and query Dataverse using ‘Dataverse SQL’, this is much easier than doing so through Dynamics or Power Apps.
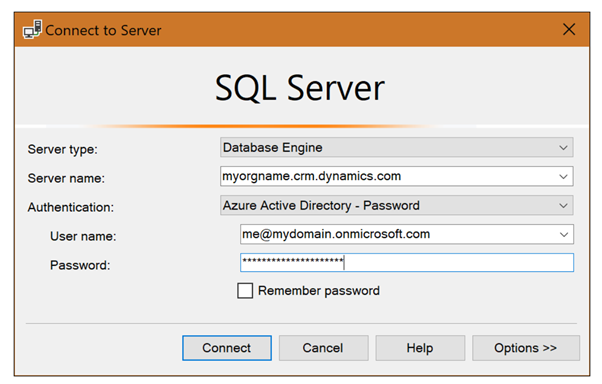
Dataverse SQL offers a subset of Transact-SQL functionality – the main limitation I found was not providing support for CTE’s. See here for a detailed list of supported SQL operations.
Bear in mind that any operation that attempts to modify data (e.g. INSERT, UPDATE) will not work, as this connection is ready only.
4. Dynamics is Slow
This surfaces itself when querying tables via SSMS, inserting records via ADF or deleting records using XRM toolbox or the bulk deletion wizard.
Upserting data:
My only advice is to limit the number of columns you are migrating and to make use of incremental loads. I fiddled around with various configurations within ADF, but to no great success.
Deleting data:
Deleting data from Dynamics 365 is also painfully slow. A tip is to instead rollback and restore the database to a previous state as this is surprisingly quicker.
5. Cannot insert certain statuses in one iteration
When migrating data to Dynamics, it is important to understand the statecode and statuscode fields that each entity has.
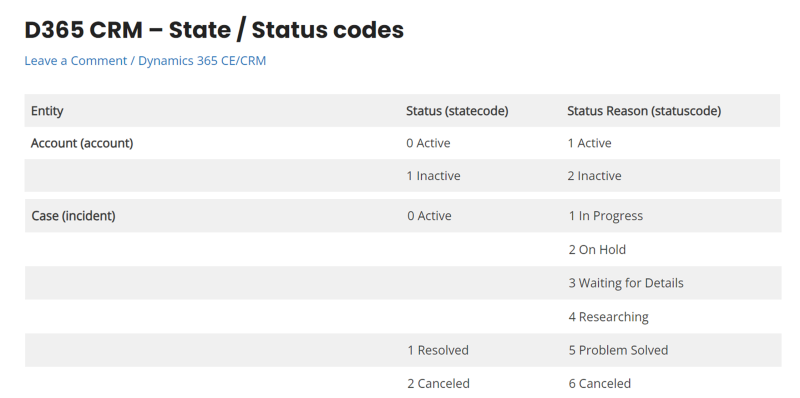
Each status has one or more status reasons associated with it. Using ADF, inserting data directly with certain statuses was not permitted.
For example, it was not possible to directly insert a record as inactive. Most entities, such as account, had this inactive status code. To migrate these inactive records, it must first be inserted as active, and then the status afterwards updated to inactive.
To insert ‘resolved’ cases, this approach of later updating an active case to ‘resolved’ did not work. Instead, a case resolution record had to be created which closed the linked case.
6. Multi-table lookups
Certain columns can dynamically look up to different tables. For example, OwnerID can look up to either the team or user entity.
Other examples include the regarding object and customer fields.
For these cases, refer to this documentation to insert these using ADF.
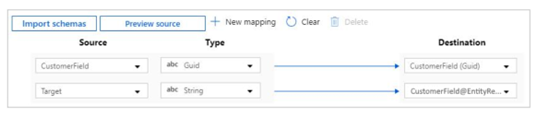
7. Virtual fields
There are various virtual attributes that are there for convenience, and do not need to be included as part of the mapping in ADF.
Choice/Picklist columns will have an associated virtual attribute, that will display the text behind the picklist value. For this example, you will insert the value of 1 into AccountCategoryCode and leave out the mapping of AccountCategoryCodeName as this will be auto-populated with ‘Preferred Customer’.
![]()
For lookups, there is a similar concept available. Take for example a lookup to the user table for ModifiedBy. Insert just the ModifiedBy lookup, which is a GUID, and the ModifiedByName will automatically display.

8. Limitations of using ADF
It is not possible to insert certain records using ADF.
As an example, a record can become merged with another record. This merged record has a merged flag and the master ID column is updated with the ID of the record it has become merged with. However, these attributes are not writable. To perform this operation, you would have to perform a merge operation using the Dynamics UI or using the REST API.
9. System fields
There are numerous fields that are present on every entity that do not appear possible to insert using ADF.
For example, CreatedOn and ModifiedOn get inserted at the time the record was created or modified.
ModifiedBy and CreatedBy get inserted as the account that was used to create or modify the record.
A solution for the CreatedOn field is to insert the CreatedOn date into the OverriddenCreatedOn field. When OverriddenCreatedOn is set, CreatedOn will be updated to this date.
In a similar fashion, CreatedOnBehalfBy and ModifiedOnBehalfBy can be used to insert the CreatedBy and ModifiedBy respectively. However, it is does not seem possible to do this using ADF. This site suggests they can only be recorded in Plugins, Custom Workflow Activities and API calls (SDK and WebAPI).
Lastly, to my knowledge, there is no way to insert ModifiedOn with a value other than the time of updating the record by using ADF or any other means.
Introduction to Data Wrangler in Microsoft Fabric
What is Data Wrangler? A key selling point of Microsoft Fabric is the Data Science
Jul
Autogen Power BI Model in Tabular Editor
In the realm of business intelligence, Power BI has emerged as a powerful tool for
Jul
Microsoft Healthcare Accelerator for Fabric
Microsoft released the Healthcare Data Solutions in Microsoft Fabric in Q1 2024. It was introduced
Jul
Unlock the Power of Colour: Make Your Power BI Reports Pop
Colour is a powerful visual tool that can enhance the appeal and readability of your
Jul
Python vs. PySpark: Navigating Data Analytics in Databricks – Part 2
Part 2: Exploring Advanced Functionalities in Databricks Welcome back to our Databricks journey! In this
May
GPT-4 with Vision vs Custom Vision in Anomaly Detection
Businesses today are generating data at an unprecedented rate. Automated processing of data is essential
May
Exploring DALL·E Capabilities
What is DALL·E? DALL·E is text-to-image generation system developed by OpenAI using deep learning methodologies.
May
Using Copilot Studio to Develop a HR Policy Bot
The next addition to Microsoft’s generative AI and large language model tools is Microsoft Copilot
Apr