I recently attended the PASS Summit in Seattle. For me one of the most interesting talks was by Davide Mauri’ who presented a very interesting session on Unit testing BI Projects. At Adatis we have our own testing framework which we have been using for some time now, however the products looked good in the demonstration and I have been excited to try them out for myself and see how they perform. The results are very promising.
This is a quick blog article to detail the initial setup of the two products and running of a very basic test, if you are interested in Agile BI (it is interesting) then these two products provide a good way of implementing unit tests in a BI project. The software supports testing of SSIS package execution, T-SQL Queries, MDX, DAX and SSRS reports. Production of tests can also be automated from a table in SQL Server (keep posted for a future blog on this).
1. Download the NUnit setup files from http://www.nunit.com/index.php?p=download
2. Run the setup utility. With the default options (this will install NUnit to C:Program Files (x86)NUnit 2.6.3)
3. Download the the files for NBi from http://nbi.codeplex.com these come as a zipped folder.
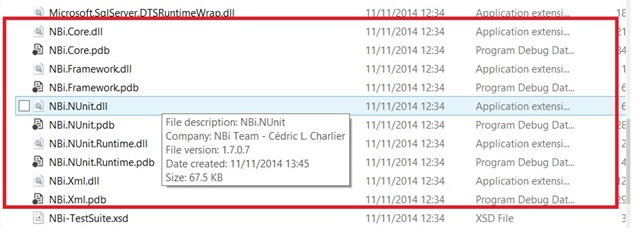
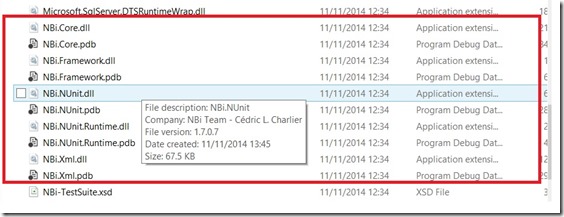
4. You then need to copy the following files from the of the Framework folder contained in the NBi zip file into the NUnit folder (default C:Program Files (x86)NUnit 2.6.3bin). The folder must contain the following additional files upon completion:
5. You now need to add a file which points to the tests you wish to execute. I created a subdirectory in the folder called ‘Tests’ and placed my test file in there (sample test file in following step). The file must be called Nbi.NUnit.Runtime.dll.config
The contents of the below file should be in this format, we can see that for this example we are pointing to a file with the name SampleTests.nbits contained in the folder Tests.
<?xml version="1.0" encoding="utf-8" ?>
<configuration>
	<configSections>
		<section name="nbi" type="NBi.NUnit.Runtime.NBiSection, NBi.NUnit.Runtime"/>
	</configSections>
	<nbi testSuite="TestsSampleTest.nbits"/>
</configuration>
6. Now you need to create a test. Tests are supplied in XML format, (there is a tool called Genbi supplied with NBi to automate the generation of the XML), for the purposes of this blog I will provide a sample test which connects to SQL Server and runs a T-SQL Query comparing it to an expected value, another which connects to a Multidimensional Model and executes an MDX query checking that it runs correctly and another that checks the results of an MDX query. This sample test file name must match the name of the file referenced in Step 5 in order for the tests to work. You will also need to amend the connection strings, queries and database names depending upon your environment!
<?xml version="1.0" encoding="utf-8"?>
<testSuite name="My first test suite" >="https://NBi/TestSuite">
	<test name="Test MDX Syntax">
		<system-under-test>
			<execution>
				<query name="MDX" connectionString="Provider=MSOLAP.5;Data Source=.md;Integrated Security=SSPI;Initial Catalog=Adventure Works DW 2008R2;"> SELECT [Measures].[Reseller Order Count] ON 0 FROM [Adventure Works] </query>
			</execution>
		</system-under-test>
		<assert>
			<syntacticallyCorrect/>
		</assert>
	</test>
	<test name="Test MDX Results">
		<system-under-test>
			<execution>
				<query connectionString="Provider=MSOLAP.5;Data Source=.md;Integrated Security=SSPI;Initial Catalog=Adventure Works DW 2008R2;"></query>
			</execution>
		</system-under-test>
		<assert>
			<equalTo>
				<resultSet>
					<row>
						<cell>3796</cell>
					</row>
				</resultSet>
			</equalTo>
		</assert>
	</test>
	<test name="Test SQL Results">
		<system-under-test>
			<execution>
				<query connectionString="Data Source=.;Initial Catalog=AdventureWorksDW2014;Provider=SQLNCLI11.1;Integrated Security=SSPI;Auto Translate=False;"></query>
			</execution>
		</system-under-test>
		<assert>
			<equalTo>
				<resultSet>
					<row>
						<cell>29358677.2207</cell>
					</row>
				</resultSet>
			</equalTo>
		</assert>
	</test>
</testSuite>
7. In order to connect to Analysis Services if you don’t have it installed already you will need to install the ADOMD client available from: http://www.microsoft.com/en-gb/download/details.aspx?id=35580
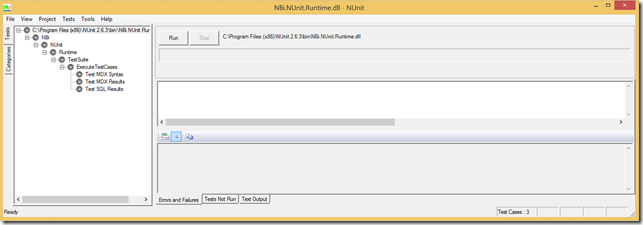
8. If you run the Nunit.exe file in the NUnit folder you should see the following GUI interface:
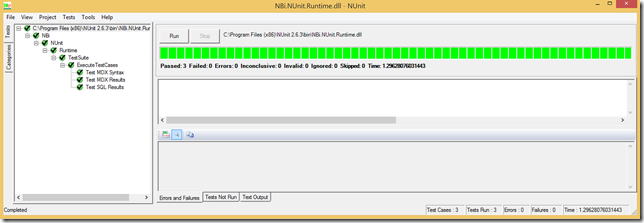
9. If you click the run button and the tests are running successfully then you should see the following:
10. If you are intending to use NUnit & NBi for automated testing you can call them straight from a command line from the NUnit directory by issuing the following command: Nunit-Console nbi.nunit.runtime.dll The results will be output to an XML file which can be used to record details of the tests or processed by SSIS, to store the test details in a database for easy future reference.

Introduction to Data Wrangler in Microsoft Fabric
What is Data Wrangler? A key selling point of Microsoft Fabric is the Data Science
Jul
Autogen Power BI Model in Tabular Editor
In the realm of business intelligence, Power BI has emerged as a powerful tool for
Jul
Microsoft Healthcare Accelerator for Fabric
Microsoft released the Healthcare Data Solutions in Microsoft Fabric in Q1 2024. It was introduced
Jul
Unlock the Power of Colour: Make Your Power BI Reports Pop
Colour is a powerful visual tool that can enhance the appeal and readability of your
Jul
Python vs. PySpark: Navigating Data Analytics in Databricks – Part 2
Part 2: Exploring Advanced Functionalities in Databricks Welcome back to our Databricks journey! In this
May
GPT-4 with Vision vs Custom Vision in Anomaly Detection
Businesses today are generating data at an unprecedented rate. Automated processing of data is essential
May
Exploring DALL·E Capabilities
What is DALL·E? DALL·E is text-to-image generation system developed by OpenAI using deep learning methodologies.
May
Using Copilot Studio to Develop a HR Policy Bot
The next addition to Microsoft’s generative AI and large language model tools is Microsoft Copilot
Apr