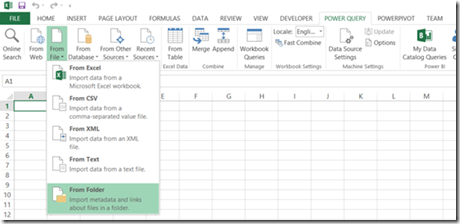
You can automatically append data from multiple files by choosing to place them in a folder and query the folder. You can choose a folder and it will also search subfolders. You can drop more files into the folder (or remove some) at a later stage, refresh the query and the new files will appear automatically.
Once you select From Folder you will be asked to specify the folder location with the option to browse to it.
Once selected, Power Query will find suitable files and list them in the query editor window.
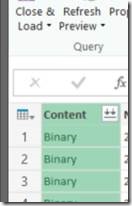
There will be a column named Content. Like the name suggests this is the contents of the file. There are other columns with details of the file like the name, extension and file path. There is also an attributes column that can be expanded to expose more properties.
At the top of the Content column there is a button. If you click this it will import your files and combine them.
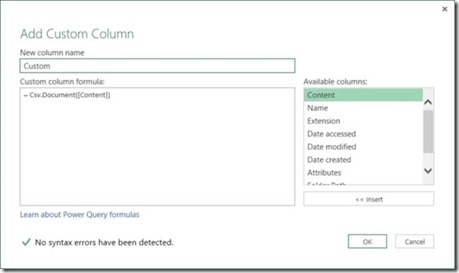
However when you use this method, you lose all the information about the files themselves and are left with just the contents. What if you want to use the information about the file? To get around that you can create a custom column like so:
This example is using csv files. Creating this adds a table object into each row of the custom column. From there you can expand the contents alongside the file information.
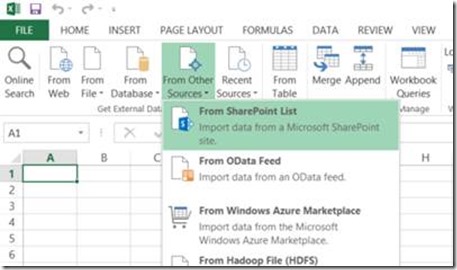
The same can be done for files stored on SharePoint.
You will be prompted to provide the URL for the SharePoint site. This will be the root URL.
When you do this, a navigator window will open up but your files won’t appear. If you click on the root and click edit you can see why in the query editor.
You’ll notice that the Source query step is in the form of this:
= SharePoint.Tables(“https://SharePoint/Site/”)
Change this to SharePoint.Files. This will list all the files within the site! Now you can filter this list by file extension or by Folder Path (using the ‘Begins with’ Text Filter), for example.


Introduction to Data Wrangler in Microsoft Fabric
What is Data Wrangler? A key selling point of Microsoft Fabric is the Data Science
Jul
Autogen Power BI Model in Tabular Editor
In the realm of business intelligence, Power BI has emerged as a powerful tool for
Jul
Microsoft Healthcare Accelerator for Fabric
Microsoft released the Healthcare Data Solutions in Microsoft Fabric in Q1 2024. It was introduced
Jul
Unlock the Power of Colour: Make Your Power BI Reports Pop
Colour is a powerful visual tool that can enhance the appeal and readability of your
Jul
Python vs. PySpark: Navigating Data Analytics in Databricks – Part 2
Part 2: Exploring Advanced Functionalities in Databricks Welcome back to our Databricks journey! In this
May
GPT-4 with Vision vs Custom Vision in Anomaly Detection
Businesses today are generating data at an unprecedented rate. Automated processing of data is essential
May
Exploring DALL·E Capabilities
What is DALL·E? DALL·E is text-to-image generation system developed by OpenAI using deep learning methodologies.
May
Using Copilot Studio to Develop a HR Policy Bot
The next addition to Microsoft’s generative AI and large language model tools is Microsoft Copilot
Apr