I had a situation recently where I was importing a CSV file into Power Query. This file had some summary data at the beginning of the file that I wanted to skip. This is perfectly easy enough using the Remove Top Rows step. However a problem I soon encountered was that if the files summary data varied in the number of rows then the Remove Top Rows step produced errors, especially if you then want to promote a row to be your header in a later step.
To get around this you can search for a particular string that is expected to appear, perhaps one that will become one of your headers or signify the start of a section of the file.
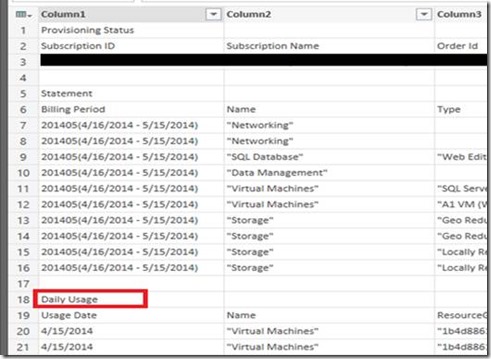
In this example I am using an Azure Usage file. I want to cut out the summary data at the top and start with the Daily Usage data.
Below is an abstract of a large query, starting at one of the file import steps:
1. Source = Csv.Document(File.Contents(“NameRemoved.csv”),null,”,”,null,1252)
2. #”FilteredRows” = Table.SelectRows(Source, each Text.Contains([Column1], “Daily Usage”)),
3. #”Position of Daily Usage” = Table.PositionOf(Source, FilteredRows {0}),
4. #”TopRemoved” = Table.Skip(Source, (#”Position of Daily Usage” + 1)),
5. #”First Row as Header” = Table.PromoteHeaders(#”TopRemoved”),
Pay attention to where steps 2, 3 and 4 all reference the step 1. These steps can be added using the advanced query editor.
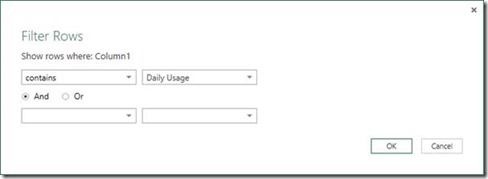
Breaking it down by steps starting with Step 2 (#”FilteredRows”); this filtered a particular column, in this case column 1, by the string you are looking for, e.g. “Daily Usage”. The result of this is inserted into a table using Table.SelectRows.
Step 3 (#”Position of Daily Usage”) then finds the position of the 1st row of the table from Step 2, within the imported data in Step 1. Table.PositionOf requires a table as the input. The {0} denotes the first row in the table.
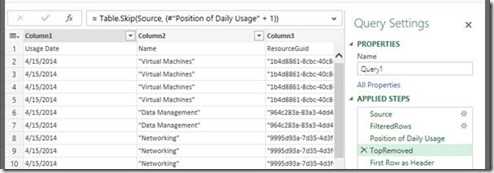
The row number is then used in Step 4 (#”TopRemoved”), in the Table.Skip function. In this example I wanted to remove the row with the Column 1 String “Daily Usage” so I added a + 1.


Introduction to Data Wrangler in Microsoft Fabric
What is Data Wrangler? A key selling point of Microsoft Fabric is the Data Science
Jul
Autogen Power BI Model in Tabular Editor
In the realm of business intelligence, Power BI has emerged as a powerful tool for
Jul
Microsoft Healthcare Accelerator for Fabric
Microsoft released the Healthcare Data Solutions in Microsoft Fabric in Q1 2024. It was introduced
Jul
Unlock the Power of Colour: Make Your Power BI Reports Pop
Colour is a powerful visual tool that can enhance the appeal and readability of your
Jul
Python vs. PySpark: Navigating Data Analytics in Databricks – Part 2
Part 2: Exploring Advanced Functionalities in Databricks Welcome back to our Databricks journey! In this
May
GPT-4 with Vision vs Custom Vision in Anomaly Detection
Businesses today are generating data at an unprecedented rate. Automated processing of data is essential
May
Exploring DALL·E Capabilities
What is DALL·E? DALL·E is text-to-image generation system developed by OpenAI using deep learning methodologies.
May
Using Copilot Studio to Develop a HR Policy Bot
The next addition to Microsoft’s generative AI and large language model tools is Microsoft Copilot
Apr