Source Control, often called Revision Control or Version Control, is a process of maintaining projects. It is essential for any software project, collaborative or otherwise. Below is a non-exhaustive list of benefits of Version Control:
- Version Control and Tracking
- Provides locking and serialized changes to any file
- Structure
- Everyone operates in the same way
- Centralized storage
- Multiple users can work on the same project simultaneously. When a person makes a change and checks it in, everyone else can get the latest version
- Backups
- If you accidentally delete a file you can just undelete it
- Ability to branch
- If you want to develop a large feature or make small fixes separate from the main trunk so as not to disturb or break the main development effort your can create a branch of code
- History
- You can see who made changes to what and when
- Roll back
- If a build is broken you can roll back the changes made
These features are fantastic for large projects but also for small ones, even if you are working by yourself. As well as the above points, there is also capacity to accommodate integrated automated builds and project planning and tracking, for starters.
So how do you go about getting free source control?
Visual Studio Online includes free TFS for up to 5 users! However this does not include MSDN Subscribers.
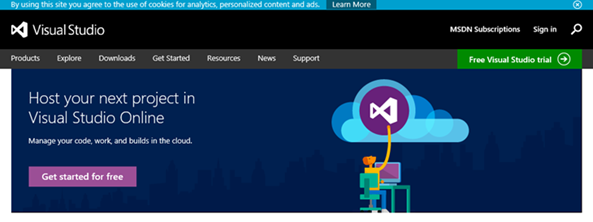
Navigate to http://www.visualstudio.com/
Click on ‘Get started for free’ and you will be redirected to a login screen. This is to create a Visual Studio Online account.
You will then be asked to sign in with your Microsoft account or an organisational account before being asked to fill in some extra details. If you do decide to sign up with an organisational account, it means that users can only sign into the Visual Studio Online account if they are a member of the connected Azure AD or 365 Subscription. If you sign up with a Microsoft account then users are fully managed by the Visual Studio Online account owner (and Administrators) and only Microsoft accounts can sign into it. When you sign up you will need to provide a URL in the form of:
https://.visualstudio.com/. This has to be unique. If you choose a URL that is already taken you will be presented with an error message stating that that URL is reserved.
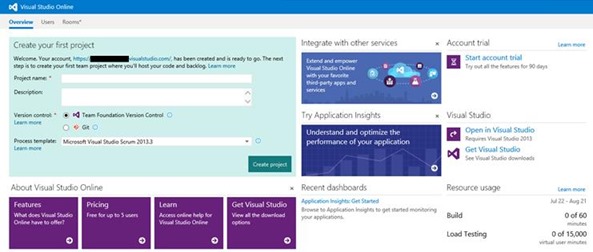
Once you’re all signed up you will be presented with your newly created Visual Studio Online page.
Here you can start creating Projects and adding users.
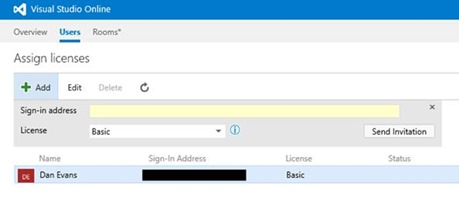
If you navigate to Users you will see that you have yourself as a user and that on the far right you should have the number of free and total users.
You can add new users by email address and select whether they are a basic or Eligible MSDN Subscriber. You can edit existing users to change their License type. Finally you can delete users.
If you navigate back to the homepage you can create your first project. With your Project you can choose between two different versions of Version control. These are Team Foundation Version Control and Git.
With Team Foundation, typically, team members have only one version of each file on their dev machines. Historical data is maintained only on the server. Git is a decentralized version control system. Each developer has a copy of the entire source repository on their dev. You can learn more about the differences in this extensive page: TFVC or Git
You also have the choice of a process template. You have the choice of 3:
- Microsoft Visual Studio Scrum 2013.3
- MSF for Agile Software Development 2013.3
- MSF for CMMI Process Improvement 2013.3
These define the set of work item types (WITs), queries, and reports that you’ll use to plan and track your project. They are detailed here: Process Templates
Once you have created the project you can open it with Visual Studio. This requires you to have Visual Studio 2013. There is a link on the home page to obtain VS 2013. There are 3 free Express versions to choose from or you can trial Ultimate 2013.
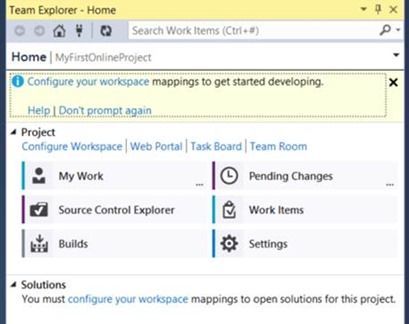
You need to configure the workspace mappings before you can open the solution. This maps the files to a local directory on your machine. Once you have chosen a directory of your choice then you can click ‘Map & Get’ and then you are ready to go. The same applies if you are using Git where you have to specify the directory for the local repository.
In the Solutions section you should see the option ‘New…’ This brings up the familiar New Project dialogue. Once you add one, you can check it in via ‘Pending Changes’, and you’re done!
If you wanted to sign into your online source control starting from Visual Studio on your desktop instead then open up Visual Studio and on the ribbon choose ‘TEAM’ > ‘Connection to Team Foundation Server…’ The Team Explorer window will appear on the right. Then choose ‘Select Team Projects’ and add your URL you created earlier, as a server. You will need to provide credentials.
If you wish to add more projects you can do so via the home page using ‘New’ under the recent projects & teams section. You can always get back to it by clicking the Visual Studio Online link that is in the blue bar at the top left of the page. This can also be done from within the Team Explorer on your desktop VS.


Introduction to Data Wrangler in Microsoft Fabric
What is Data Wrangler? A key selling point of Microsoft Fabric is the Data Science
Jul
Autogen Power BI Model in Tabular Editor
In the realm of business intelligence, Power BI has emerged as a powerful tool for
Jul
Microsoft Healthcare Accelerator for Fabric
Microsoft released the Healthcare Data Solutions in Microsoft Fabric in Q1 2024. It was introduced
Jul
Unlock the Power of Colour: Make Your Power BI Reports Pop
Colour is a powerful visual tool that can enhance the appeal and readability of your
Jul
Python vs. PySpark: Navigating Data Analytics in Databricks – Part 2
Part 2: Exploring Advanced Functionalities in Databricks Welcome back to our Databricks journey! In this
May
GPT-4 with Vision vs Custom Vision in Anomaly Detection
Businesses today are generating data at an unprecedented rate. Automated processing of data is essential
May
Exploring DALL·E Capabilities
What is DALL·E? DALL·E is text-to-image generation system developed by OpenAI using deep learning methodologies.
May
Using Copilot Studio to Develop a HR Policy Bot
The next addition to Microsoft’s generative AI and large language model tools is Microsoft Copilot
Apr