An experiment with Azure Custom Vision
Azure Cognitive Services is a comprehensive family of APIs, SDKs and AI services that help developers build intelligent applications. No direct data science skills or machine-learning expertise is required to use them. The services offered by ACS are split into five main categories – Vision, Speech, Language, Web Search, and Decision.
The vision category of services offers pre-built functionality to enable computer vision in your applications and is further divided into: Computer Vision, Custom Vision, Face Recognizer, Form Recognizer, Ink Recognizer and Video Indexer.
Azure Custom Vision enables you to build and improve your own image classifiers. Unlike the Computer Vision service, Custom Vision allows you to specify the labels to apply. It boasts a user-friendly interface that walks you through developing and deploying your own models with ease.
The first part of this blog will showcase how accessible it is to train a custom vision classifier that classifies food items/ingredients in pictures by using the custom vision web portal. This can also be achieved by using the SDK provided.
Highlighting how easy it is to consume your trained classifier, the second part of this blog, will take the published model prediction API and integrate it into a PowerApps application that will let the user upload and classify food items in images while finally returning a list of recipe recommendations that could be cooked with the identified items.
Azure Custom Vision
Azure Custom Vision works by using a machine learning algorithm to apply labels to images. The images should feature the characteristics and traits that it will enable it to learn and distinguish between them. The algorithm will then train on the submitted images and calculate its own evaluation metrics (Accuracy, Recall, ROC) by testing itself on those same images. After the model has been trained, it can be tested on distinct images, retrained and then deployed for use.
The service can be divided into two functionalities. Image classification and object detection. In both one or more labels can be applied to an image with the difference being that object detection also returns the coordinates(bounding box) in the image where the applied label(s) can be found.
Lets start by logging in on the custom vision website where we can create a new project. If you don’t have an account, you can easily sign up and start with $200 worth of free credits.
Once logged in, create a new multi-label classification project by clicking New Project which will bring up the “Create new project” dialog box. If you don’t already have a resource group created, you can easily create a new one by simply clicking “create new”.
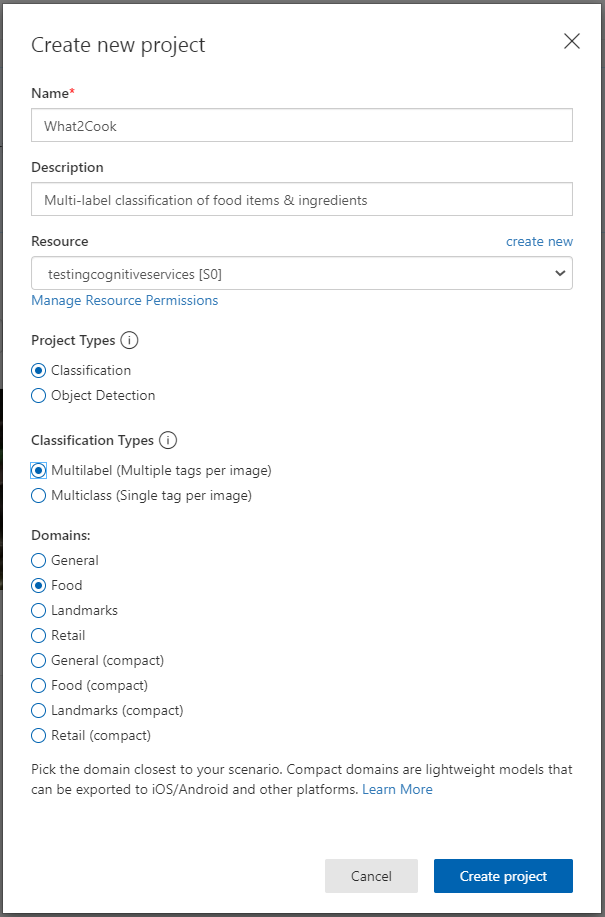
Notice the domain options, here each domain optimizes the classifier for specific types of images. For this use case, the food domain is optimized for photographs of dishes, individual fruits and vegetables.
After the project has been created it’s time to choose the training images. Microsoft recommends a minimum of 30 images per tag in the initial training set and in order to train the model effectively the images should vary by camera lighting, size, angle, background, individual or grouped items.
To keep the costs to the minimum I’ve randomly chosen 20 tags (food items) and scraped around 25-30 images per tag from Google searches. Note that this is only to prove the concept and that for a performance up to industry standards I would recommend using datasets with at least hundreds of samples per tag. As an example of costs, storing 100,000 images would costs $70, training a model for 16 hours costs $320 and 10,000 image predictions costs only $20 bringing it up to a total of $410.
While there are some costs involved, there are also innumerable benefits that Custom Vision brings by liberating the developers from low-level networking details and letting them focus on training a model and creating smart, distributed applications.
Let’s add the images by clicking the Add images button and then select Browse local files. Select the images you want to add and press Open to move to the tagging stage. Here your tag will be applied to all the images you’ve selected to upload. Note that it’s much easier to upload images in groups so that the tag can be applied to the whole group. Tags can also be changed for individual images and an image can also have multiple tags for a multilabel project however only one tag is allowed for a multiclass project.
To create a new tag, simply type in the text box of My Tags and press enter. If you’ve already created the tag it will just appear in a dropdown menu. To finish uploading the now tagged images, use the Upload files button.

Train the classifier by selecting the Train button in the upper right corner of the screen. It will use all of the uploaded & tagged images to create a model that identifies the visual qualities of each tag. If you want to better understand how this process works under the hood in the case of convolutional models the following blog will come in handy : Introduction to Artificial Neural Networks part four: Convolutional Neural Networks
Once ready to train, you’ll notice there are two options to do so, a quick and an advanced mode. As the name suggests, the quick mode is the faster approach as it uses minimal compute and is optimised for speed while the advanced mode will let you specify a compute time budget and will experimentally identify the best training and augmentation settings.

The actual training time will depend on the total number of images, their quality, resolution and other factors.
In this case, as there are only around 500-600 images the training process should only take a few minutes. During this time, information about the training process is displayed in the Performance tab.
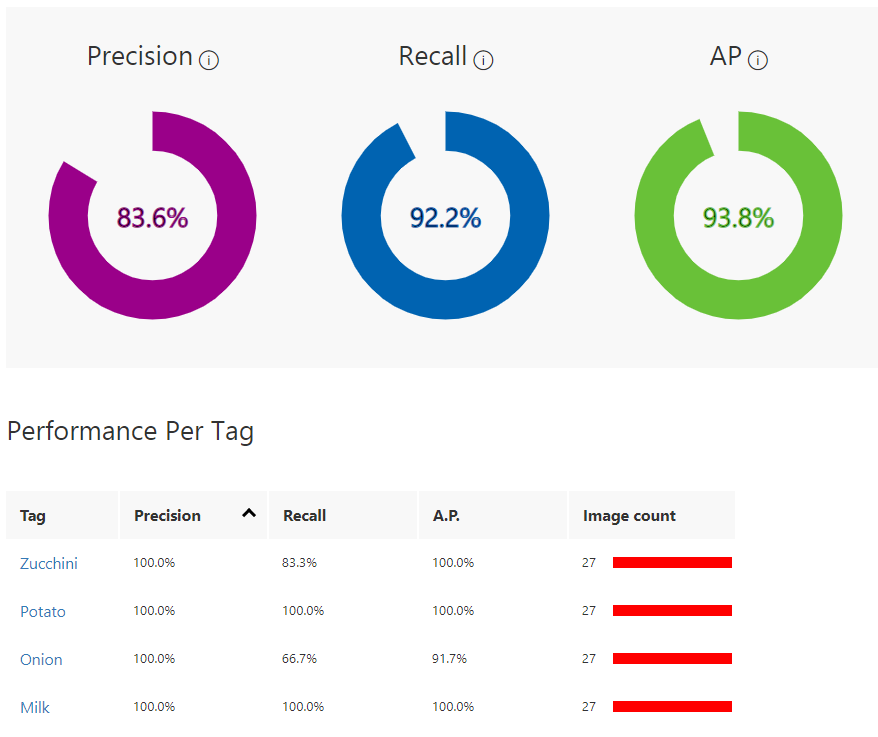
On the same Performance tab, after the training has been completed, the model’s performance will be estimated and displayed. Custom Vision Service calculates precision, recall and average precision using a process called k-fold cross validation.
- Precision indicates the fraction of identified classifications that were correct. For example, if the model identified 100 images as dogs, and 99 of them were actually of dogs, then the precision would be 99%.
- Recall indicates the fraction of actual classifications that were correctly identified. For example, if there were actually 100 images of apples, and the model identified 80 as apples, the recall would be 80%.
- Average precision is a measure that combines recall and precision for ranked retrieval results. It summarizes a precision-recall curve as the weighted mean of precisions achieved at each threshold, with the increase in recall from the previous threshold used as the weight
For a detailed explanation of those metrics and others used to evaluate a model’s performance I highly recommend reading Daniel Fitton’s blogs Evaluating Models in Azure Machine Learning Part 1 & Part 2
Once a model has been trained, it can be quickly tested by using a locally stored image or an online image. The test uses the most recently trained iteration however if you have multiple iterations you can choose which one to test by selecting the Iteration drop down menu box.
First select Quick Test on the right of the top menu bar and in the Quick Test window, click the Browse local files button and select a local image file or click in the Submit Image field and enter a valid URL of the image you want to use for the test.
The selected image will appear in the middle of the page with results on the left in the form of a Predictions table with two columns, labelled Tags and Probability.
The image used for testing can then be added the model and used for future training iterations.
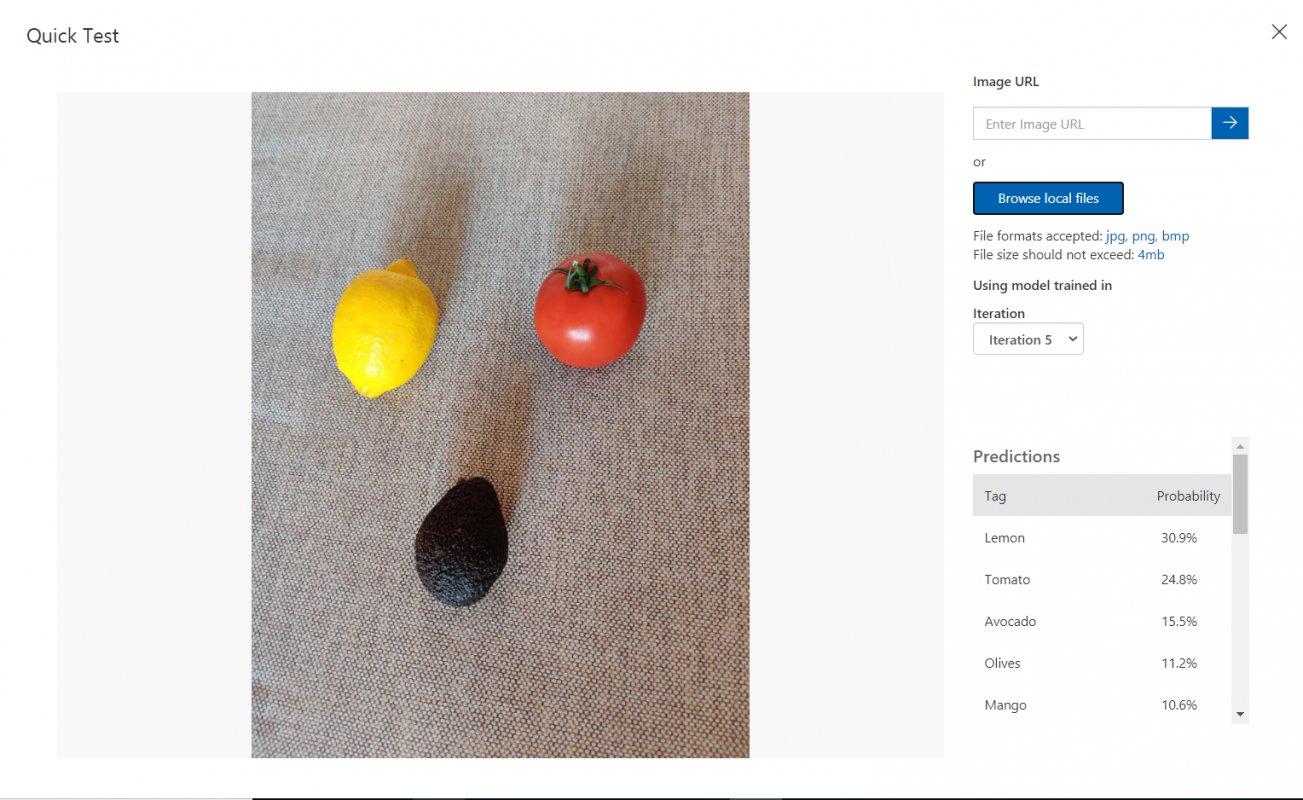
In this case we can see that the performance of the model is limited, it has correctly classified the items in the picture however it’s not that sure of itself as the probabilities for the predictions are quite low.(Lemon 30%, Tomato 24%, Avocado 15%) This might be due to the low amount of data used to train this classifier as well the low variance within the data.
The quality of the classifier will always depend on the amount, quality, variety and distribution of the labelled data provided. A classifier that will perform up to industry standards will need a balanced training dataset that is representative of what will be submitted to the classifier. Keep in mind that getting the expected results from a classifier is an iterative process that requires a few rounds of training.
Microsoft suggests the following general pattern to build a more accurate classifier:
- First-round training
- Add more images and balance data; retrain
- Add images with varying background, lighting, object size, camera angle, and style; retrain
- Use new image(s) to test prediction
- Modify existing training data according to prediction results
When the classifier has reached an acceptable performance, it can be published and made accessible to the Prediction API of the Custom Vision Azure resource.
After the model has been successfully published, a “Published” label will appear next to the iteration in the left-hand sidebar.
You can now run your models wherever you need them and according to your unique scenario and requirements. With just one click, a trained model can be exported to any devices or containers for low-latency scenarios.
Custom Vision Service also allows classifiers to be exported to run offline. The exported classifier can be embedded into an application and run locally on a device for real-time classification.
Export options:
- Tensorflow for Android.
- CoreML for iOS11.
- ONNX for Windows ML.
- Vision AI Developer Kit.
- A Docker container for Windows, Linux, or ARM architecture. The container includes a Tensorflow model and service code to use the Custom Vision API.
This blog has showcased how to train a Custom Vision classification model using the web UI portal. This is, of course, just the tip of the iceberg but it gives a general idea of the power and flexibility of Custom Vision. It’s ease of use brings about many benefits to data scientists and developers and frees their time to focus on what is really important.
In part two of this blog we will take the published model prediction API and integrate it within a PowerApps app that will let us upload an image of food items, classify the items in the image using the prediction API and then query a recipe dictionary in order to return a list of recipes that could be cooked with the identified items.
If you’re interested in more use cases, download the Adatis AI Proof of Concept or have a browse through our Data Science blogs.
Introduction to Data Wrangler in Microsoft Fabric
What is Data Wrangler? A key selling point of Microsoft Fabric is the Data Science
Jul
Autogen Power BI Model in Tabular Editor
In the realm of business intelligence, Power BI has emerged as a powerful tool for
Jul
Microsoft Healthcare Accelerator for Fabric
Microsoft released the Healthcare Data Solutions in Microsoft Fabric in Q1 2024. It was introduced
Jul
Unlock the Power of Colour: Make Your Power BI Reports Pop
Colour is a powerful visual tool that can enhance the appeal and readability of your
Jul
Python vs. PySpark: Navigating Data Analytics in Databricks – Part 2
Part 2: Exploring Advanced Functionalities in Databricks Welcome back to our Databricks journey! In this
May
GPT-4 with Vision vs Custom Vision in Anomaly Detection
Businesses today are generating data at an unprecedented rate. Automated processing of data is essential
May
Exploring DALL·E Capabilities
What is DALL·E? DALL·E is text-to-image generation system developed by OpenAI using deep learning methodologies.
May
Using Copilot Studio to Develop a HR Policy Bot
The next addition to Microsoft’s generative AI and large language model tools is Microsoft Copilot
Apr