The Azure Machine Learning Portal is a cloud based service that provides users the ability to manage the full life-cycle of their machine learning efforts. By being able to carry out data exploration, model experimentation and service deployment from one place, the work of solving a machine learning problem is made significantly simpler. For those that were familiar with the Azure Machine Learning Service Workspace, the new preview portal can be accessed here: ml.azure.com
You may be tempted to compare Azure Machine Learning (AML) with Azure Machine Learning Studio and whilst these services are similar, Studio only provides a no-code, visual interface and operates on a number of proprietary systems. AML however, offers not just the no-code UI but also supports SDK’s and the ability to use many different types of compute engine. In essence, Studio is excellent for citizen data scientists looking to get started and solve problems quickly but AML is the tool of choice for those that actively work with machine learning problems and technologies, be they beginners or experts.
What’s in the Azure Machine Learning Portal
The service consists of a number of different elements, each making particular challenges of the machine learning process easier. These are,
- Authoring: create models using a range of methods
- Working with assets: explore datasets, view experiments and manage endpoints
- Managing resources: setup compute, datastores and notebook VM’s
Authoring
Often the process of authoring models is iterative and time consuming. This is because there is a great deal of preparation and understanding that goes into a finalised model, therefore testing that the model accurately reflects this is critical. AML offers a number of different ways to approach authoring, the first of which is Automated ML.
Automated ML short cuts the trial and error process massively by iterating through a range of models against the given data and recording the outputs of each. As the run is in progress, key metrics about each model are captured and plotted on a graph. Once the run has completed, the most accurate model can easily be determined and, with a single click, be exposed as a web endpoint through a deployment to an Azure Container Instance. Currently AML can automatically train models to solve 3 types of supervised learning problems,
- Classification: using features of the dataset, attempt to predict an outcome of a particular column
- Regression: used to predict continuous values
- Forecasting: produce a forecast of a given column
Certain algorithms can be excluded from consideration to improve the run time of the experiment but every run can be downloaded and deployed from the service, not just the most accurate. See the below screenshot for a preview of the Automated ML capability. A further blog will detail the steps on how to use Automated ML with AML.

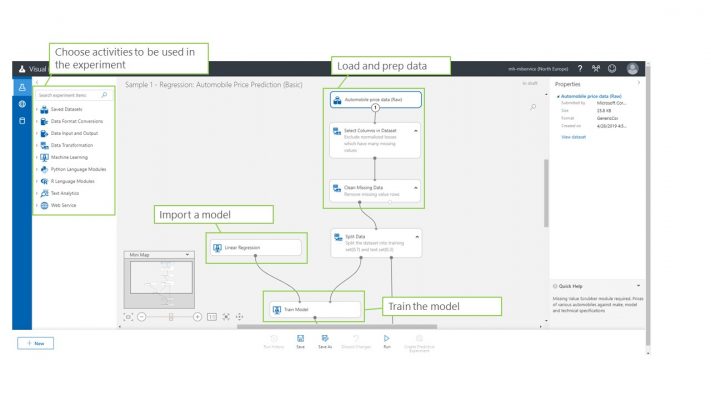
The next method for authoring ML models is to use the visual interface. As mentioned before, this closely resembles the Azure Machine Learning Studio except can be more extensively configured. The primary focus of the visual UI is to allows data science developers the ability to create model processing routines with out the need to know any code. This is implemented through a drag-and-drop style interface where you can choose activities from a range of different types. The activity groups available in the visual UI are,
- Datasets: access your custom datasets or choose from a large sample set
- Data Format Conversion: convert your data into a CSV, tabular format
- Data Input and Output: Either enter data manually or import/extract data
- Data Transformation: manipulate datasets to create new columns or re-model existing ones. Also split data into training and test samples
- Machine Learning: utilise a pool of machine learning models covering regression, clustering and classification problems. Also perform common tasks such as score and train against models
- Python / R Language Modules: write your own python or R scripts and have them run as part of the experiment
- Text Analytics: use text processing algorithms to assist with analysis
- Web Service: interact with web services that have been deployed into the service
See the below image for a glimpse of how the visual UI make building ML models simple and clear.
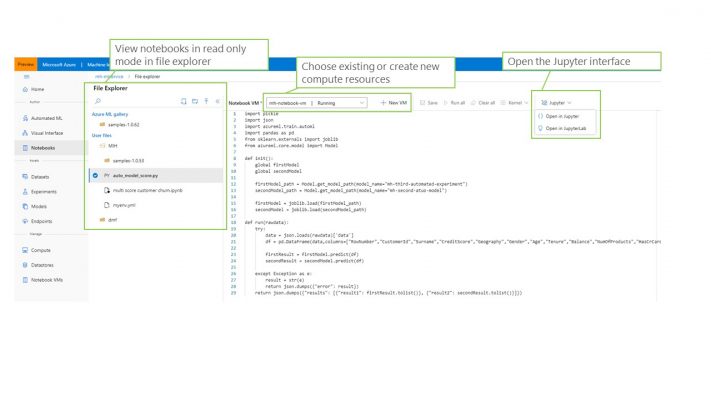
The final aspect of authoring is Notebooks. Whilst the previous two options take much of the difficulty out of ML development, the ability to use Notebooks means that those developers who need to code their solutions or want to build models using a highly configurable environment can do so right from the portal. The Notebooks functionality require that a compute resource has been set up and can then provide a read only view of notebook files and also a link to a Jupyter environment for the developer to work in.
Working with Assets
AML allows for simple management and maintenance of your ML models once they have been authored. The objects that can be managed here are,
- Datasets: explore and understand your datasets using common profiling techniques
- Experiments: review past experiments. These could include training or scoring operations as well as Automated ML experiments
- Models: manage registered models that can be supplied from the Automated ML experiment or uploaded manually by a developer
- Endpoints: view service endpoints that provide API access to models deployed in Kubernetes clusters
The service provides a rich capability for profiling datasets that have been uploaded into the portal. Aside from seeing a sample of the data you can also retrieve some sample code that can be used in the AML SDK to fetch the data into a pandas dataframe. Additionally, the service can generate a profile of the data which analyses each column and its values to present you with a detailed view of he kind of data featured in the dataset. Lastly, the UI also shows you each model and experiment run that features the dataset. See the below screenshot for a view of how datasets are managed in the service.

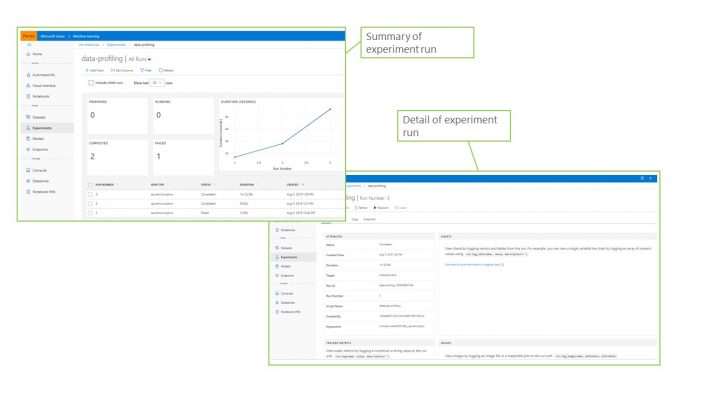
Experiments describe the core processes that are run by AML. These could be written using the visual UI, or run using Automated ML, or kicked off manually from a notebook. Experiments need to be run using a compute target which can be created from a Machine Learning VM, standard VM, Databricks cluster or HD Insight cluster. Once experiments have been run they can be viewed in detail here, showing metrics such as number and duration of runs and alos exposing logs and output artefacts. The below screenshot shows an example of the experiments UI.
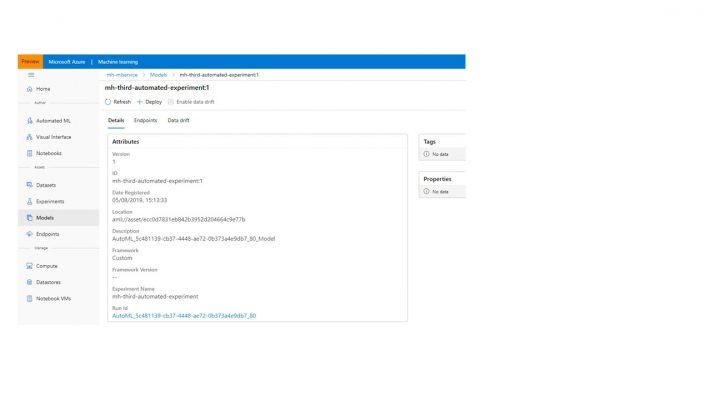
The Models tab presents a list of all the models that have been registered in the portal. Again, these can be models that have arrived from an Automated ML experiment or uploaded by a developer. From this model UI, deployments can be created that combine the model, a scoring file and a YAML file to create a service that is published into an Azure Container Instance or a Kubernetes cluster.
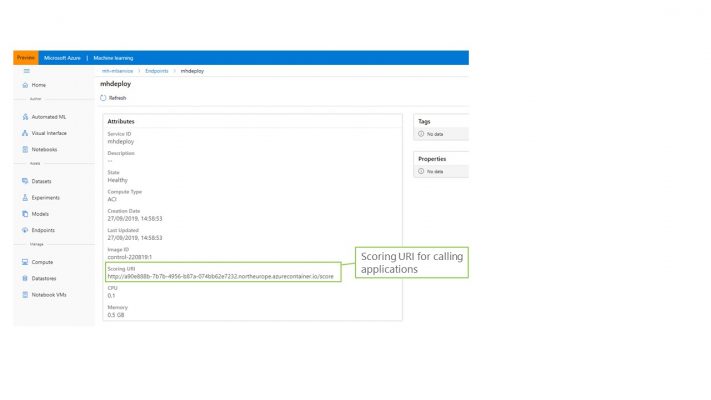
In order to view the deployed services, the Endpoints tab can be used. To fully manage the deployment you would need to use the Azure Container Instances of Azure Kubernetes Service areas of the portal however summary details are available here and most importantly, the scoring URI which is to be used as the endpoint for applications that want to integrate with the deployed model. The screenshot below highlights this URI in the endpoints tab.
Managing Resource
The final area of the AML portal allows the user to manage the resources that support the experiments and services. Using these tabs users can manage,
- Compute: compute resource that are created to run experiments and endpoints
- Datastores: the locations that hold datasets. These can be of many different types, e.g. data lake, database, blob storage
- Notebook VMs: VM’s that run a notebook server, allowing developers to write code and use the AML SDK’s
Using the compute tab, resources of several different types can be built. These could be Databricks clusters, Machine Learning VM’s, normal VM’s and even Kubernetes clusters. Additionlly, advanced settings can be set such as VPN access and admin details.
The Datastores tab provides the ability to build authenticated connections to a variety of data storage engines such as file systems and databases. Once these data stores are created, datasets can be created from them.
The Notebook VM’s tab lets developers create new Notebook VM’s and launch Jupyter environments from existing notebook VM’s.
Now that you have a better knowledge of how the Azure Machine Learning Portal works, come back soon for the next blog which will focus on producing ML capability quickly with Automated ML.
Introduction to Data Wrangler in Microsoft Fabric
What is Data Wrangler? A key selling point of Microsoft Fabric is the Data Science
Jul
Autogen Power BI Model in Tabular Editor
In the realm of business intelligence, Power BI has emerged as a powerful tool for
Jul
Microsoft Healthcare Accelerator for Fabric
Microsoft released the Healthcare Data Solutions in Microsoft Fabric in Q1 2024. It was introduced
Jul
Unlock the Power of Colour: Make Your Power BI Reports Pop
Colour is a powerful visual tool that can enhance the appeal and readability of your
Jul
Python vs. PySpark: Navigating Data Analytics in Databricks – Part 2
Part 2: Exploring Advanced Functionalities in Databricks Welcome back to our Databricks journey! In this
May
GPT-4 with Vision vs Custom Vision in Anomaly Detection
Businesses today are generating data at an unprecedented rate. Automated processing of data is essential
May
Exploring DALL·E Capabilities
What is DALL·E? DALL·E is text-to-image generation system developed by OpenAI using deep learning methodologies.
May
Using Copilot Studio to Develop a HR Policy Bot
The next addition to Microsoft’s generative AI and large language model tools is Microsoft Copilot
Apr