One of the exciting new features I have been using recently in Azure is the new ‘Azure Files’ service. Currently this is only available in preview, however I have already found it to be very useful.
What this does is that it allows you to setup a storage account in the cloud, this is similar to the BLOB storage (not currently accessible in the same way) however it carries the added benefit is that you can mount this storage making it available as a virtual drive which can be used by several machines to share a set of files!
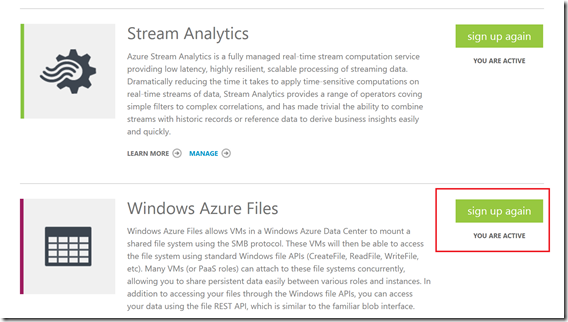
To setup a File Service storage account you must first sign up for the preview feature at https://account.windowsazure.com/PreviewFeatures
As soon as the subscription is activated you are ready to start using the service.
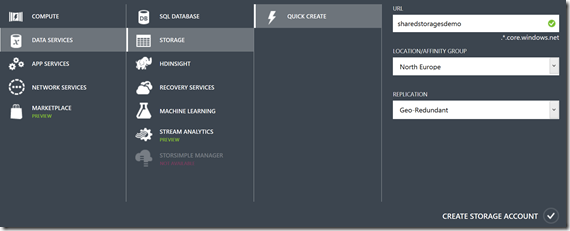
To setup a storage account (it needs to be a new storage account, created after you signed up for the preview to use the feature) you should navigate to the portal and select the storage option, then create a new storage account.
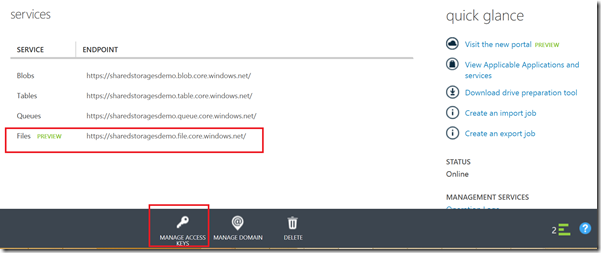
Once the storage account creation has completed you can confirm the new storage account is setup for the preview by selecting the new storage account and navigating to the dashboard. You will notice in the example below tat the Files service is marked as active and also it is highlighted that the service is in preview.
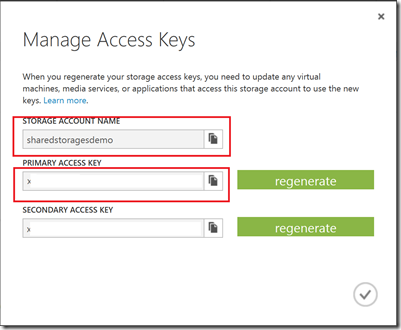
Clicking manage access keys at the bottom of the dashboard will give you the storage account name and access key. Note the storage account name and the primary access key, you will need these later (you could also use the secondary access key if preferred).
You now need to create a file share within the new storage account. To do this we use Azure PowerShell. To do this you must have first download PowerShell and setup the account to work with your subscription – if you have not done this already instructions on this can be found here: http://azure.microsoft.com/en-gb/documentation/articles/powershell-install-configure/ Once you have connected to your subscription you need to issue the following commands:
#Retrieve the storage account context and stored in a variable named $StorageContext
$StorageContext = New-AzureStorageContext#Create a File share for the storage context specified in the previous step.
New-AzureStorageShare -Context $StorageContext
If all goes well you should see something like the following in your PowerShell window:
The next step is to log onto the virtual machine in which you wish to create the shared drive and setup persisted credentials. This is required so that when you restart the machine the drive does not dissapear each time. From PowerShell or storage tools issue the following command:
cmdkey /add:.file.core.windows.net /user: /pass:
Once the credential is added issue the following command to map the network drive:
net use : \.file.core.windows.net
If all goes well you should see something like the below:
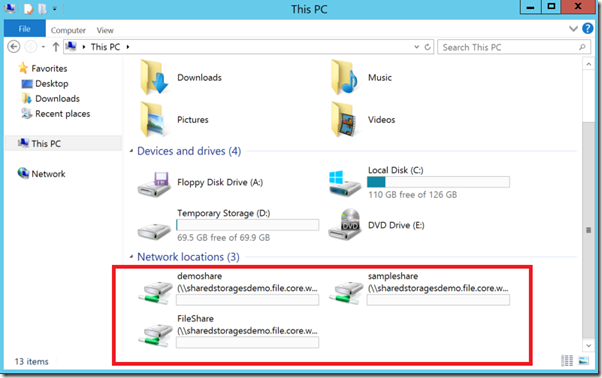
That it, once you open windows explorer you should now see a permanent drive mapped as per the below. If you repeat the mapping steps you can add this drive to many machines within Azure!
The only limitation I have found so far is that you cannot create the file share on a local machine. I found that the easiest way to transfer files was to use AzCopy (provided with the Azure SDK). You can upload a file with a simple command in this format:
“C:Program Files (x86)Microsoft SDKsAzureAzCopyAzCopy” /Source:d:SourceFolder /Dest:https://.file.core.windows.net// /DestKey: /s
Further information on using Azcopy can be found here



Introduction to Data Wrangler in Microsoft Fabric
What is Data Wrangler? A key selling point of Microsoft Fabric is the Data Science
Jul
Autogen Power BI Model in Tabular Editor
In the realm of business intelligence, Power BI has emerged as a powerful tool for
Jul
Microsoft Healthcare Accelerator for Fabric
Microsoft released the Healthcare Data Solutions in Microsoft Fabric in Q1 2024. It was introduced
Jul
Unlock the Power of Colour: Make Your Power BI Reports Pop
Colour is a powerful visual tool that can enhance the appeal and readability of your
Jul
Python vs. PySpark: Navigating Data Analytics in Databricks – Part 2
Part 2: Exploring Advanced Functionalities in Databricks Welcome back to our Databricks journey! In this
May
GPT-4 with Vision vs Custom Vision in Anomaly Detection
Businesses today are generating data at an unprecedented rate. Automated processing of data is essential
May
Exploring DALL·E Capabilities
What is DALL·E? DALL·E is text-to-image generation system developed by OpenAI using deep learning methodologies.
May
Using Copilot Studio to Develop a HR Policy Bot
The next addition to Microsoft’s generative AI and large language model tools is Microsoft Copilot
Apr