I was recently tasked with connecting to a SQL Server database, sitting on an external Windows Azure VM. Simply typing in the SQL server name and providing appropriate SQL Server authentication is not enough to connect. The following error is displayed:
An Azure VM works differently to a physical server and cmd commands such as ping do not work. As a result, it was difficult to test connection to the DNS server name or the IP address. After scouring numerous forums and trying a number of ‘fixes’, I still could not connect to the VM SQL Server from my local machine.
I passed the problem to Sacha and luckily, he managed to work out where I was going wrong. The below steps MUST be adhered to for the connection to work:
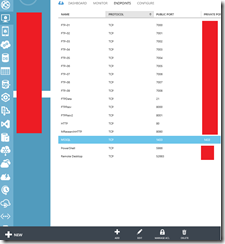
1. Within Windows Azure, navigate to ‘ENDPOINTS’ and Select ‘ADD’ at the bottom of the page.
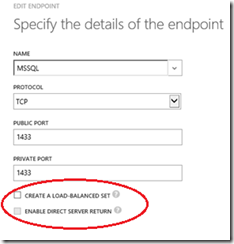
2. You will need to open up a port in order to allow access to the instance of SQL Server. I’m going to stick with the default port of 1433 and create a new endpoint here. Make sure Both Check boxes (circled below) are NOT ticked.
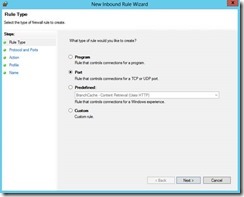
3. Next up we need to configure the firewall on the server itself. Open an RDP session and log into the Azure VM. Open Control Panel > Windows Firewall and configure a new inbound rule in the Windows firewall for port 1433:
4. Select a rule type of ‘Port’, as shown above. The default port for SQL Server is 1433 but this can be different depending on how the SQL Server properties have been set up. Simply type ‘tcp setting for SQL Server’ in a search engine and this will tell you where to find or change the port number.
After clicking next, the options are as follows:
· Select TCP and specify port 1433
· Next, select ‘Allows This Connection’
· Then, select when you want the rule applied – typically ‘Public.’ This will enable external connection to the port.
· Lastly, assign this rule a name (e.g SQL Port)
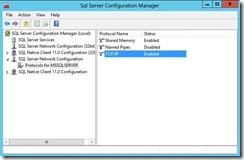
5. The next step is to verify that SQL Server is enabled to use the TCP protocol. Ensure that ‘Named Pipes’ is set to DISABLED.
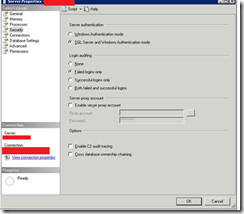
6. Check that SQL Server is configured to use mixed mode authentication. Windows Azure does support Active Directory at this time, so SQL authentication will be required. Right Click on the server (within SSMS) and toggle to the ‘Security’ page and verify that the radio button ‘SQL Server and Windows Authentication Mode’ is selected.
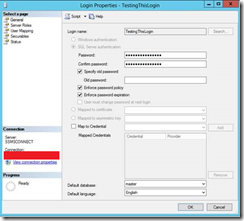
7. Create a test login (sys admin for simplicity) and ensure the user is set up with SQL Server authentication and a meaningful password is set.
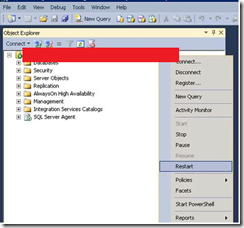
8. Restart the SQL Server (either through SSMS or SQL Server Configuration Manager). In the below example, SSMS was used. It is important the service is restarted, otherwise, any changes to the tcp or pipelines will n bot have been committed.
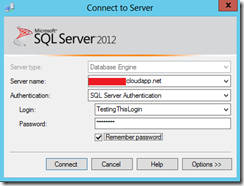
9. The final step is to login in from your local SSMS. Specify the full server name (taken from Azure) and the new user credentials created.
10. Connection should now be established. If you are still seeing the error message shown at the beginning of the blog, please go through the above steps again or speak to Sacha or myself.
If you have any questions or require further information, do not hesitate to contract me.


Introduction to Data Wrangler in Microsoft Fabric
What is Data Wrangler? A key selling point of Microsoft Fabric is the Data Science
Jul
Autogen Power BI Model in Tabular Editor
In the realm of business intelligence, Power BI has emerged as a powerful tool for
Jul
Microsoft Healthcare Accelerator for Fabric
Microsoft released the Healthcare Data Solutions in Microsoft Fabric in Q1 2024. It was introduced
Jul
Unlock the Power of Colour: Make Your Power BI Reports Pop
Colour is a powerful visual tool that can enhance the appeal and readability of your
Jul
Python vs. PySpark: Navigating Data Analytics in Databricks – Part 2
Part 2: Exploring Advanced Functionalities in Databricks Welcome back to our Databricks journey! In this
May
GPT-4 with Vision vs Custom Vision in Anomaly Detection
Businesses today are generating data at an unprecedented rate. Automated processing of data is essential
May
Exploring DALL·E Capabilities
What is DALL·E? DALL·E is text-to-image generation system developed by OpenAI using deep learning methodologies.
May
Using Copilot Studio to Develop a HR Policy Bot
The next addition to Microsoft’s generative AI and large language model tools is Microsoft Copilot
Apr