In this blog article I will be detailing how I use Team City to automate the building and deployment of SSAS projects. When looking at possible ways of doing this I wanted to make sure that it met the following requirements:
-Supported CI Deployment and building of Both Multidimensional and Tabular Projects without using a different approach for each.
-Allowed customising deployment options such as stopping the overwriting of partitions.
I tried a few different approaches but I believe this one provided the best results and met the criteria.
Prerequisites
This blog assumes the reader has first followed or is familiar with the steps outlined in the previous blogs in this series. These are available from:
Getting Started – Continuous Integration – TeamCity Installation and Setup
Configuring TeamCity to Connect to Visual Studio
Using TeamCity to Automate Building and Development of Database Projects
Continuous Integration with TeamCity – Automating SSIS Build and Deployment
Overview
The technique used is to call visual studio from MSBuild to build the projects. We use a file to set the default deployment options and then make a call to the AnalysisServices Deployment Wizard in silent mode to deploy the project to the target server.
Automating the Build
To Automate the build we use an xml file in the following format
<?xml version="1.0" encoding="utf-8"?>
<Project DefaultTargets="Build" >="https://schemas.microsoft.com/developer/msbuild/2003">
  <Target Name="Build">
    <Exec Command='"C:Program Files (x86)Microsoft Visual Studio 12.0Common7IDEdevenv.exe" "./SSASTabular/SSASTabular.smproj" /Build Debug /projectconfig'/>
  </Target>
</Project>
Add this file to the root of your project with the name SSASBuild.proj and check it in.
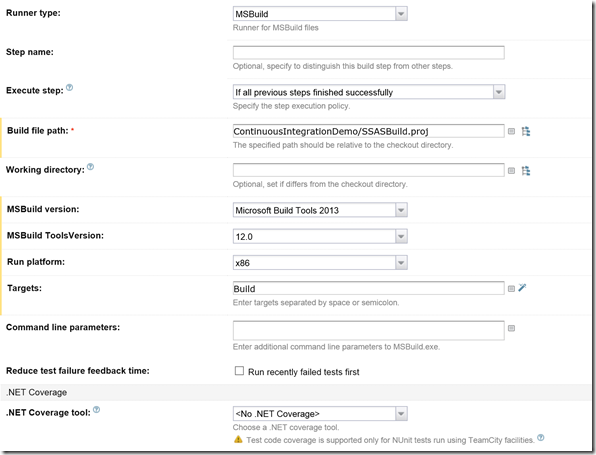
Add a build step to TFS to execute the step as per the below:
Ensure in Visual Studio that all the projects are set to build as without this the folders will be empty!
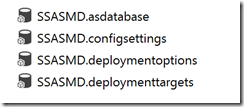
Upon running the step you should see that the project has now built and the relevant files are now contained in the bin folder of the project, it will look a little different depending if the project is MD or Tabular.
Setting the Deployment Options
One of the main requirements was to enable incremental deployments and the option for example of retaining existing partitions.
Unfortunately whilst some of the required settings are configurable from Visual Studio not all of these can be configured and when the project is built the *.deploymentoptions file which is created will always be in the same format.
As such the only option is to replace the file with one which contains the settings that we would like to use before the project is deployed.
To do this you will need to modify the format of the file so that it meets your requirments – if you need to you can run the deployment wizard using the /a answer switch which will amend the files for you based upon the options selected (see http://msdn.microsoft.com/en-us/library/ms162758.aspx for further information).
A sample file for Multidimensional deployments is included below, the method for Tabular deployments is the same although the file structure is a little different.
<DeploymentOptions >="https://www.w3.org/2001/XMLSchema" >="https://www.w3.org/2001/XMLSchema-instance" >="https://schemas.microsoft.com/analysisservices/2003/engine/2" >="https://schemas.microsoft.com/analysisservices/2003/engine/2/2" >="https://schemas.microsoft.com/analysisservices/2008/engine/100/100" >="https://schemas.microsoft.com/analysisservices/2010/engine/200" >="https://schemas.microsoft.com/analysisservices/2010/engine/200/200" >="https://schemas.microsoft.com/analysisservices/2011/engine/300" >="https://schemas.microsoft.com/analysisservices/2011/engine/300/300" >="https://schemas.microsoft.com/analysisservices/2012/engine/400" >="https://schemas.microsoft.com/analysisservices/2012/engine/400/400" >="https://schemas.microsoft.com/DataWarehouse/Designer/1.0">
  <TransactionalDeployment>false</TransactionalDeployment>
  <PartitionDeployment>RetainPartitions</PartitionDeployment>
  <RoleDeployment>DeployRolesRetainMembers</RoleDeployment>
  <ProcessingOption>Default</ProcessingOption>
  <OutputScript></OutputScript>
  <ImpactAnalysisFile></ImpactAnalysisFile>
  <ConfigurationSettingsDeployment>Deploy</ConfigurationSettingsDeployment>
  <OptimizationSettingsDeployment>Deploy</OptimizationSettingsDeployment>
  <WriteBackTableCreation>UseExisting</WriteBackTableCreation>
</DeploymentOptions>
I saved the file as SSASMDDeploy.options and added it to the project
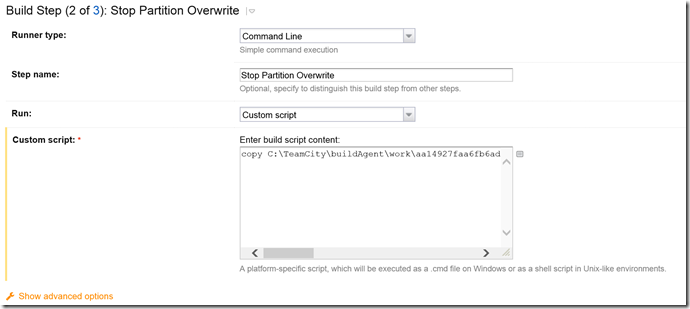
Then add a new build step to Team City, this time we are going to use a simple command line based runner to replace the file which is created when the project is built with out pre-prepared one which has the options we selected as per the below:
The command I used in full was of the format below, you will need to amend this depending upon the environment you are working in. Note that you will need to use the %system.teamcity.build.workingDir% variable in the script as the path of the files may change.
copy %system.teamcity.build.workingDir%ContinuousIntegrationDemoSSASMDDeploy.options %system.teamcity.build.workingDir%ContinuousIntegrationDemoSSASMDbinSSASMD.deploymentoptions /Y
Upon executing this build step you should be able to confirm the contents of the file at build are being replaced with the ones from the project.
Automating the Deployment
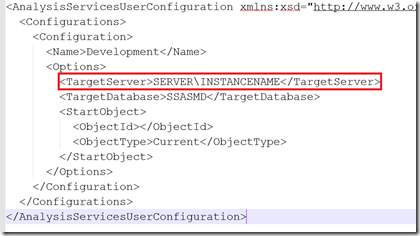
We to ensure that the project will deploy to the correct target. Because these options are generally set on a user by user basis changing they are normally excluded from source control and therefore checking this in will not change the value on the build server. You could potentially change this to include the file, however it would mean that if another person working on the project changed this value then the CI build would try to build to this server.
I found the simplest way to do this was to modify the *.dwproj.user options file on the build server as this will not be subsequently overwritten
The final step is to automate the deployment. We do this by making a call to the AnalysisServices deployment wizard from a Command Line runner in the same manner as step 2.
The command I used was of the format
“C:Program FilesMicrosoft SQL Server110ToolsBinnManagementStudioMicrosoft.AnalysisServices.Deployment.exe”
%system.teamcity.build.workingDir%ContinuousIntegrationDemoSSASMDbinSSASMD.asdatabase /s
Upon completion you will see that the projects have been deployed to the target server specified in the user options file.


Introduction to Data Wrangler in Microsoft Fabric
What is Data Wrangler? A key selling point of Microsoft Fabric is the Data Science
Jul
Autogen Power BI Model in Tabular Editor
In the realm of business intelligence, Power BI has emerged as a powerful tool for
Jul
Microsoft Healthcare Accelerator for Fabric
Microsoft released the Healthcare Data Solutions in Microsoft Fabric in Q1 2024. It was introduced
Jul
Unlock the Power of Colour: Make Your Power BI Reports Pop
Colour is a powerful visual tool that can enhance the appeal and readability of your
Jul
Python vs. PySpark: Navigating Data Analytics in Databricks – Part 2
Part 2: Exploring Advanced Functionalities in Databricks Welcome back to our Databricks journey! In this
May
GPT-4 with Vision vs Custom Vision in Anomaly Detection
Businesses today are generating data at an unprecedented rate. Automated processing of data is essential
May
Exploring DALL·E Capabilities
What is DALL·E? DALL·E is text-to-image generation system developed by OpenAI using deep learning methodologies.
May
Using Copilot Studio to Develop a HR Policy Bot
The next addition to Microsoft’s generative AI and large language model tools is Microsoft Copilot
Apr