I have been working on a project where we have been using Continuous Integration (CI). Having used this for several months I am very enthusiastic about it. To give a brief explanation, using CI means that when you check in your source the project will be built built and (configuration dependant) deployed to a shared development environment.
Whilst this takes a little getting used to I have found the benefits are significant – errors during the build are immediately spotted and with the automatic deployment to the shared environment errors or code clashes can be identified quickly.
In this blog post I will be detail the setup of Team city in a windows and TFS environment for use in CI. The free edition of Team City will be used which allows access to all features and use of 3 build agents should be sufficient for most BI development environments. In subsequent blog posts I will cover the setup of automated build and deployment for Database and SSIS packages using MSBuild.
Preparation
1. Download Team City (Windows edition) from: http://www.jetbrains.com/teamcity/download/
2. Create a domain account which will be used to run the Team City service. The account does not require any special permissions on the network but should be granted local administration rights on the machine selected as the build server. Later when we use Team city for deploying projects this account will need appropriate permissions on the target servers to deploy the Databases, SSIS Projects etc.
3. Download the latest version of the JDBC driver for SQL Server from Microsoft, available from http://www.microsoft.com/en-us/download/details.aspx?displaylang=en&id=11774
4. Select a SQL Server instance to be used to hold the Team City metadata (2005 or higher). Mixed mode authentication should be enabled.
5. Create a database on the server to hold the Team City metadata. I suggest calling it TeamCity and using the Full recovery model. Ensure that the default collation of the database is set to SQL_Latin1_General_CP1_CS_AS this is generally NOT the default configuration.
6. Create a non windows account and give it full permissions over the TeamCity database created in step 5.
Installation
1. Run the Team City setup program as an administrator.
2. Install to the default directories and Select all features.
3. Select the option to install as a service. When prompted use the service account setup in Preparation Step 2 for Team City Agent & Scheduler (not the SYSTEM account).
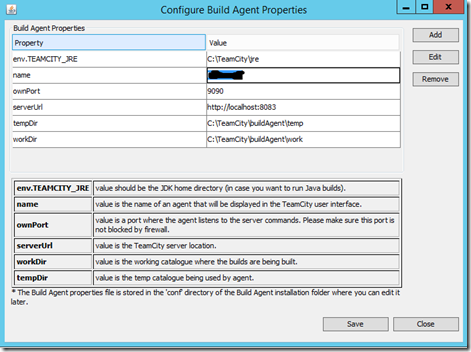
4. Choose a default port for the Team City Agent. This will be used when you access the administration portal to view build progress and make configuration changes. For the purposes of this tutorial I will use 8083 which will make the address of the when viewed from the local machine http://localhost:8083/
5. You should be presented with a screen like the below. If the configuration looks correct click save.

6. Select to run immediately upon completion of the install.
7. Open your web browser and navigate to http://localhost:8083/mnt (change port number if required) You should be presented with the following screen:

8. Click Proceed. Following this (if you do not click proceed the directory will not exist) Install the JDBC driver from preparation step 6 and place the drivers (sqljdbc4.jar & sqljdbc.jar) in the C:ProgramDataJetBrainsTeamCitylibjdbc directory (assumes default installation paths).
9. When prompted to setup access to a database chose ‘MS SQL Server’ as the instance type. Set the connection properties and name of the database to the DB setup in step 5 of the preparation using the SQL account from step 6 of the preparation.
10. Read and accept the license agreement.
11. Create an Administrator account for Team City configuration and ensure that the credentials are stored securely for later use.

The next step is to connect TeamCity to your source control. Check out our blog on how to Configure TeamCity to Connect to Visual Studio.
Introduction to Data Wrangler in Microsoft Fabric
What is Data Wrangler? A key selling point of Microsoft Fabric is the Data Science
Jul
Autogen Power BI Model in Tabular Editor
In the realm of business intelligence, Power BI has emerged as a powerful tool for
Jul
Microsoft Healthcare Accelerator for Fabric
Microsoft released the Healthcare Data Solutions in Microsoft Fabric in Q1 2024. It was introduced
Jul
Unlock the Power of Colour: Make Your Power BI Reports Pop
Colour is a powerful visual tool that can enhance the appeal and readability of your
Jul
Python vs. PySpark: Navigating Data Analytics in Databricks – Part 2
Part 2: Exploring Advanced Functionalities in Databricks Welcome back to our Databricks journey! In this
May
GPT-4 with Vision vs Custom Vision in Anomaly Detection
Businesses today are generating data at an unprecedented rate. Automated processing of data is essential
May
Exploring DALL·E Capabilities
What is DALL·E? DALL·E is text-to-image generation system developed by OpenAI using deep learning methodologies.
May
Using Copilot Studio to Develop a HR Policy Bot
The next addition to Microsoft’s generative AI and large language model tools is Microsoft Copilot
Apr