In a previous post I introduced Azure Data Catalog. Because it’s great for data discovery and for data asset management, it makes sense to automate, as much as possible, the process of registering new data assets, and allowing users to discover data in a more natural, perhaps conversational, way. In order to automate the registration of data assets or to allow discovery through other tools, it’s necessary to look at how Azure Data Catalog authenticates users using Azure Active Directory (AAD). This post is going to explore some of the options the Azure Data Catalog uses for authentication and a walkthrough of a code example to make authentication work without user input.
Azure Active Directory Authentication
If you have interacted with Azure Data Catalog before, you will find that there are two ways of doing so. First, there’s the web application that allows you to conduct data discovery and data asset management. Then there’s the native application that sits on your local machine that can be used for registering data assets. These use different methods of authenticating using Azure Active Directory. The first one uses Web Browser to Web Application authentication. The second uses Native Application to Web API authentication.
Web Browser to Web Application
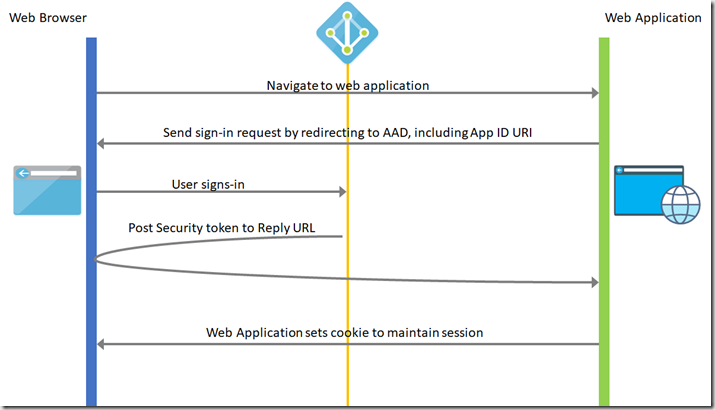
What is involved with Web Browser to Web Application authentication? Simply put, the web application directs the user’s browser to get them to sign-in AAD. AAD then returns a token which authenticates the user to use the web application. In practice, it’s a bit more complex, so here’s a diagram to help explain it.

In a bit more detail, the process it follows is:
1) A user visits the application and needs to sign in, they are redirected via a sign-in request to the authentication endpoint in AAD.
2) The user signs in on the sign-in page.
3) If authentication is successful, AAD creates an authentication token and returns a sign-in response to the application’s Reply URL that was configured in the Azure Portal. The returned token includes claims about the user and AAD that are required by the application to validate the token.
4) The application validates the token by using a public signing key and issuer information available at the federation metadata document for Azure AD. After the application validates the token, Azure AD starts a new session with the user. This session allows the user to access the application until it expires.
This method of authentication is used by Azure Data Catalog when discovering data through the browser.
Native Application to Web API
What’s the process of Native Application to Web API authentication? Simply put, the application will ask you to sign-in to AAD, so that it can acquire a token in order to access resources from the Web API. In practice, it’s a bit more complex, so here’s a diagram to help explain it.

In a bit more detail, the process it follows is:
1) The native application makes a request to the authorisation endpoint in AAD, but using a browser pop-up. This request includes the Application ID and redirect URI of the native application (see the following article for native applications and registering them in Azure) and the Application ID URI of the Web API. The user is then requested to sign-in.
2) AAD authenticates the user. AAD then issues an authorisation code response back to the application’s redirect URI.
3) The Application then stops the browser activity and extracts the authorisation code from the response. Using the authorisation code, the Application then requests an access token from AAD. It also uses details about the native application and the desired resource (Web API).
4) The authorisation code and details are checked by AAD, which then returns an access token and a refresh token.
5) The Application then uses the access token to add to the authorisation header in its request to the Web API. Which returns the requested resource, based on successful authentication.
6) When the access token expires, the refresh token is used to acquire a new access token without requiring the user to sign-in again.
This method of authentication is used by Azure Data Catalog when registering data assets via the desktop application.
Automated Interaction with Azure Data Catalog
In both of the examples above, they require the user to interact in order to provide sign-in credentials. This is not ideal if we want to automate the registration of data assets or conduct data discovery outside of the browser. Therefore we’ll need to use a different method of authentication. This is the Server Application to Web API authentication method. Simply, it assumes that the server has already required a user to login and therefore has the user’s credentials. It then uses those credentials to request the access and refresh tokens from AAD.

In a bit more detail, the process it follows is:
1) The Server Application makes a request to AAD’s Token Endpoint, bypassing the Authentication Endpoint, providing the credential, Application ID and Application URI.
2) AAD authenticates the application and returns an access token that can be used to call the Web API.
3) The Application uses the access token to add to the authorisation header in its request to the Web API. Which returns the requested resource, based on successful authentication.
This method is what we’re going to use to automate our interaction with Azure Data Catalog.
From an authentication aspect, the code for Server Application to Web API is simple and this example will take us to the point of returning that token, from which we can then use to request resources from the Azure Data Catalog API. The full code can be found my GitHub repo.
We are going to use the Client Id and Secret from an application we’ve registered in AAD (full process can be found in this Microsoft article on Integrating Applications with AAD).
private static string clientId = "ApplicationId";
private static string secret = “ApplicationKey”;
Then, we’re going to make sure we’re connecting to the correct AAD instance
private static string authorityUri = string.Format("https://login.windows.net/{0}", tenantId);
So we can create an authorisation context
AuthenticationContext authContext = new AuthenticationContext(authorityUri);
In order to acquire a token
authResult = await authContext.AcquireTokenAsync(resourceUri, new ClientCredential(clientId, secret));
Which can then be used in an authorisation header in requests to the Azure Data Catalog API. In the next related post, we’ll explore how to make a call to the API using this authentication method.
Introduction to Data Wrangler in Microsoft Fabric
What is Data Wrangler? A key selling point of Microsoft Fabric is the Data Science
Jul
Autogen Power BI Model in Tabular Editor
In the realm of business intelligence, Power BI has emerged as a powerful tool for
Jul
Microsoft Healthcare Accelerator for Fabric
Microsoft released the Healthcare Data Solutions in Microsoft Fabric in Q1 2024. It was introduced
Jul
Unlock the Power of Colour: Make Your Power BI Reports Pop
Colour is a powerful visual tool that can enhance the appeal and readability of your
Jul
Python vs. PySpark: Navigating Data Analytics in Databricks – Part 2
Part 2: Exploring Advanced Functionalities in Databricks Welcome back to our Databricks journey! In this
May
GPT-4 with Vision vs Custom Vision in Anomaly Detection
Businesses today are generating data at an unprecedented rate. Automated processing of data is essential
May
Exploring DALL·E Capabilities
What is DALL·E? DALL·E is text-to-image generation system developed by OpenAI using deep learning methodologies.
May
Using Copilot Studio to Develop a HR Policy Bot
The next addition to Microsoft’s generative AI and large language model tools is Microsoft Copilot
Apr