Introduction
This is the second part of a series of blog posts intended to show a way to load data in to MDS via SSIS. In part 1 we have loaded the staging tables with new members and attributes for several entities. In this blog post we are going to extend the SSIS package with tasks to move the data from the staging tables into the MDS Product model and validate these newly inserted members.
Completing The Solution
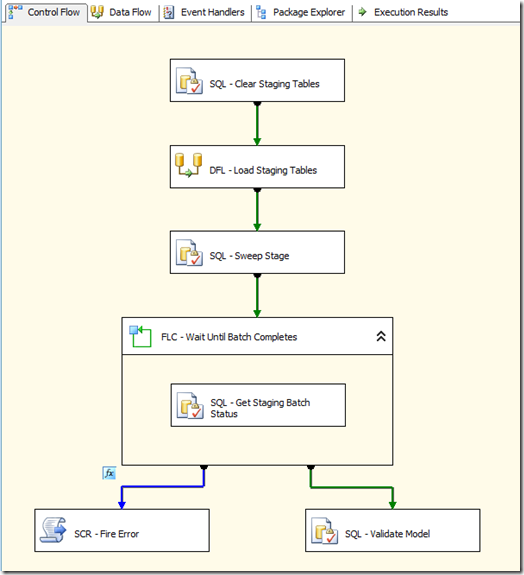
We need to move the data from the staging tables into the model. This is carried out by executing the MDS staging sweep process. To achieve this we need to add an Execute SQL Task to the control flow of our package. Rename the task – I’ve called mine ‘SQL – Sweep Stage’ and connect it up to the ‘DFL – Load Staging Tables’ task with a success constraint.
On the General tab set the connection to MasterDataServices and the SQL Statement as follows:
DECLARE @ModelName   NVARCHAR(50) = ?
DECLARE @UserName    NVARCHAR(50) = ?
DECLARE @User_ID     INT
DECLARE @Version_ID  INT

SET @User_ID =    (SELECT ID
                   FROM  mdm.tblUser u
                   WHERE u.UserName = @UserName )

SET @Version_ID = (SELECT MAX(ID)
                   FROM mdm.viw_SYSTEM_SCHEMA_VERSION
                   WHERE Model_Name = @ModelName)


EXECUTE mdm.udpStagingSweep @User_ID, @Version_ID, 1
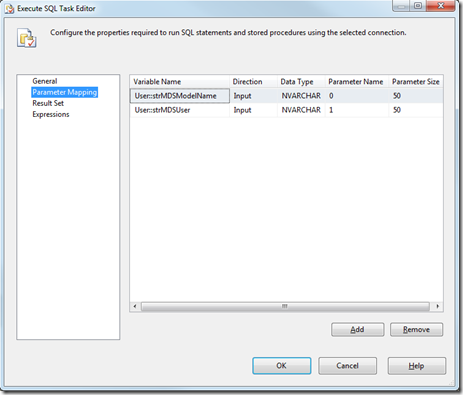
Then add the Parameter mapping as shown below:
That’s all there is to do to get our data into the model. However this process is asynchronous and before we can validate the model we need to know when the staging sweep has finished.
Add a For Loop Container task to the control flow of the package and connect it up to the ‘SQL – Sweep Stage’ task with a success constraint. Rename the task – I’ve called mine ‘FLC – Wait Until Batch Completes’. Add an Execute SQL Task inside the loop container task and rename it. Mine is called ‘SQL – Get Staging Batch Status’. Change the connection to MasterDataServices, change the ResultSet property to ‘Single row’ and then add the following SQL script to the SQLStatement property:
DECLARE @Version_ID INT

SET @Version_ID = (SELECT MAX(ID)
                   FROM mdm.viw_SYSTEM_SCHEMA_VERSION
                   WHERE Model_Name = ?)

SELECT TOP    1 Status_ID
FROM          mdm.tblStgBatch
WHERE         Version_ID = @Version_ID
ORDER BY      ID DESC
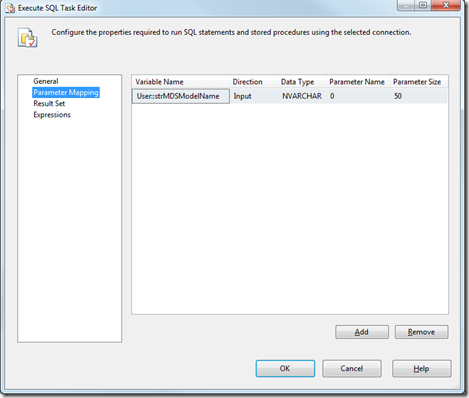
Add the parameter mapping as shown below:
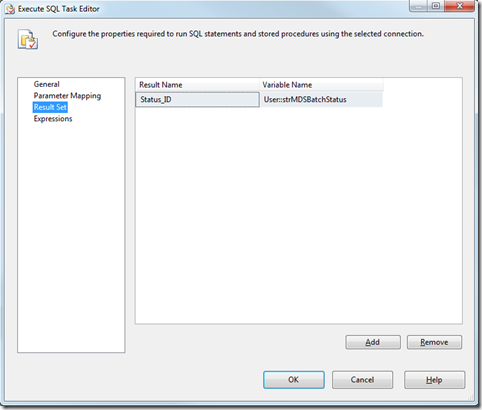
And the Result Set as shown below:
Add three more parameters to the package as shown in the table below:
Next configure the For Loop Properties as shown in the table below:
The InitExpression value sets the @dtMDSLoopTimer to the current time plus the interval set in our @intMDSTimeout variable. The EvalExpression checks if the @strMDSBatchStatus is either not equal to 2 (Success) or the timeout has expired.
The For Loop Container can only succeed if the staging batch is successfully loaded.
Now we can validate the model so add an Execute SQL Task to the control flow and connect it to the ‘FLC – Wait Until Batch Completes’ task with a success constraint. Rename the task – mine is called ‘SQL – Validate Model’. Change the connection to MasterDataServices and the SQLStatement as follows:
DECLARE @ModelName    NVARCHAR(50) = ?
DECLARE @UserName     NVARCHAR(50) = ?
DECLARE @User_ID      INT
DECLARE @Version_ID   INT
DECLARE @Model_id     INT


SET @User_ID =        (SELECT ID
                       FROM  mdm.tblUser u
                       WHERE u.UserName = @UserName )

SET @Version_ID =     (SELECT MAX(ID)
                       FROM mdm.viw_SYSTEM_SCHEMA_VERSION
                       WHERE Model_Name = @ModelName)

SET @Model_ID =       (SELECT Model_ID
                       FROM mdm.viw_SYSTEM_SCHEMA_VERSION
                       WHERE Model_Name = @ModelName)


EXECUTE mdm.udpValidateModel @User_ID, @Model_ID, @Version_ID, 1
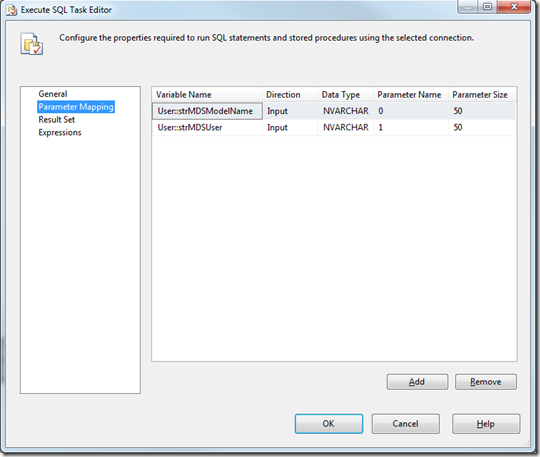
Set the parameter mapping as follows:
Almost done. Just to finish it off lets add a script task to the control flow and connect it to the ‘FLC – Wait Until Batch Completes’ task with a completion constraint. Change the Evaluation Operation of the constraint to ‘Expression and Constraint’ and set the Expression to ‘@strMDSBatchStatus != 2′. Edit the script and add the following line of code under // TODO: Add your code here:
Dts.Events.FireError(0, "SCR - Fire Error", "MDS Timeout Occurred", string.Empty, 0);
This task will fire an error event if the MDS staging batch does not complete successfully.
The finished package control flow should look similar to the following image:
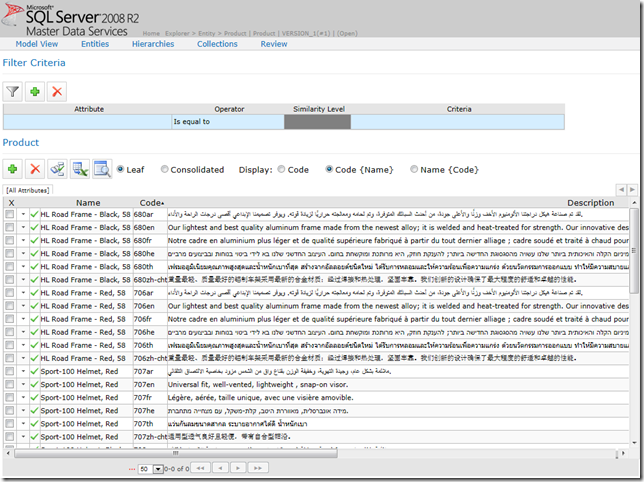
Execute this package and then check the Product entity in MDS. It should look something like the following:
Looking at the other entities you will see that we have added members to three entities and validated all these new members.
Summary
Over the last two blog posts I have shown a way of automating the loading of data to Master Data Services via SSIS. This pattern can be used to cater for most of your loading requirements.
That’s it, the completed Integration Services project source code and MDS Model can be downloaded from here – (You will need to create a login first).
Your comments are very welcome.




Introduction to Data Wrangler in Microsoft Fabric
What is Data Wrangler? A key selling point of Microsoft Fabric is the Data Science
Jul
Autogen Power BI Model in Tabular Editor
In the realm of business intelligence, Power BI has emerged as a powerful tool for
Jul
Microsoft Healthcare Accelerator for Fabric
Microsoft released the Healthcare Data Solutions in Microsoft Fabric in Q1 2024. It was introduced
Jul
Unlock the Power of Colour: Make Your Power BI Reports Pop
Colour is a powerful visual tool that can enhance the appeal and readability of your
Jul
Python vs. PySpark: Navigating Data Analytics in Databricks – Part 2
Part 2: Exploring Advanced Functionalities in Databricks Welcome back to our Databricks journey! In this
May
GPT-4 with Vision vs Custom Vision in Anomaly Detection
Businesses today are generating data at an unprecedented rate. Automated processing of data is essential
May
Exploring DALL·E Capabilities
What is DALL·E? DALL·E is text-to-image generation system developed by OpenAI using deep learning methodologies.
May
Using Copilot Studio to Develop a HR Policy Bot
The next addition to Microsoft’s generative AI and large language model tools is Microsoft Copilot
Apr