The titled error message (above) often occurs when a number of people work on a particular server, using the same credentials. This article explains the different workspace permissions that can be assigned in Visual Studio, as well a way of eradicating the error message.
Please Note:
This post is only relevant to TFS 2010 and beyond. Any previous versions will only allow a workspace to use the ‘private workspace’ setting
Background
In most cases, you would want TFS to apply the ‘private workspace’ permission. This ensures individuals have their own copy of locally developed work and prevent the risk of anything being accidentally overwritten or deleted. However, there may be a need to share a workspace across multiple users, where the solution files are store on a shared drive. Furthermore, some servers use generic log in credentials (to a server), in which more than one person would connect to TFS. Switching the TFS workspace to a more ‘public’ setting would enable everyone to share the same solution files.
Workspace Permissions
There are 3 types of workspaces in TFS 2010 (and beyond);
1. Private
a. Default setting and most commonly used. Only the logged in user will be able to create, edit or delete from the local files. In effect, only the owner will have permissions.
2. Public-limited
a. Additional users are granted the Read and Use permissions on the workspace.
3. Public
a. Every valid user of the team project collection has the same permissions as the owner: Read, Use, CheckIn, Administer.
Edit TFS Workspace Settings
The below instructions illustrate how to change a workspace permission in Visual Studio 2010. The same logic applies to Visual Studio 2012 and 2014.
1. From the File menu, click Source Control, and then click Workspaces.
2. In the Manage Workspaces dialog box, under the Name column, highlight the workspace that you want to modify, and then click Edit.
3. In the Edit Workspace dialog box, Click Advanced.
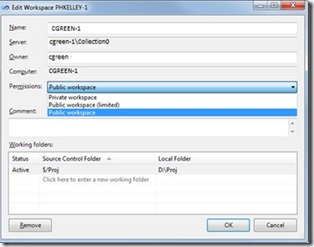
4. Change to the desired workspace by using the ‘permissions’ drop down.
Fig 1.0 – Edit Workspace Example
5. Click OK to confirm.
Test Workspace Permissions
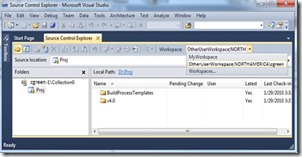
You’ll need to log onto the machine which has the public workspace. After starting Visual Studio 2010 and connecting to the server which has a public workspace, you’ll be able to see the workspace in the appropriate drop-down combo boxes in the Source Control Explorer and Pending Changes tool windows.
1. From the Team Explorer home page (Keyboard: Ctrl + 0, H), choose Source Control Explorer.
2. From the menu bar choose View, Other Windows, Source Control Explorer.
3. Choose the recently changed ‘Public Workspace’ and begin to use it.
Summary
Although the original TFS error message was the reason for my findings, it also highlights the fact that there are now different workspace permissions that can fit your needs. To any users of TFS and Source Control, these types of articles are priceless when learning more about it.
Visit the websites below for a more in depth look into workspaces:
– http://blogs.msdn.com/b/phkelley/archive/2010/02/04/improvements-to-workspaces-in-tfs-2010.aspx
– http://msdn.microsoft.com/en-us/library/ms245466(v=vs.100).aspx


Introduction to Data Wrangler in Microsoft Fabric
What is Data Wrangler? A key selling point of Microsoft Fabric is the Data Science
Jul
Autogen Power BI Model in Tabular Editor
In the realm of business intelligence, Power BI has emerged as a powerful tool for
Jul
Microsoft Healthcare Accelerator for Fabric
Microsoft released the Healthcare Data Solutions in Microsoft Fabric in Q1 2024. It was introduced
Jul
Unlock the Power of Colour: Make Your Power BI Reports Pop
Colour is a powerful visual tool that can enhance the appeal and readability of your
Jul
Python vs. PySpark: Navigating Data Analytics in Databricks – Part 2
Part 2: Exploring Advanced Functionalities in Databricks Welcome back to our Databricks journey! In this
May
GPT-4 with Vision vs Custom Vision in Anomaly Detection
Businesses today are generating data at an unprecedented rate. Automated processing of data is essential
May
Exploring DALL·E Capabilities
What is DALL·E? DALL·E is text-to-image generation system developed by OpenAI using deep learning methodologies.
May
Using Copilot Studio to Develop a HR Policy Bot
The next addition to Microsoft’s generative AI and large language model tools is Microsoft Copilot
Apr