In Part 1 of my Power BI Embedded blog series I focused on the great advantages which an embedded solution offers to your business as part of your digital transformation journey.
If you haven’t read it, be sure to check it out, especially as it highlights the use cases and in the business environment nowadays.
Now, let’s continue with the conceptual considerations of such PaaS solution and examine how Power BI embedding works in practice.
Decide on your Power BI embedding environment
Before starting with the development, you need to choose an embedding solution suitable for your needs. There are two options, depending on whether you would like to embed Power BI application for internal use in your organisation or for your customers.
- Embed Power BI for your organization’s internal users: Users will need a Power BI account and permission to access the underlying content: to view and interact with embedded data.
- Embed Power BI in your product for your customers: In this scenario, your users will not need a Power BI account to view and interact with embedded data.
In this blog, I will focus on the latter model that allows you to embed Power BI reports for your customers, often referred to as “App Owns Data” model.
Prerequisites to create Power BI Capacity
Power BI Embedded is a capacity which is used to embed your Power BI Reports to any of your app. In order to implement this service, you need to purchase capacity as per your needs.
In order to get started with your app development, you should go through the following prerequisites and steps to create Power BI Capacity.
- Set up a Power BI Pro account. You need at least one Pro account for the application developer.
- Create a Microsoft Azure subscription or use your existing one.
- Set up your own Azure Active Directory tenant – Your Azure Subscription should have a valid Azure Active Directory.
Configure your embedding environment
As a starting point in the Power BI Embedded development, you need to register your application. By registering an application you enable its interaction with Azure.
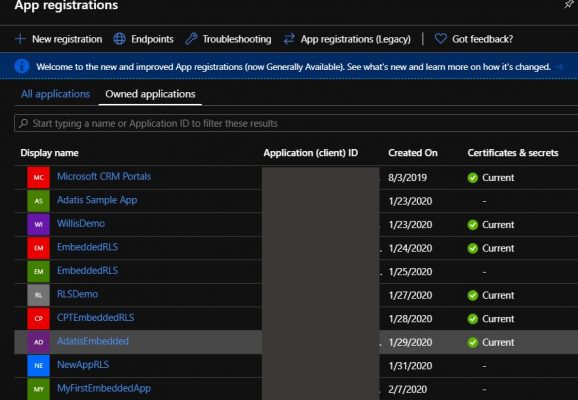
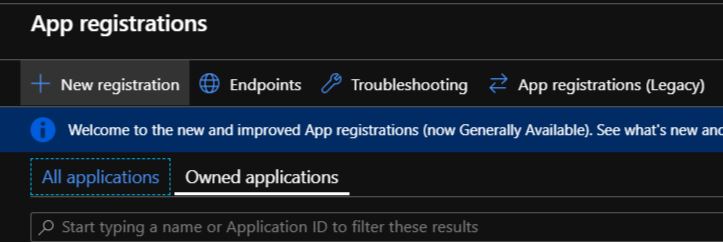
How to register an application?
There are two ways to register your application.
1. Register your application through Power BI Embedded setup tool
The embedded setup tool provided by Microsoft is a simple wizard that lets you set up environment in five simple steps.
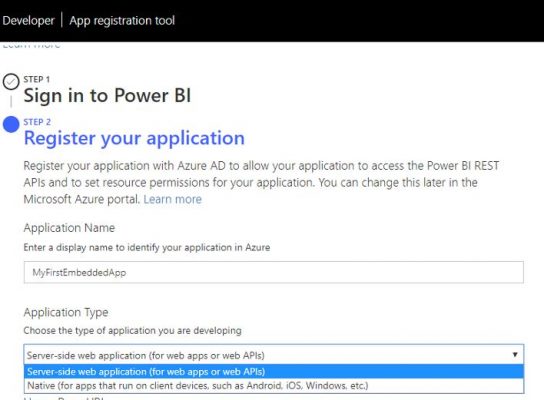
1. First, log back into your account and give your application an application name.
2. Then, you need to fill out application type – whether your application is a native or server-side web app. For third party embedding, select a native app.
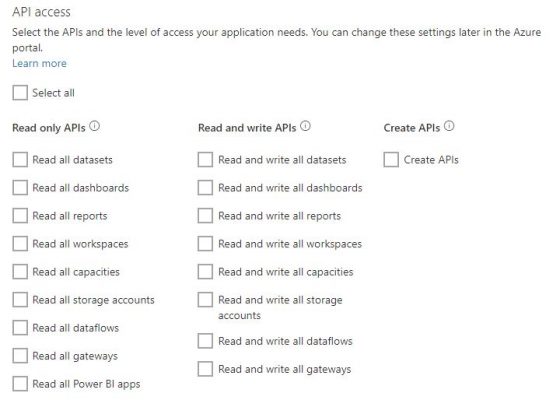
3. Next, on API access choose the permissions that your application has through Azure AD about which Power BI should have REST APIs. You can have these permissions changed later at any time through the Azure portal.
-
- Set the permissions for the corresponding Read only APIs
- Click on “Register” to set the permissions for your application
An Application ID has been generated and is now displayed the Application ID a summary box you will see your application ID and now also the workspace ID from your newly created workspace.
2. Register your application through Azure
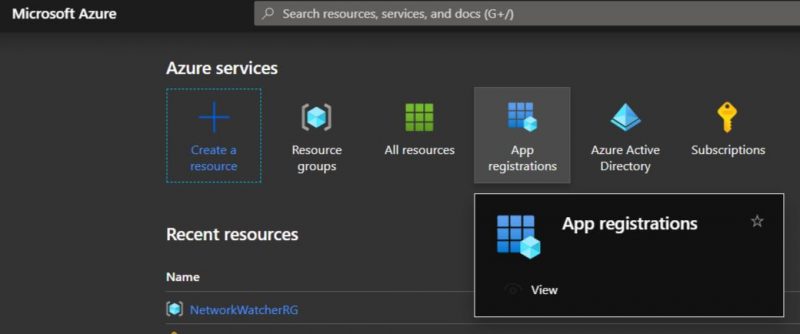
When registering a new app through Azure, you will be asked for the following details:
- Resource Name: You can give a valid name (For example, “MyFirstApp”) to this Power BI Embedded. This will also be visible at Power BI admin portal.
- Supported Account types: For Embedding Power BI for you customers, you will need the second option: Accounts in any organisation (Any Azure AD directory – Multi-tenant)
- Redirect URI: For development purposes, you can set it to http://localhost:##### . You can edit this later in the Authentication section of your app.
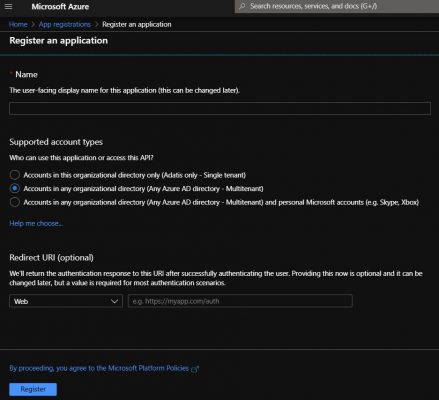
Finally, click on create and after a minute or two your app will be created.
Congratulations! Now you have a registered application which can interact with the Power BI service and with your Power BI Embedded application.
Create your Power BI Workspace and assign a dedicated capacity
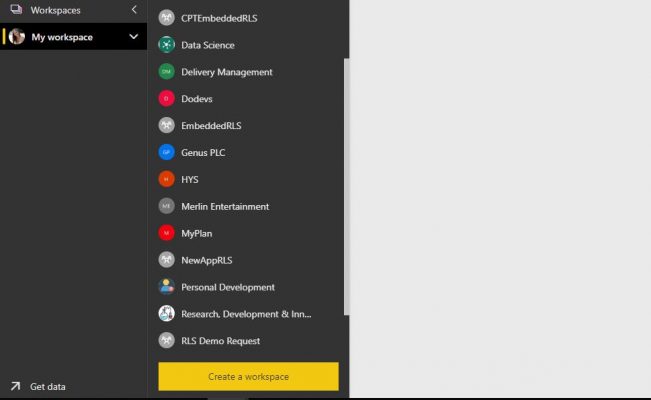
As part of setting up the Power BI Embedded environment, you need to create a Power BI workspace and assign a dedicated capacity to your embedded Power BI. You need a Pro license to create this app workspace within the Power BI service. After you are signed in, select “Workspaces” menu and push “Create а workspace”. In your production application your Power BI Embedded capacity is charged in Microsoft Azure. The reports in the dedicated workspace are not consumed by the personal license, but the resource-based license is used with flexible Power BI Embedded capacity.
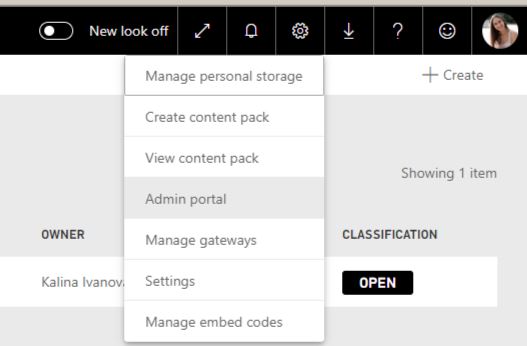
You can also assign an Embedded capacity using Power BI admin portal. See “Manage capacities within Power BI Premium and Power BI Embedded” for details about admin portal settings.
Once you’ve created the customer’s app workspace, you can get the workspace ID (also called “group ID”). You can copy this ID from the workspace URL of the Power BI service.
Next, you import your Power BI file (.pbix file) into this newly created workspace. Open your Power BI file in Power BI desktop and publish the report to the workspace you have created. After you’ve published your Power BI report, you can get the imported dataset id, report id, dashboard id as well (After you create a dashboard in the online service.)
Having setup your Power BI Embedded capacity, next step is to begin with the scripting and coding of your application with Power BI REST API.
As a starting point you can download a sample code provided by Microsoft from Microsoft’s GitHub repo. For embedding Power BI reports for your customers you will need to use the solution in the “PowerBIEmbedded AppOwnsData” folder.
For independent software vendor (ISV) applications the data security is highly important. The good news is that Embedding supports RLS. In the Embedded scenario, Row-level security (RLS) can be used to restrict user access to data within dashboards, tiles, reports, and datasets. Each end user can work with the same underlying data but they will be only able to see the rows they have been granted access to. RLS is authored in Power BI Desktop where you specify the permissions for each tenant (end user). As a final step of the RLS security, the roles configured in Power BI Desktop, need to be assigned in the Power BI online service.
Now let’s recap why you benefit from analytic solution embedded into your app
There are many things MS Power BI can do to increase data visibility and improve decision making within your organisation.
- Embedding analytics helps business users to access their business data and perform required actions to generate valuable insights application data.
- Power BI Embedded helps you deliver value for your customers by easily exploring data and gaining insights.
Hope you enjoyed my post and found it useful. If you would like to know how to take full advantage of Power BI Embedded, please get in touch. Our BI consultants will be happy to prepare a demo and support you to take well informed data-driven decisions for your business.


Hi Kalina, thanks for your article, it is very well written and useful for who (like my organization) has to start to embed everything 🙂
I have a question about the Workspace Capacity Assignment.
Is it possible to link a Power BI Workspace in a Tenant with an Azure Power BI Embedded Resource in another Tenant?
Because with the B2B Azure Feature, I have the availability to add external users in my own tenant (so I think the Power BI User that is administrator of the Workspace in the first Tenant).
Let me know if you need further details.
Thanks and regards,
Antonio