Introduction to the Azure OpenAI Playground
The Azure OpenAI Service has been a trending topic in the tech world this year as it combines the power of OpenAI’s advanced generative AI models with the comprehensive suite of services available on the Azure cloud. It has given developers the opportunity to create and embed high performing AI models into the Azure environment to deliver more efficient, insightful & innovative solutions. In this blog, we will take a high level look at some of the key features within the Azure OpenAI playground and how we can get the best out of it.
Setup
It is currently necessary to obtain approval to Azure OpenAI from Microsoft (which can be acquired by filling out the provided form). A resource can then be provisioned and accessed within an approved subscription by following these steps:
- Sign into the Azure Portal
- Create an Azure OpenAI resource with the following settings:
- An Azure subscription approved as above
- A new resource group in any region
- A unique name
- Standard pricing tier
- Wait for deployment to complete then go to the Azure OpenAI resource in the Azure portal
Model Deployment
Once a resource is created, exploration of Azure OpenAI is conducted through Azure OpenAI Studio, a web-based portal which facilitates the deployment and management of models. This is accessed using the explore button on the Overview page of the resource.

From here, we can deploy a variety of models through ‘Deployments’ on the sidebar and have a play.
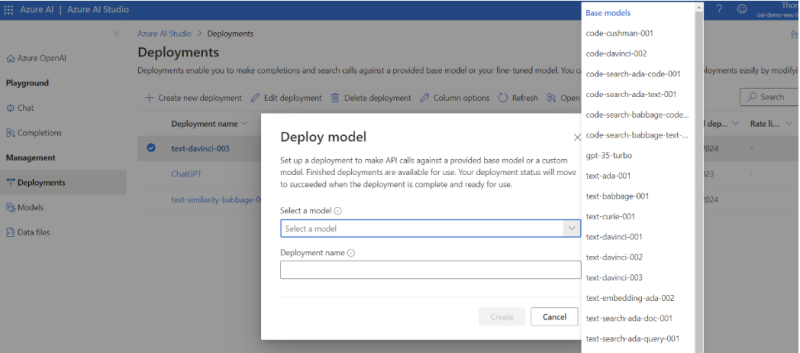
Selecting a model
The service currently provides access to 4 main types of models, grouped into families by their intended tasks. Each model is optimised for a different balance of capability and performance:
- GPT-4 → A set of models that can understand as well as generate natural language, code & images
- GPT-3 → A series of models that can understand and generate natural language (includes the ChatGPT model)
- Codex → A series of models that can understand and generate code, including translating natural language to code
- Embeddings → A set of models that can understand and use embeddings, a format of data representation that can be easily utilised by machine learning models and algorithms. More information on embeddings can be found here.
I would suggest visiting the Microsoft learn document on Azure OpenAI Service Models to further understand model selection before testing some of the capabilities in the Playground. However, for the purpose of trialling the technology I’d recommend deploying the Davinci model (text-davinci-003) of the GPT-3 family as a starting point.
Playgrounds
Once a model is deployed, playgrounds in Azure OpenAI Studio then serve as the interfaces that allow you to test your models. It is here that we can start to input prompts to generate conversational responses, undo and edit any work or fine tune parameters before regenerating to get a slightly different outcome (discussed in the next section).
There are already a variety of example assignments built into the playground to get started. Upon selection of text-davinci-003 for example, you will see a list in the ‘Examples’ drop-down that help with generating an email, translating text, explaining a SQL query and many more (these are just templates that can be customised).
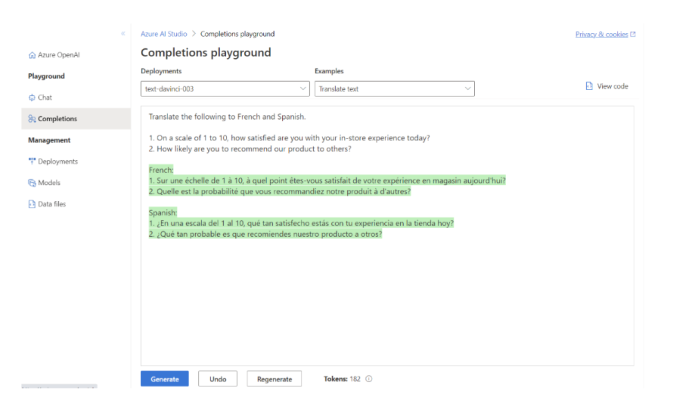 Azure OpenAI Example prompt and response
Prompts
It is worth noting at this stage that although extremely powerful, each model is highly sensitive to the input provided and therefore prompt construction is a crucial skill to develop when using Azure OpenAI. What’s difficult about this concept is that each model behaves slightly differently, so constructing a valuable prompt requires some experience and intuition.
Essentially, each model is attempting to produce the most likely continuation of the text provided, so techniques when writing prompts can be really useful to getting the most out of the model.
I’d recommend taking a look at the introduction to prompt engineering article here and follow this up with prompt engineering techniques that cover this topic in much greater detail.
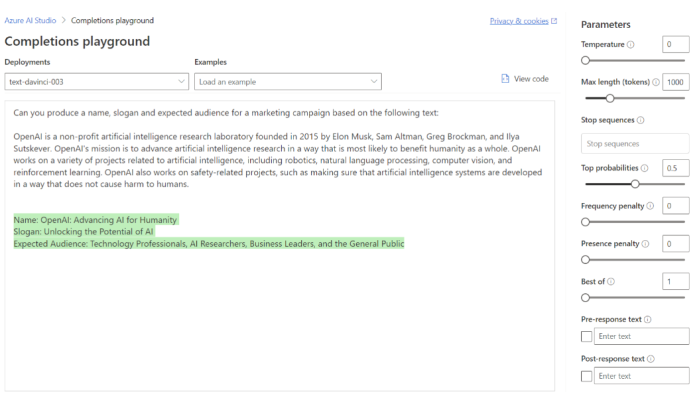
Parameters
As mentioned previously, there are also a set of adjustable parameters on the right hand side that influence behaviour of the model and are important for different use cases. These are:
Temperature (0-1) → This regulates the degree of randomness in the model’s responses. A lower temperature makes the model more deterministic, generating the same answer for the same question every time (a model with a temperature of 0 will always produce the same sentence).
Max length (0-2048) → Determines the length (in tokens) of the model’s response.
Stop sequences (user input) → Instructs the model to stop generating it’s response at a certain point.
Top probabilities (0-1) → Influences the tokens that the model considers when generating a response. For instance, setting it to 0.8 means the model will prioritise the top 80% most likely tokens. It is worth noting that setting it to 1 may limit the variety of responses, especially when the model has low confidence in the highest-scoring tokens.
Frequency penalty (0-1) → Controls the likelihood of the model repeating the same tokens in its response. A higher penalty reduces the probability of seeing duplicate tokens within the same response. The penalty is proportional to the frequency of the token’s appearance in the text thus far, distinguishing it from the next parameter.
Presence penalty (0-2) → Similar to the frequency penalty, this parameter reduces the repetition of any token that has appeared in the text so far. However, it is more stringent and further increases the probability of introducing new topics in the response.
Best of (0-20) → Generates multiple responses and presents only the one with the greatest overall probability among all tokens.
Pre and post-response text (user input) → This parameter allows you to insert text before and after the model’s response. It can be useful in providing context or setting up the model for a specific type of response.
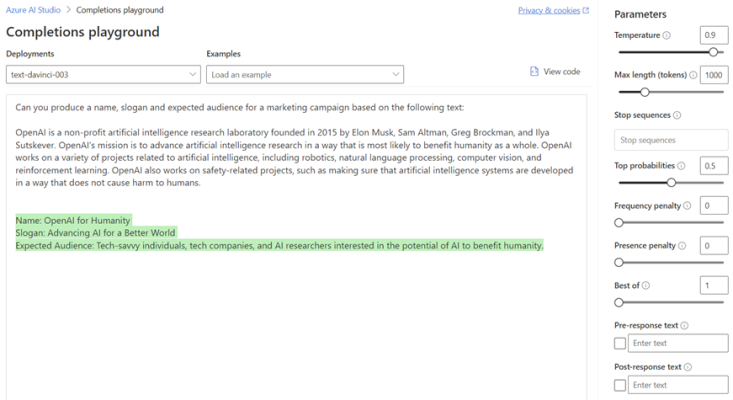
To put some of this into practice, I’ve regenerated a prompt with a temperature of 0 and top probabilities set at 0.5. No matter how many times we regenerate, we can expect the same response.
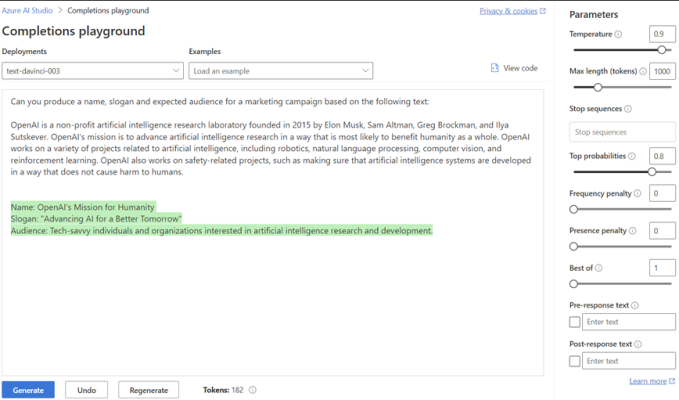
However, if we set the temperature to 0.9 and regenerate, greater creativity is introduced into the model (with phrases such as tech-savvy) as the chances of selecting a word with slightly lower probability are increased.
Taking this one step further by increasing the top probabilities to 0.8, the model’s response becomes even more adventurous as it starts to consider those tokens with a lower probability.
It’s clear that setting a high temperature and top probability are great for creating many variations quickly, however this does increase the risk of ‘hallucinations’ as the AI begins to select words that may be off topic or do not make sense.
Use Cases
With the fundamentals covered, let’s take a look at some examples of what can be produced (I have used ‘text-davinci-003’ throughout, however there may be more suitable models for the particular task):
‘Summarise the following text in less than 50 words’

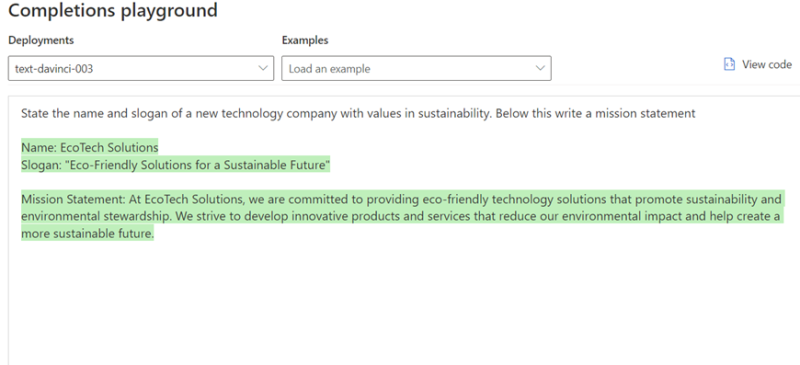
‘State the name and slogan of a new technology company with values in sustainability. Below this write a mission statement’
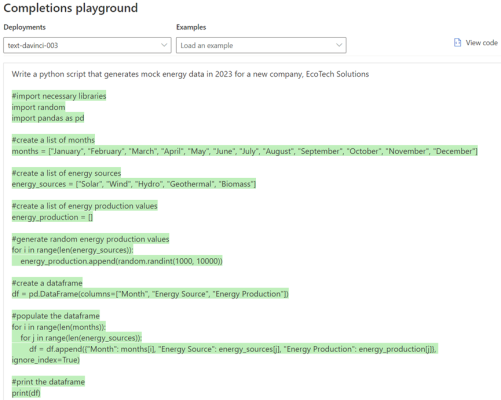
‘Write a python script that generates mock energy data in 2023 for a new company, EcoTech Solutions’
Applications
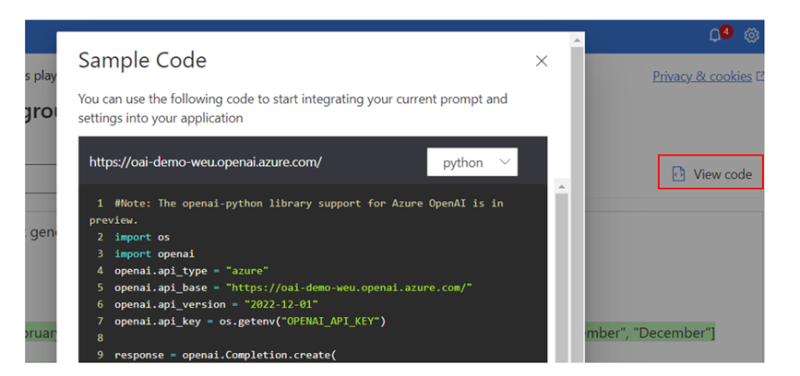
With a good understanding of the model and parameters we are satisfied with, it can now be embedded into our applications by calling the API described in ‘View code’ (further information on how to do this can be found here).
Once embedded, there are countless ways that AI functionality can enhance our solutions (I even asked it if it could give me a few). This is what it came up with:
- Interactive Virtual Assistants: Your applications can employ conversational AI to create interactive virtual assistants that can understand and respond to user queries, providing a seamless and natural user experience.
- Contextual Chatbots: With conversational AI, your applications can integrate contextual chatbots that understand the context of user conversations, enabling personalised and effective interactions.
- Voice-Activated Interfaces: Conversational AI enables voice-activated interfaces that allow users to interact with your applications using voice commands, providing a hands-free and intuitive user experience.
- Natural Language Understanding: By leveraging conversational AI, your applications can enhance their natural language understanding capabilities, enabling them to accurately interpret and respond to user inputs, improving user satisfaction.
- Sentiment Analysis: Conversational AI can enable your applications to analyse the sentiment behind user inputs, allowing for better understanding of user emotions and enabling appropriate responses.
- Multilingual Support: Incorporating conversational AI functionalities into your applications allows them to support multiple languages, opening up your user base to a global audience.
- Real-time Language Translation: Conversational AI can facilitate real-time language translation, enabling seamless communication between users who speak different languages.
And I’m sure there are many more …
I hope this short blog provides a good foundation to get started within the platform and begin incorporating AI into your future projects. If you have any questions related to this post please reach out to me through LinkedIn or Get in touch and speak to a member of the Adatis team to discuss the topic in greater detail.
If you want to learn more about applying OpenAI to your organisation, watch our webinar with our Head of Data Science and Microsoft’s UK Lead for Data & AI, as they provide a practical view on how organisations can leverage Azure OpenAI technology to drive real business value. If you are interested in getting started with Azure OpenAI, our Azure OpenAI Envisioning Workshop could be a great first step.
Thanks for reading!
Tom
Introduction to Data Wrangler in Microsoft Fabric
What is Data Wrangler? A key selling point of Microsoft Fabric is the Data Science
Jul
Autogen Power BI Model in Tabular Editor
In the realm of business intelligence, Power BI has emerged as a powerful tool for
Jul
Microsoft Healthcare Accelerator for Fabric
Microsoft released the Healthcare Data Solutions in Microsoft Fabric in Q1 2024. It was introduced
Jul
Unlock the Power of Colour: Make Your Power BI Reports Pop
Colour is a powerful visual tool that can enhance the appeal and readability of your
Jul
Python vs. PySpark: Navigating Data Analytics in Databricks – Part 2
Part 2: Exploring Advanced Functionalities in Databricks Welcome back to our Databricks journey! In this
May
GPT-4 with Vision vs Custom Vision in Anomaly Detection
Businesses today are generating data at an unprecedented rate. Automated processing of data is essential
May
Exploring DALL·E Capabilities
What is DALL·E? DALL·E is text-to-image generation system developed by OpenAI using deep learning methodologies.
May
Using Copilot Studio to Develop a HR Policy Bot
The next addition to Microsoft’s generative AI and large language model tools is Microsoft Copilot
Apr