This post is to share some of my findings about the different ways of dealing with Type 2 changes in SSIS environment. I wanted to provide comparison of the methods in terms of performance, reusability and ease of maintenance.
For the purposes of the testing let’s take the scenario where a client would like to implement historical tracking in their DW environment for one of their dimensions, lets say that they have given the following requirements:-
-
The ordered online flag should be replaced with a more user friendly text field containing ‘Yes’ or ‘No (done in a derived column transformation/SQL case statement).
-
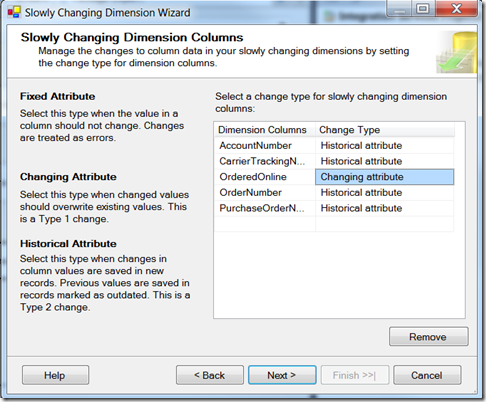
The client would like to track any changes to the Purchase Order Number, Customer Account Number or Carrier Tracking Number so that they can preserve the history of these changes. These will be setup as Type 2 changing attributes and we will need to record the time that each change was induced.
-
Any changes to the OrderedOnline field will be as the result of corrections made to the source data and historic tracking of changes will not be required for this in the DW and all rows should be updated with the new value (a Type 1 change).
I created the following table to hold the data:
CREATE TABLE DimOrder
(Order_Key INT IDENTITY(1,1) PRIMARY KEY NOT NULL –Surrogate Key
,SalesOrderID INT NOT NULL –Source Key
,LineNumber TINYINT NOT NULL –Source Key
,OrderNumber NVARCHAR(25) NOT NULL
,PurchaseOrderNumber NVARCHAR(25) NOT NULL
,AccountNumber NVARCHAR(15) NOT NULL
,CarrierTrackingNumber NVARCHAR (25)
,OrderedOnline NVARCHAR (3) NOT NULL
,RecordValidFromDate DATETIME NOT NULL
,RecordExpiredDate DATETIME
)
The three methods I have selected are:-
-
The SSIS inbuilt Slowly Changing Dimension (SCD) Task.
-
A custom built SSIS package to perform the Type 2 changes.
-
Using a T-SQL Procedure to perform the dimension population.
In each of the comparisons I have performed the following tests:-
-
An initial load of data (all of the records are new are there are no changes.
-
A load of the same data from Step 1 (no changes all records exist)
-
A load of data which contains both Type 1 and Type 2 changes
I used Adventure Works as a source and Step 1 & 2 both use the same source statement which looks like this:
SELECT
OrdHed.SalesOrderID
,SalesOrderDetailID
,OnlineOrderFlag
,SalesOrderNumber
,PurchaseOrderNumber
,AccountNumber
,CarrierTrackingNumber
FROM Sales.SalesOrderHeader OrdHed
INNER JOIN Sales.SalesOrderDetail OrdDet
ON Ordhed.SalesOrderID = Orddet.SalesOrderID
For the third test I created some copies of the source tables and then ran some basic statements on them to change the format of the data as below:
SELECT * INTO [Sales].SalesOrderDetailTest FROM [Sales].SalesOrderDetail
SELECT * INTO [Sales].SalesOrderHeaderTest FROM [Sales].SalesOrderHeader
–this will only exhibit Type 1 changes
UPDATE Sales.SalesOrderHeaderTest
SET OnlineOrderFlag = Case when OnlineOrderFlag = 1 THEN 0 ELSE 1 END
WHERE salesOrderID BETWEEN 59392 AND 67257
–this will exhibit only a Type 2 change
UPDATE Sales.SalesOrderHeaderTest
SET PurchaseOrderNumber = ‘X’ + PurchaseOrderNumber
WHERE salesOrderID < 51525
–this does a mix of both.
UPDATE Sales.SalesOrderHeaderTest
SET
PurchaseOrderNumber = ‘X’ + PurchaseOrderNumber
,OnlineOrderFlag = CASE WHEN OnlineOrderFlag = 1 THEN 0 ELSE 1 END
WHERE salesOrderID BETWEEN 51524 AND 59391
The data is then sourced from the new tables which provide the changes for testing.
1. SSIS Slowly Changing Dimension Task
Configuration of the package is very straightforward; you add a data source, drag on a slowly changing Dimension task to the data flow and double click it to configure how you want it to run. The whole process takes less than 10 minutes to complete and there are many options that should suit a variety of needs.


Once the configuration is completed we end up with a dataflow which looks like this:

2. Custom Built SSIS Package
Next I designed a package in SSIS but without using the SCD wizard. I used the following principles during design to try and improve performance:
1. Changes can be detected in the data flow by using simple lookup transformations (we could consider hash checking to improve performance if there were very many columns) to see if there is any change to the data, by using several lookups with we can determine if the change is Type 1, 2 or both.
2. Updates in the data flow are performed in SSIS using the ‘OLE DB Command’ task. As this works on a row-by-row basis this has a large impact on performance. To avoid this I created tables to hold the Type 1 and Type 2 changes and then used an ‘Execute SQL task’ in the control flow to make the updates in one go.
The completed dataflow looks like this:

New records go straight into the target tables and the ones which have changes are split using a multicast, where a change has occurred the records are inserted into holding tables and then processed in the control flow.
The control flow looks like this:

The control flow executes the statements below:
–Make Type 1 changes
UPDATE TGT
SET TGT.OrderedOnline = SRC.OrderedOnline
FROM DimOrder TGT
INNER JOIN DimOrderType1 SRC
ON TGT.SalesOrderID = SRC.SalesOrderID
AND TGT.LineNumber = SRC.LineNumber;
–Type 2 expire old rows
UPDATE TGT
SET TGT.RecordExpiredDate = SRC.TransactionDate
FROM DimOrder TGT
INNER JOIN DimOrderType2 SRC
ON TGT.SalesOrderID = SRC.SalesOrderID
AND TGT.LineNumber = SRC.LineNumber;
–Type 2 insert new records
INSERT INTO DimOrder(SalesOrderID,LineNumber,OrderNumber,PurchaseOrderNumber,AccountNumber
,CarrierTrackingNumber,OrderedOnline,RecordValidFromDate)
SELECT
SalesOrderID
,LineNumber
,OrderNumber
,PurchaseOrderNumber
,AccountNumber
,CarrierTrackingNumber
,OrderedOnline
,TransactionDate AS RecordValidFromDate
FROM DimOrderType2;
3. T-SQL Script
I also thought I would try a basic SQL script to see how this performed.
CREATE PROC popDimOrder AS
BEGIN
CREATE TABLE #OrderData
(
SalesOrderID INT NOT NULL
,LineNumber INT NOT NULL
,OrderNumber NVARCHAR(25) NOT NULL
,PurchaseOrderNumber NVARCHAR(25) NOT NULL
,AccountNumber NVARCHAR(15) NOT NULL
,CarrierTrackingNumber NVARCHAR(25) NOT NULL
,OrderedOnline NVARCHAR(3) NOT NULL
,RecordExists smallINT NOT NULL default(0)
)
DECLARE @TransactionDate Datetime
SELECT @TransactionDate = GETDATE()
INSERT INTO #OrderData(SalesOrderID, LineNumber, OrderNumber, PurchaseOrderNumber, AccountNumber, [CarrierTrackingNumber], [OrderedOnline], RecordExists
)
SELECT
OrdHed.SalesOrderID
,SalesOrderDetailID As LineNumber
,SalesOrderNumber As OrderNumber
,ISNULL(PurchaseOrderNumber,”) As PurchaseOrderNumber
,AccountNumber
,ISNULL(CarrierTrackingNumber,”) As CarrierTrackingNumber
,CASE OnlineOrderFlag
WHEN 0 THEN ‘No’
WHEN 1 THEN ‘Yes’
END As OrderedOnline
,0 As RecordExists
FROM [AdventureWorks2012].Sales.SalesOrderHeaderTest OrdHed
INNER JOIN [AdventureWorks2012].Sales.SalesOrderDetailTest OrdDet
ON Ordhed.SalesOrderID = Orddet.SalesOrderID
–Check if records exist
UPDATE SRC
SET RecordExists = 1
FROM #OrderData SRC
INNER JOIN POC.dbo.DimOrder TGT
ON TGT.SalesOrderID = SRC.SalesOrderID
AND TGT.LineNumber = SRC.LineNumber
–Insert new records
INSERT INTO DimOrder(SalesOrderID,LineNumber,OrderNumber,PurchaseOrderNumber,AccountNumber
,CarrierTrackingNumber,OrderedOnline,RecordValidFromDate,RecordExpiredDate
)
SELECT SalesOrderID
,LineNumber
,OrderNumber
Once in awhile you happen upon a really useful feature in SSRS that you were unaware of. For me strip lines are definitely one of these features that you don’t see that much mention of but which can add valuable insight to a report.
Below is a simple example of a scatter chart with a horizontal and vertical strip line each marking the average values of their axis.

In order to add strip lines to the report you need to do the following:
1. Select the chart axis to which you wish to add the strip line and go to the properties window. In this there is an option marked ‘StripLines’. When you click in the cell you can open up the Strip Line Collection editor.


2. Click the ‘Add’ button in the strip line editor (note: you can add multiple strip lines to each axis if required).
3. In the option marked ‘IntervalOffset’ specify the required value for the Strip Line, you can either specify a fixed value or use an expression from your Dataset. If you require the line to repeat over fixed values you can fill in the properties for ‘Interval’.

4. You then need to set the display properties for the strip lines under appearance in order for them to be visible. To produce the example strip lines in this post I have set the ‘BorderColour’ to black and the ‘BorderStyle’ to dashed.

5. If you wish to add text after the strip line on the graph – for example to illustrate that values after the strip line are above average as shown below then the settings are under the title section.


That’s it for now, hope that you’ve found this helpful ?
Introduction to Data Wrangler in Microsoft Fabric
What is Data Wrangler? A key selling point of Microsoft Fabric is the Data Science
Jul
Autogen Power BI Model in Tabular Editor
In the realm of business intelligence, Power BI has emerged as a powerful tool for
Jul
Microsoft Healthcare Accelerator for Fabric
Microsoft released the Healthcare Data Solutions in Microsoft Fabric in Q1 2024. It was introduced
Jul
Unlock the Power of Colour: Make Your Power BI Reports Pop
Colour is a powerful visual tool that can enhance the appeal and readability of your
Jul
Python vs. PySpark: Navigating Data Analytics in Databricks – Part 2
Part 2: Exploring Advanced Functionalities in Databricks Welcome back to our Databricks journey! In this
May
GPT-4 with Vision vs Custom Vision in Anomaly Detection
Businesses today are generating data at an unprecedented rate. Automated processing of data is essential
May
Exploring DALL·E Capabilities
What is DALL·E? DALL·E is text-to-image generation system developed by OpenAI using deep learning methodologies.
May
Using Copilot Studio to Develop a HR Policy Bot
The next addition to Microsoft’s generative AI and large language model tools is Microsoft Copilot
Apr