There are already a few good Gemini/PowerPivot blogs that provide an introduction into what it is and does so there is no need for repetition. What I haven’t seen are examples of how existing investments can be harnessed for Gemini/PowerPivot based self-service analytics.
This series of posts focuses on various ways of creating Custom Data Feeds that can be used by Gemini/PowerPivot natively – Providing a direct feed from otherwise closed systems opens up new channels of analytics to the end user.
Gemini/PowerPivot supports reading data from Atom-based data feeds, this post looks at a quick way of creating an Atom-based feed that can be consumed by Gemini/PowerPivot. By far the simplest way to develop an Atom-based data feed is to employ ADO.NET Data Services in conjunction with ADO.NET Entity Framework. With very few (in fact one and a bit!) lines of code, a data source can be exposed as a feed that Gemini/PowerPivot can read natively.
I am going to use the AdventureWorksDW sample hosted by a SQL Server 2008 R2 instance for this – obviously Gemini/PowerPivot natively reads SQL Server databases, so creating a custom feed over the top may seems a little pointless. However, this technique may be useful for quick wins in several scenarios, including:
– Preventing the need for users to connect directly to the underlying data source.
– Restricting access to various elements of the data source (tables/columns etc)
– Applying simple business logic to raw data.
ADO.NET Data Services are a form of Windows Communication Foundation (WCF) services, and therefore can be hosted in various environments. Here, I will simply host the ADO.NET Data Service inside an ASP.NET site.
To create a Native Gemini/PowerPivot feed, you take seven steps:
1 – Create ASP.NET Web Application
2 – Create Entity Data Model
3 – Create the Schema
4 – Create the Data Service
5 – Load From Data Feed
6 – Create Relationships
7 – Test
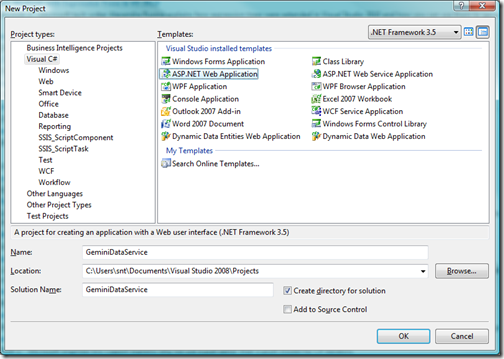
Step 1) Create ASP.NET Web Application
I’m using Visual Studio 2008 here to create an ASP.NET Web Application.

Step 2) Create Entity Data Model
Add an ADO.NET Entity Data Model item to the project, these files have a .edmx extension and allow us to create a schema that maps to the underlying database objects.

Step 3) Create the Schema
We simply require a 1:1 mapping so will ‘Generate from Database‘. Incidentally, the ‘Empty Model’ option allows you to build a conceptual model of the database resulting in custom classes that can be optionally mapped to the database objects later.

Create a Microsoft SQL Server connection to AdventureWorksDW2008.

Select the appropriate database objects, I’ve selected the following tables:
– DimCurrency
– DimCustomer
– DimDate
– DimProduct
– DimPromotion
– DimSalesTerritory
– FactInternetSales

Once the wizard has completed, a new .edmx and associated cs file is created that respectively contain an Entity Relationship Diagram and a set of Auto Generated Classes that represent the database objects.
Due to the way the Entity Framework handles Foreign Key Constraints we have to apply a workaround to ensure the Foreign Keys on the FactInternetSales table are exposed and brought into Gemini/PowerPivot. A previous post Exposing Foreign Keys as Properties through ADO.NET Entity Framework walks through the workaround.

![]()
Step 4) Create the Data Service
Add an ADO.NET Data Service item to the project.

The service class inherits from a generic version of the System.Data.Services.DataService object, so we need to inform the compiler what class to base the generic object on. We essentially want to base our Data Service on the class representing our newly created Entity Data Model. The class name is derived from the database name, unless changed when the Entity Data Model was created, so in our case the class name is AdventureWorksDW2008Entities.
The auto generated service class contains a ‘TODO’ comment that asks you to ‘put your data source class name here’. The comment needs replacing with AdventureWorksDW2008Entities.
The final step is to expose the resources in the Entity Data Model. For security reasons, a data service does not expose any resources by default. Resources need to be explicitly enabled.
To allow read only access to the resources in the Entity Data Model the InitializeService method needs updating with a single line of code. The code snippet below details the final class implementation, notice the AdventureWorksDW2008Entities reference at line 1 and the the explicit resource enablement at line 6.
- public class GeminiDataService : DataService<AdventureWorksDW2008Entities>
- {
- // This method is called only once to initialize service-wide policies.
- public static void InitializeService(IDataServiceConfiguration config)
- {
- config.SetEntitySetAccessRule(“*”, EntitySetRights.AllRead);
- }
- }
That’s all that’s needed, by default, ADO.NET Data Services conform to the Atom standard, so in theory the Service is ready to be consumed by Gemini/PowerPivot.
Before we try, it’s worth giving the service a quick test, building and running the solution (F5) launches Internet Explorer navigating to the Service hosted by the ASP.NET Development Server.

You are first presented with an XML document containing elements that represent database objects, you can further drill into the objects by amending the URL. For example, if you want to see the contents of the DimPromotion table then append DimPromotion to the end of the URL: http://localhost:56867/GeminiDataService.svc/DimPromotion (Case sensitive)
Note: You may need to turn off Feed Reader View in Internet Explorer to see the raw XML (Tools->Internet Options–>Content->Settings–>Turn On Feed Reader View – make sure this is unchecked)

As a slight aside, the URL can be further enhanced to, filter, top n rows, extract certain properties etc etc. Here are a couple of examples:
| URL | Effect |
| http://localhost:56867/GeminiDataService.svc/DimCustomer?$top=5 | Return the top 5 Customers |
| http://localhost:56867/GeminiDataService.svc/DimCustomer(11002) | Return Customer with id 11002 |
| http://localhost:56867/GeminiDataService.svc/DimCustomer(11002)/FirstName | Return the First Name of Customer 11002 |
| http://localhost:56867/GeminiDataService.svc/DimProduct(310)?$exapnd=FactInternetSales | Returns Product with id 310 and all related Internet Sales Records |
Confident that the feed is working, we can now deploy the service, and start using the feed in Gemini/PowerPivot.
Step 5) Load From Data Feed
Open up Excel 2010, launch the Gemini/PowerPivot Client (by selecting ‘Load & Prepare Data’)

Select ‘From Data Feed’ from the ‘Get External Data’ section of the Gemini/PowerPivot Home Ribbon to launch the Table Import Wizard.

Specify the Url from the ADO.NET Data Services feed created earlier, in my case: http://localhost:56867/GeminiDataService.svc as the ‘Data Feed Url’ and click Next.
Incidentally, you can use the majority of the enhanced Urls to, for example only select the DimProduct table should you so wish, however by specifying the root Url for the service you have access to all objects exposed by the service.

From the Table Import Wizard Select the required tables, in my case I’ll select them all. (You can optionally rename and filter the feed objects here too).
Following the summary screen, the Gemini/PowerPivot Client then gets to work importing the data from the ADO.NET Data Service:

Once completed, Gemini/PowerPivot displays all the data from all of the feed objects as if it came directly from the underlying database.

Step 6) Create Relationships
There is one final step before we can test our model using an Excel Pivot Table. We need to create the relationships between the tables we have imported. The Gemini/PowerPivot Client provides a simple, if a little onerous way of creating relationships, the ‘Create Relationship’ action on the Relationships section of the Home Ribbon launches the Create Relationship wizard:

Each table needs relating back to the primary Fact table which results in the following relationships:

Step 7) Test
We are now ready to start our analysis, selecting PivotTable from the View section of the Gemini/PowerPivot Client Home ribbon creates a pivot table in the underlying Excel workbook attached to your custom fed Gemini/PowerPivot data model.


So, to allow fast access to, for example, potentially sensitive data, through Gemini/PowerPivot you can quickly build a custom data feed that can be consumed natively by the Gemini/PowerPivot Client data feed functionality.
Introduction to Data Wrangler in Microsoft Fabric
What is Data Wrangler? A key selling point of Microsoft Fabric is the Data Science
Jul
Autogen Power BI Model in Tabular Editor
In the realm of business intelligence, Power BI has emerged as a powerful tool for
Jul
Microsoft Healthcare Accelerator for Fabric
Microsoft released the Healthcare Data Solutions in Microsoft Fabric in Q1 2024. It was introduced
Jul
Unlock the Power of Colour: Make Your Power BI Reports Pop
Colour is a powerful visual tool that can enhance the appeal and readability of your
Jul
Python vs. PySpark: Navigating Data Analytics in Databricks – Part 2
Part 2: Exploring Advanced Functionalities in Databricks Welcome back to our Databricks journey! In this
May
GPT-4 with Vision vs Custom Vision in Anomaly Detection
Businesses today are generating data at an unprecedented rate. Automated processing of data is essential
May
Exploring DALL·E Capabilities
What is DALL·E? DALL·E is text-to-image generation system developed by OpenAI using deep learning methodologies.
May
Using Copilot Studio to Develop a HR Policy Bot
The next addition to Microsoft’s generative AI and large language model tools is Microsoft Copilot
Apr