This blog series will give you a quick run through of Azure Machine Learning and by the end of it will have you publishing an analytical model which can be consumed by various external programs. This particular blog will focus on just preparing the file before we will look at training the model in the next blog.
Source file
The source file we will be using can be found at archive.ics.uci.edu/ml/machine-learning-databases/autos/imports-85.data. The column names are fairly self-explanatory but if you would like a little bit more information please visit archive.ics.uci.edu/ml/machine-learning-databases/autos/imports-85.names. Make sure you download the file to somewhere you can easily access later.
Please open up the file and convert all column headers with a hyphen to camel case, so for example ‘normalized-losses’ to ‘normalizedLosses’ and save it.
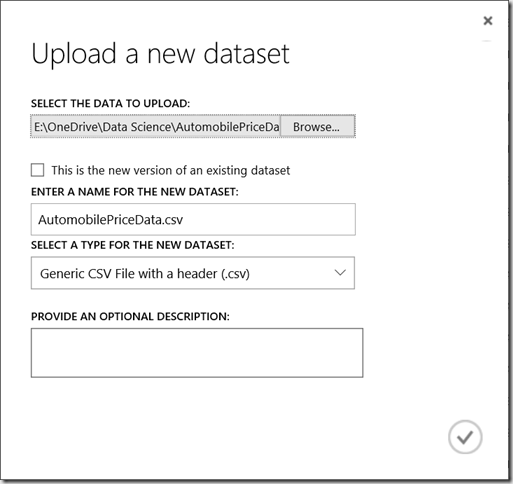
Once you are logged into Microsoft Azure Machine Learning Studio you must add a data set. To do so go Datasets > New > From Local File. Click Browse and navigate to the source file you downloaded earlier and select it. The rest of the fields should populate automatically and display similar values to the image below, when you are happy click the tick to add the dataset.

Creating the experiment
Next, navigate to New > Experiment > Blank Experiment. You will be presented with a blank canvas, rename it by overwriting ‘Experiment Created on’ todays date to ‘Automobile Price Regression’. You should be looking at a screen similar to below:

Learning your way around
The far left blue strip allows you to carry out navigation within Azure Machine Learning Studio. It gives you access to Projects, Experiments, Web Services, Notebooks, Datasets, Trained Models and Settings. Projects and Notebooks are in preview so we won’t discuss these in this blog. Experiments is a list all the experiments you have created. Web Services is a list of all the experiments you have published, more information on this will be provided later. Trained Models are the complete predictive models that have been trained already, again, more information will be provided later. Finally, Settings is fairly self-explanatory and allows you to view information such as various IDs, tokens, users and information about your work space.
The white toolbox to the right of the navigation pane is the experiment item toolbox. This contains all the datasets and modules needed to create a predictive analytics model. The toolbox is searchable and the items can be dragged onto the canvas.
The canvas describes the experiment and shows all the datasets and modules used. The datasets and modules can be moved freely and lines are drawn between input and output ports to enforce the ordering.
The properties pane allows you to modify certain properties of a dataset or module by clicking on the item and modifying the chosen property in the pane.
Cleaning the source file
First up expand Saved Datasets > My Datasets within the experiment item toolbox and drag on your newly created dataset onto the canvas.
Next, expand Data Transformation > Manipulation and drag on Clean Missing Data. Connect the tasks by dragging the output port of the dataset to the input port of the Clean Missing Data task. Make sure the properties mirror the screenshot below. This will replace all missing values with the value ‘0‘. The below image is what you should see when Clean Missing Data is selected:

Then drag on the Project Columns task onto the canvas. Drag the leftmost output port from the Clean Missing Data task to the input port of the Project Columns task. Select the Launch column selector and select All Columns under Begin With and make sure Exclude and column names are selected and add the columns bore and stroke. This will remove the selected columns because they are not relevant when predicting the price, and therefore will have an adverse effect on the accuracy of the prediction. When you are happy it should look something like the screen below. Click the tick to confirm.

The boring bit is now out of the way! In the next blog we will start the real machine learning by splitting the data into training and testing sets and then producing a model.
Introduction to Data Wrangler in Microsoft Fabric
What is Data Wrangler? A key selling point of Microsoft Fabric is the Data Science
Jul
Autogen Power BI Model in Tabular Editor
In the realm of business intelligence, Power BI has emerged as a powerful tool for
Jul
Microsoft Healthcare Accelerator for Fabric
Microsoft released the Healthcare Data Solutions in Microsoft Fabric in Q1 2024. It was introduced
Jul
Unlock the Power of Colour: Make Your Power BI Reports Pop
Colour is a powerful visual tool that can enhance the appeal and readability of your
Jul
Python vs. PySpark: Navigating Data Analytics in Databricks – Part 2
Part 2: Exploring Advanced Functionalities in Databricks Welcome back to our Databricks journey! In this
May
GPT-4 with Vision vs Custom Vision in Anomaly Detection
Businesses today are generating data at an unprecedented rate. Automated processing of data is essential
May
Exploring DALL·E Capabilities
What is DALL·E? DALL·E is text-to-image generation system developed by OpenAI using deep learning methodologies.
May
Using Copilot Studio to Develop a HR Policy Bot
The next addition to Microsoft’s generative AI and large language model tools is Microsoft Copilot
Apr