This is the final part of a 3 blog series detailing some of the basics regarding SQL Server backups to Azure Blob storage. This blog shows how backups (and management of) to Azure Storage can be part of your ETL process using SSIS.
The SSIS backup database task has gained the dialog that allows you to back up a database to a URL. This is simply leveraging the same backup to URL functionality present in SSMS. This way you can implement your backups as part of your ETL process, perhaps running at the end of a load.
The guide below is for a Full Backup of a single database. It also contains a PowerShell script that will clean up old backup files to stop the container getting too full. It does this using the last modified date property of the blobs and a provided threshold value. The database being backed up in this example is a very small database used for testing out programming concepts such as test driven development.
Create a SQL Server Credential
You need to add a credential into SQL Server for access to Azure Storage. Use SQL Server Management Studio to do this with the follow code, substituting your details.
CREATE CREDENTIAL [https://adatissqlbackupstorage.blob.core.windows.net]
WITH IDENTITY = ”,
SECRET = ”
The backup task will need this credential in order to create the backup. You could be more specific and try setting up tighter access to a single container user a SAS (Shared Access Signature) but in this I’m keeping it simple and just using the storage account.
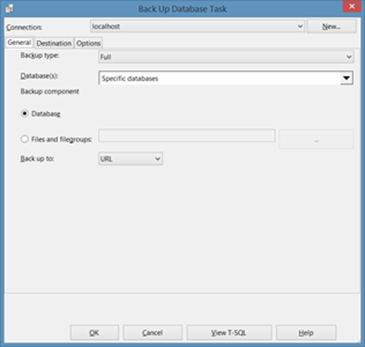
When you open up the backup database task, in the ‘Back up to’ dropdown, select ‘URL’. Also choose which database(s) you want to backup up.
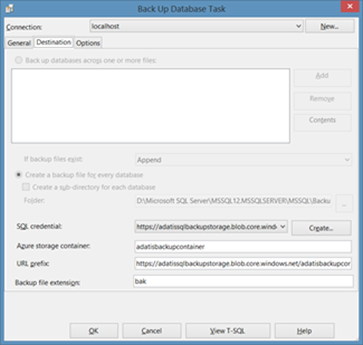
In the destination window select the credential that you created and then enter the name of the storage container you are backing up into. The URL prefix should be in the form of:
https://.blob.core.windows.net/
PowerShell maintenance script
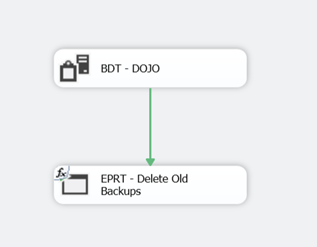
Because there is no way of maintaining backups stored in the cloud via SSIS natively, we have to create some scripts that run using PowerShell to clean up backups that have reached a certain age.
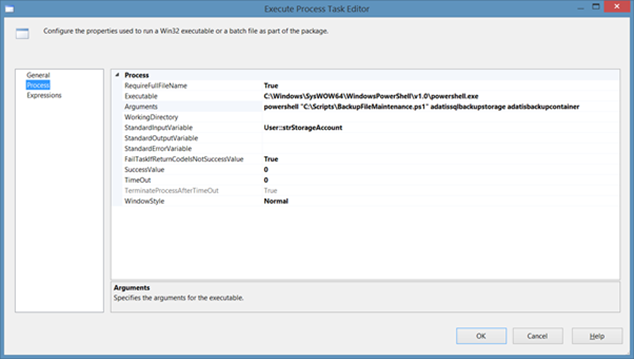
This is the editor for the execute process task. Here you want to edit the following properties:
Executable – This is the property where you set the path to the executable, i.e. Azure PowerShell.
Arguments – This is the property where you set the path to your script and also provide any variables.
Standard Input Variable -This is where you can input the actual variables.
In my example I have tried to “variablize” as much as possible:
The script below accepts two parameters:
- AzureStorageAccountName – Name of the storage account
- AzureContainerName – Name of the Container that the backup blobs reside in
In order to simplify the process of signing into an azure subscription you can create something called an Azure Publish Settings File using the following command in PowerShell:
Get-AzurePublishSettingsFile
You may find that you are having problems with your scripts trying to use different subscriptions if you have imported more than one of these files. The easy solution is to just delete all the files in the folder C:UsersAppDataRoamingWindows Azure Powershell. Once this is done you can re-run the above statement to get the file for the Azure subscription you want.
The example has a time of only 24 hours which I used mainly for testing. You will probably want to set this to longer than that, perhaps a week or a month or whatever period of time you want to retain your backups for.
Save your script with the extension ‘.ps1’. This extension is primarily associated with PowerShell.
There you have it. A very basic script that will allow you to stop you hoarding too many backup file blobs.


![clip_image002[5] clip_image002[5]](https://adatis.co.uk/wp-content/uploads/historic/danevans_clip_image0025_thumb_5A71AE7A.png)
Introduction to Data Wrangler in Microsoft Fabric
What is Data Wrangler? A key selling point of Microsoft Fabric is the Data Science
Jul
Autogen Power BI Model in Tabular Editor
In the realm of business intelligence, Power BI has emerged as a powerful tool for
Jul
Microsoft Healthcare Accelerator for Fabric
Microsoft released the Healthcare Data Solutions in Microsoft Fabric in Q1 2024. It was introduced
Jul
Unlock the Power of Colour: Make Your Power BI Reports Pop
Colour is a powerful visual tool that can enhance the appeal and readability of your
Jul
Python vs. PySpark: Navigating Data Analytics in Databricks – Part 2
Part 2: Exploring Advanced Functionalities in Databricks Welcome back to our Databricks journey! In this
May
GPT-4 with Vision vs Custom Vision in Anomaly Detection
Businesses today are generating data at an unprecedented rate. Automated processing of data is essential
May
Exploring DALL·E Capabilities
What is DALL·E? DALL·E is text-to-image generation system developed by OpenAI using deep learning methodologies.
May
Using Copilot Studio to Develop a HR Policy Bot
The next addition to Microsoft’s generative AI and large language model tools is Microsoft Copilot
Apr