Azure Notebooks is a Microsoft Azure Platform as a Service (PaaS) offering of Jupyter Notebooks, here I’d like to introduce you to the Azure version and some of its benefits over the traditional version.
A brief overview of Jupyter Notebooks
By downloading and installing you’re able to create documents with a mixture of markdown text, code, and visualizations from within your web browser. This isn’t just any document though – it allows for code modification, execution, and live visualization generation.
It’s a fantastic tool for documentation, training, learning, and interactive report generation and exploration.
For more information on Jupyter, check out Nigel Meakins’ Introduction to Jupyter Notebooks post.
Benefits of Azure Notebooks
No installation, no maintenance
As with any PaaS solution, Azure Notebooks makes it far quicker and easier to get up and running, as there’s no download or installation required. Microsoft handles all the maintenance for you too!
Easier sharing
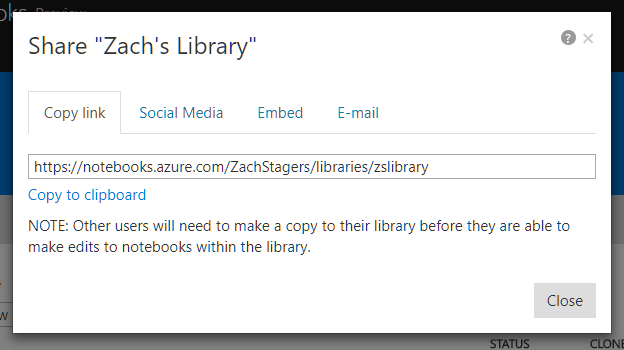
Just click your library, and hit Share to be presented with a popup of sharing options:
At the moment, you can share via a direct URL, social media (options being Twitter, Facebook, and Google+), embed code, and emailing directly from the pop-up.
Other Features of Azure Notebooks
Slides
This is an excellent tool for presenting your work from directly within your notebook – meaning you can modify and execute code from your slideshow. This allows you to better adapt your presentation to your audience, helping explain or answer questions with additional examples and not having to swap to another application.
To set up your presentation, open your Notebook, from the View menu, go to Cell Toolbar, and select Slideshow.
This gives you the Slide Type option on each Cell of your notebook. Once you’ve configured each of your cells, you can select Enter/Exit RISE Slideshow to enter presentation mode and see how it looks.
Notebook Cloning
Companies and universities are turning their books and other content in to Azure Notebooks, making it publicly available for all to clone to their own libraries to play around with and learn.
Here are a few to get you started:
https://notebooks.azure.com/Microsoft/libraries
https://notebooks.azure.com/jakevdp/libraries/PythonDataScienceHandbook
It’s also smart to clone your own notebook if you plan on tinkering around and don’t quite know where you’ll end up, essentially backing up and preserving an original copy.
Public and private notebooks
Not ready to share your work? Keep your notebook private until you are.
If you’ve already shared your notebook, but later want to lock it down to make changes, go in to the settings of your library and make it private again. It couldn’t be simpler.
Limitations
This product is still in preview, and I’ve no doubt will be growing in capability, but at time of writing, the following limitations are in place:
- Jupyter supports over 40 languages, at time of writing Azure Notebooks supports three: Python (2 and 3), R, and F#.
- 4GB memory usage limit.
- The service restrictions documentation mention Microsoft reserving the right to remove your data after 60 days of inactivity.
- I’ve read elsewhere online that there’s a 1GB storage limit – but I haven’t been able to find this detailed in Microsoft documentation.
Get Started
To start producing your own notebook, head to https://notebooks.azure.com, sign in with a Microsoft account, and create a library.
Add a notebook file to your library by pressing “New”, select the type of Notebook you’d like to create (Python/R/F#), give it a name and press New again to create it. The same New button can be used to add files, such as CSV’s you can reference in your notebook, to your library, either from your own computer, or from the web.
Click on your notebook file to start editing, and once in the editor, I’d recommend taking the self-paced user interface tour available from the Help menu if you haven’t worked with Jupyter before.


Introduction to Data Wrangler in Microsoft Fabric
What is Data Wrangler? A key selling point of Microsoft Fabric is the Data Science
Jul
Autogen Power BI Model in Tabular Editor
In the realm of business intelligence, Power BI has emerged as a powerful tool for
Jul
Microsoft Healthcare Accelerator for Fabric
Microsoft released the Healthcare Data Solutions in Microsoft Fabric in Q1 2024. It was introduced
Jul
Unlock the Power of Colour: Make Your Power BI Reports Pop
Colour is a powerful visual tool that can enhance the appeal and readability of your
Jul
Python vs. PySpark: Navigating Data Analytics in Databricks – Part 2
Part 2: Exploring Advanced Functionalities in Databricks Welcome back to our Databricks journey! In this
May
GPT-4 with Vision vs Custom Vision in Anomaly Detection
Businesses today are generating data at an unprecedented rate. Automated processing of data is essential
May
Exploring DALL·E Capabilities
What is DALL·E? DALL·E is text-to-image generation system developed by OpenAI using deep learning methodologies.
May
Using Copilot Studio to Develop a HR Policy Bot
The next addition to Microsoft’s generative AI and large language model tools is Microsoft Copilot
Apr