
Recently I needed to create an Azure Function app that would connect to an API and send data to an Event Hub as part of a real-time data streaming solution.
Azure functions are the perfect connectivity option for a task like this, allowing you to focus on the trigger and the resulting output message you want to capture in the event stream, while Azure handles the maintenance of the cloud infrastructure and hosting to run it.
Azure functions can be written in multiple languages. I needed to write mine in python, meaning that I had to set up a configuration file to connect to the Event Hub (as I will explain in further detail below).
Configuring this file with other services on the platform, while simple, can often take a fair amount of reading though.
As such, I’ve written this short blog to give you a helping hand and speed up your process.
Note:
The following guide should still be applicable to other scripting languages such as JavaScript. However, If you are working with PowerShell or compiled languages such as C# and Java you may like to read the Microsoft documentation here.
I’ll be running a demo Azure Function in Visual Studio Code so if you wish to follow along, here are some prerequisites:
- The Azure Functions extension installed in VS Code
- An Event Hub Namespace and Instance provisioned on your Azure account
When debugging locally:
- An installation of the Azure Functions Core Tools – here for download
- The Azure Storage Emulator (downloaded from the Azure Functions Core Tools) running in the background.
The Configuration File
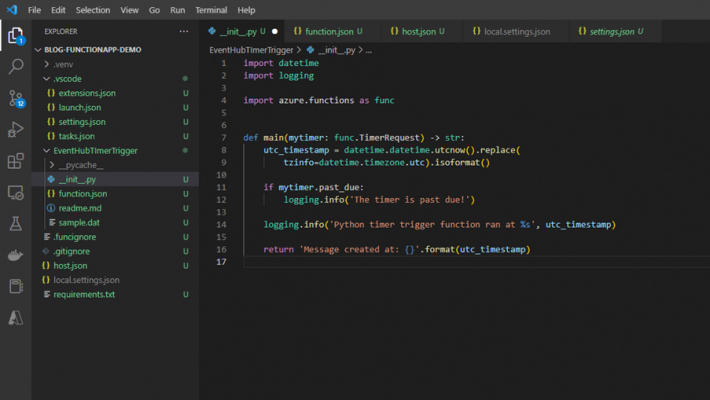
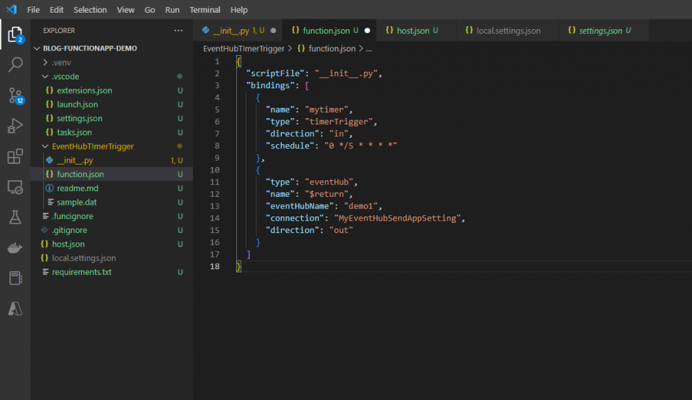
Here is the default, autogenerated, Visual Studio Code _init_.py script for an Azure Function timer trigger. It is currently scheduled to trigger the function every 5 mins, as you can see from the ‘schedule’ variable within the binding in the configuration file (function.json) below:
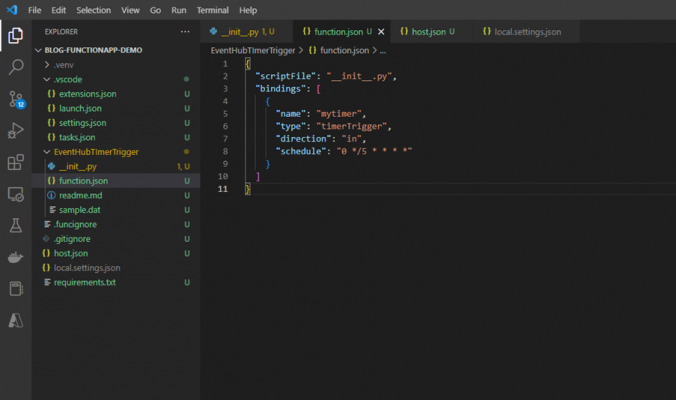
The function.json file defines the function’s trigger, bindings, and other configuration settings.
Every function only has one trigger which needs to be defined in the config file. Then Azure’s integration runtime, from your Azure Data Lake Storage account, uses this config file to determine the events to monitor and how to pass data into and return data from a function execution.
For compiled languages such as C#, this config file is generated automatically from annotations in your code but for scripting languages such as Python, you need to provide the config file yourself. As such, to send messages to an event hub, the function.json file needs to be modified first.
Output Bindings
The Azure Functions VS Code extension supports trigger and output bindings for Event Hubs which are used to write events to an event stream – as per the Microsoft documentation, the binding looks something like this:
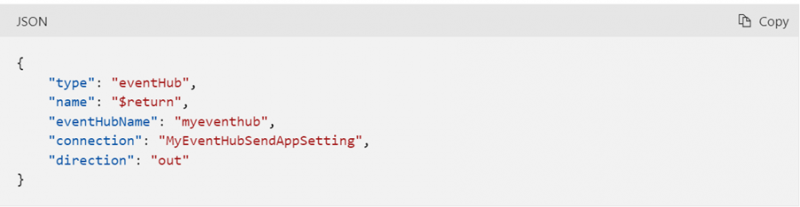
The “type” function property specifies the type of binding. In this case we want to create an output binding to an event stream, so we set the “type” property to “eventHub” and the “direction” property to “out”.
In the “name” property, you need to point to the variable used in the __init__.py function script that represents the message you want to send to your event hub. In this case this is set to the return statement, but it can be set to the name of a string object in your code.
In the “eventHubName” property, you need to specify the name of the event hub instance you want to send messages to.
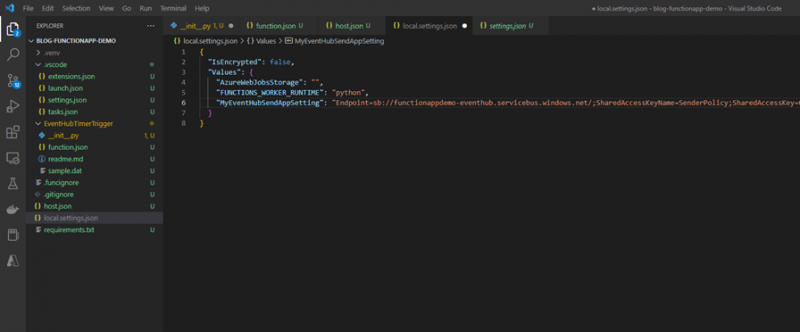
Finally, under “connection” you need to place a string object, in this case called “MyEventHubSendAppSetting”, which is defined by the primary connection string to the Namespace, not the event hub instance itself.
This connection string should be stored in the local.settings.json file, or the settings.json file, depending on whether you are working locally, via the Azure storage emulator found in the Azure Functions Core Tools SDK, or via the azure app service, connected to a live Azure Storage Account.
Event Hub Shared Access Policy
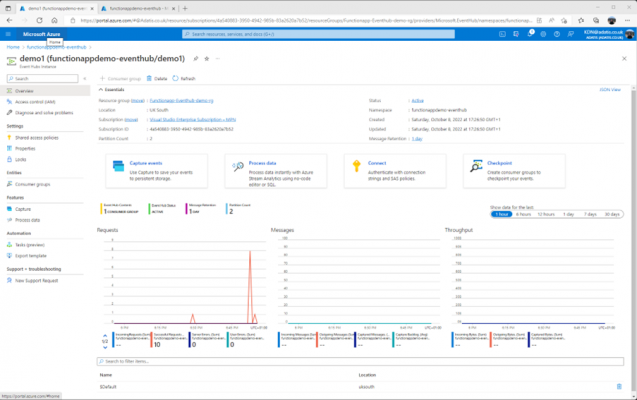
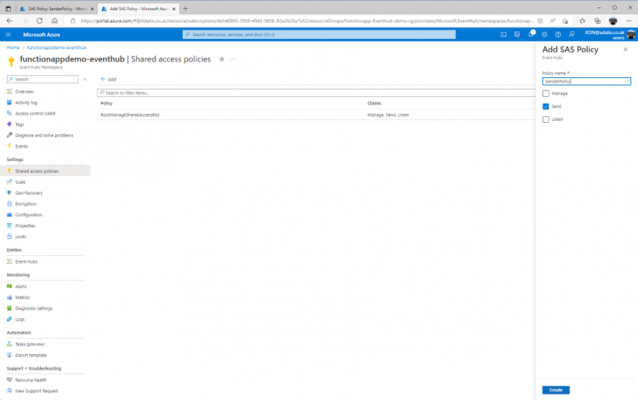
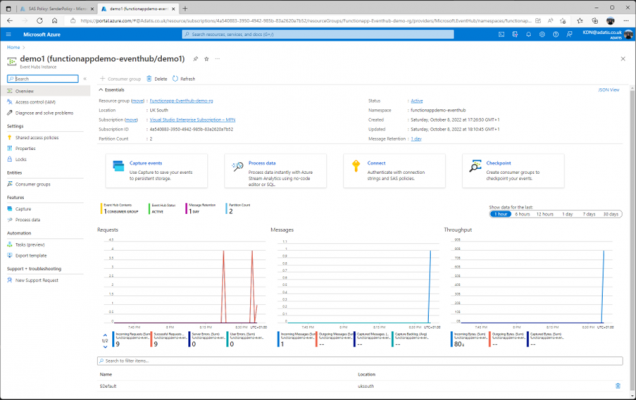
Before you can write events to the event stream, you need to ensure you have Send permissions in the Event Hubs namespace (not the event hubs instance). Here’s an Event Hubs Instance called demo1 which sits under a namespace called functionappdemo-eventhub.
To ensure you have ‘send’ permissions, enter the Shared Access Policy settings and add a new access policy with ‘send’ permissions – while there should already be a default shared access policy, this includes manage and listen permissions which are unnecessary for a function app only writing out to an event stream. Once the new SAS policy has been created, copy the Primary Key Connection string for the connection output binding.
With the policy created, we now have all the details we need to complete the output bindings.
The easiest way to include the Event Hubs binding to the function.json file is to nest it within the “bindings” property’s value list:
Alternatively, you can right-click the function.json file in the explorer, select ‘add binding…’ and follow the guided prompts to fill-out the binding for you. As you can see, this process can be replicated for trigger and output bindings of your choosing – not just for timer triggers or Event Hub outputs.
Since I’m running the function app locally here, I’ve placed the connection string in local.settings.json
Now with the configuration files complete, I’ve debugged the script – you can now see a message has been sent to the Event Hubs Instance.
Summary
In this blog I covered the following:
- Setting up the Azure Function configuration file
- Understanding output bindings
- Shared Access Settings and assigning Event Hub parameters to the output bindings
Feel free to leave any questions or comments and reach out to me on LinkedIn.
Introduction to Data Wrangler in Microsoft Fabric
What is Data Wrangler? A key selling point of Microsoft Fabric is the Data Science
Jul
Autogen Power BI Model in Tabular Editor
In the realm of business intelligence, Power BI has emerged as a powerful tool for
Jul
Microsoft Healthcare Accelerator for Fabric
Microsoft released the Healthcare Data Solutions in Microsoft Fabric in Q1 2024. It was introduced
Jul
Unlock the Power of Colour: Make Your Power BI Reports Pop
Colour is a powerful visual tool that can enhance the appeal and readability of your
Jul
Python vs. PySpark: Navigating Data Analytics in Databricks – Part 2
Part 2: Exploring Advanced Functionalities in Databricks Welcome back to our Databricks journey! In this
May
GPT-4 with Vision vs Custom Vision in Anomaly Detection
Businesses today are generating data at an unprecedented rate. Automated processing of data is essential
May
Exploring DALL·E Capabilities
What is DALL·E? DALL·E is text-to-image generation system developed by OpenAI using deep learning methodologies.
May
Using Copilot Studio to Develop a HR Policy Bot
The next addition to Microsoft’s generative AI and large language model tools is Microsoft Copilot
Apr