A few people have asked me about this recently, so I thought I’d share my approach.
Creating demo environments, particularly for the MS BI Stack, can be time consuming and a challenge, particularly when you need to take the demo with you and can’t rely on powerful, internal servers and good client internet connectivity.
A bit of history
Initially we used to have a dedicated, decently specced, Demo laptop that would be installed with all the goodies that we would need to demo. This worked until the demo needed to be in two places at once, or you needed to carry around your day-to-day laptop too.
The solution was to use the demo environment as our day to day workstation but it was massive overkill to have full blown Windows Server running SharePoint with multiple instances of SQL Server etc. and, unless you had a high spec machine, everything was a little laggy.
The next approach was to carry around a couple of laptop hard disks that you’d swap in and out depending on whether you were demoing or working. This worked well for a good while but did prevent timely demos (no screwdriver, no demo).
Then we entertained VirtualBox and Hyper-V and other virtualisation tech to run Virtual environments – this was all well and good but the primary downfall of this approach is the fact you need a really high spec machine to run both the host and the virtual environment or performance is going to be a major issue and for demos, you want performance to be good, as good as possible.
Then we discovered Boot to VHD. I’m not sure when this was first possible and I definitely believe we were late to the game but we’ve been using it for around 12 months, long enough to prove it to be a solid approach to creating and running [not only] demo environments.
Boot to VHD
The concept is easy, and “does what it says on the tin”. You create, or acquire a VHD and configure your laptop to Boot directly to the VHD.
Advantages
1) The VHD can use all the host resources. Under traditional virtualisation approaches you need to split memory and/or processors which impacts performance. So on an 8GB, 2 proc laptop traditionally you would have 4GB, 1 proc for the host and 4GB, 1 proc for the virtual environment. With Boot to VHD the virtual environment can utilise the full 8GB and both processors.
2) It’s flexible. I have a chunky external HHD containing several different virtual environments for different purposes. I can backup, swap out, replace and roll-back environments in the time it takes to copy a VHD from local to external or vice-versa. You can even share demo environments with you colleagues.
3) You always have a demo environment to hand. All it takes is a reboot to load up the appropriate environment for those spontaneous demo opportunities.
Disadvantages
1) You do need to be careful regarding disk space usage and be very disciplined to ensure you always have enough disk space available. If you are running a number of large environments there will be an element of maintenance to ensure everything always fits.
2) Without resorting to a hybrid approach, you can’t demo a distributed system working together.
Setup
So to make use of Boot to VHD, we’ll assume we already have a VHD available and ready for booting to. These can either be created manually, acquired from your internal infrastructure team, or from other third-parties.
When creating them manually I ALWAYS create “Dynamically Expanding” virtual hard disks. This way, you can actually store more VHD environments on your laptop than you would otherwise.
Although dynamically expanding disks allow you to store more environments, you will still need to ensure you have enough disk space for the disk to expand into as this will be required at the time of boot up. So, if your VHD is set to a 100GB dynamically expanding disk, (it might only be a 20GB file), but when it’s booted up, it will expand to 100GB, so you will need that space on your hard disk or the boot up will fail.
1) Copy the VHD to your laptop to a suitable location e.g. C:VHD
2) Create a new Boot entry
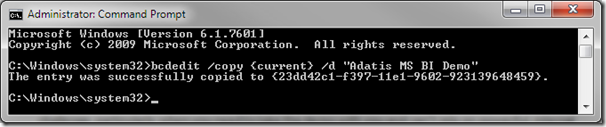
Run the following at a command prompt as an Administrator:
bcdedit /copy {current} /d “My New VHD Option“
Be sure to update the label to something to help you identify the VHD – this label will appear on the boot menu when you reboot.

Note the new GUID that has been created.
3) Using the GUID created for you in the previous step and the location of the VHD, run the following three commands, one after the other
bcdedit /set {23dd42c1-f397-11e1-9602-923139648459} device vhd=[C:]VHDAdatisBI.vhd
bcdedit /set {23dd42c1-f397-11e1-9602-923139648459} osdevice vhd=[C:]VHDAdatisBI.vhd
bcdedit /set {23dd42c1-f397-11e1-9602-923139648459} detecthal on
Note the square brackets around the drive letters, these are required. If you have spaces in your path, or filename, you’ll need to wrap the path, excluding the drive letter, in quotes.e.g.
..vhd=[C:]“VHD PathAdatisBI.vhd“

That’s all there is to it. Reboot and you should be presented with a new Boot option and away you go.
Troubleshooting
When it doesn’t work you generally get a BSOD on boot up. To date I’ve identified two reasons for this:
1) You don’t have enough disk space for the VHD to expand (The BSOD actually does inform you of this)
2) You may need to change the SATA Mode configuration in the BIOS. Depending on how and where the VHD was created you may need to change the setting to either ATA or AHCI. If that works, you’ll have to reverse the change to reboot into your physical installation.
I’ve yet to create a portable (i.e. sharable amongst colleagues) VHD for Windows 8. I have successfully created a Windows 8 VHD but it only currently works on the laptop it was created on, this is unlike any other VHD I have created in the past. If I work out a fix, I will update this post.
Additional Information
There are a couple of extra benefits that are worth pointing out.
1) Once you’ve booted to VHD, your original, physical OS installation drive is reallocated, normally to drive D (Your VHD will assume C drive). This allows you to share files between environments, or as I do, place my SkyDrive folder on an accessible location on the original, physical drive. This allows me to have SkyDrive installed on VHDs but only have a single copy of the contents on my HDD.
2) The reverse is true too. You can attach a VHD (from the physical install, or from within another VHD) using the Disk Management tool to access, move or copy files between environments. The disk is expanded at this point so you will need enough disk space to accommodate it.
3) If disk space is a premium, you can shrink the VHD using a tool such as VHD Resizer. It doesn’t resize the physical VHD file, but allows you to reduce the size of the virtual hard disk. It also allows you to convert from Fixed to Dynamic disks and vice-versa.
4) You can remove boot entries with the following (or you can use the System Configuration tool):
bcdedit /delete {GUID}
5) I have found this approach so reliable my day-to-day Windows 7 installation is a VHD. I have not noticed any impact to performance. The only thing that I have noticed is that you cannot determine a “Windows Experience Index” when running a VHD – but I can live with that ![]()
Introduction to Data Wrangler in Microsoft Fabric
What is Data Wrangler? A key selling point of Microsoft Fabric is the Data Science
Jul
Autogen Power BI Model in Tabular Editor
In the realm of business intelligence, Power BI has emerged as a powerful tool for
Jul
Microsoft Healthcare Accelerator for Fabric
Microsoft released the Healthcare Data Solutions in Microsoft Fabric in Q1 2024. It was introduced
Jul
Unlock the Power of Colour: Make Your Power BI Reports Pop
Colour is a powerful visual tool that can enhance the appeal and readability of your
Jul
Python vs. PySpark: Navigating Data Analytics in Databricks – Part 2
Part 2: Exploring Advanced Functionalities in Databricks Welcome back to our Databricks journey! In this
May
GPT-4 with Vision vs Custom Vision in Anomaly Detection
Businesses today are generating data at an unprecedented rate. Automated processing of data is essential
May
Exploring DALL·E Capabilities
What is DALL·E? DALL·E is text-to-image generation system developed by OpenAI using deep learning methodologies.
May
Using Copilot Studio to Develop a HR Policy Bot
The next addition to Microsoft’s generative AI and large language model tools is Microsoft Copilot
Apr