Introduction
This blog is not looking at one or two exciting technologies, but THREE! Namely Visual Studio, R and Azure Machine Learning. We will be looking at bringing them together in harmony using R Tools for Visual Studio (RTVS).
Installation
As this blog will be touching on a whole host of technologies, I won’t be going into much detail on how to set each one up. However instead I will provide you with a flurry of links which will provide you with all the information you need.
Here comes the flurry…!
· Visual Studio 2015 with Update 1 – I hope anyone reading this is familiar with Visual Studio, but to piece all these technologies together version 2015 with Update 1 is required, look no further than here: visualstudio.com/en-us/downloads/download-visual-studio-vs.aspx
· R – Not sure exactly what version is needed but just go ahead and get the latest version you can, which can be found here: https://cran.r-project.org/bin/windows/base/
· Azure Machine Learning – No installation required here, yay! But you will need to set up an account if you have not done so already, this can be done here studio.azureml.net/
· R Tools for Visual Studio – More commonly known as RTVS. The name is fairly self-explanatory but it allows you to run R through Visual Studio. If you have used R and Visual Studio separately before it will feel strangely familiar. Everything you need to download, install and set up can be found here: microsoft.github.io/RTVS-docs/
· Devtools Package – The final installation step is a simple one. Installing the correct R packages to allow you to interact with Azure ML. If you’ve used R to interact with Azure ML before you probably have already done this step, but for those who have not, all the information you will need to do so can be found here: github.com/RevolutionAnalytics/AzureML
Introduction to RTVS
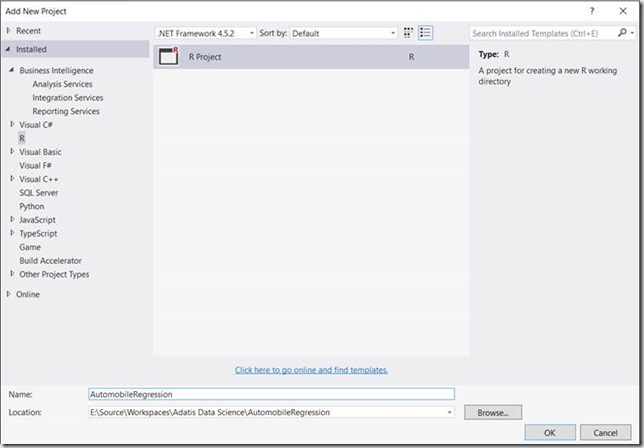
Once all the prerequisites have been installed it is time to move onto the fun stuff! Open up Visual Studio 2015 and add an R Project: File > Add > New Project and select R. You will be presented with the screen below, name the project AutomobileRegression and select OK.

Microsoft have done a fantastic job realising that the settings and toolbar required in R is very different to those required when using Visual Studio, so they have split them out and made it very easy to switch between the two. To switch to the settings designed for using R go to R Tools > Data Science Settings you’ll be presented with two pop ups select Yes on both to proceed. This will now allow you to use all those nifty shortcuts you have learnt to use in RStudio. Anytime you want to go back to the original settings you can do so by going to Tools > Import/Export Settings.
You should be now be looking at a screen similar to the one below:

This should look very recognisable to anyone familiar to R:

For those not familiar, the top left window is the R script, this will be where you do your work and what you will run.
Bottom left is the console, this allows you to type in commands and see the output, from here you will run your R scripts and test various functions.
Top right is your environment, this shows all your current objects and allows you to interact with them. You can also change to History, which displays a history of the commands used so far in the console.
Finally the bottom right is where Visual Studio differs from RStudio a bit. The familiar Solution Explorer is visible within Visual Studio and serves its usual function. Visual Studio does contain R Plot and R Help though, which both also feature in RStudio. R Plot will display plots of graphs when appropriate. R Help provides more information on the different functions available within R.
Look for my next blog, which will go into more detail on how to use RTVS.
Introduction to Data Wrangler in Microsoft Fabric
What is Data Wrangler? A key selling point of Microsoft Fabric is the Data Science
Jul
Autogen Power BI Model in Tabular Editor
In the realm of business intelligence, Power BI has emerged as a powerful tool for
Jul
Microsoft Healthcare Accelerator for Fabric
Microsoft released the Healthcare Data Solutions in Microsoft Fabric in Q1 2024. It was introduced
Jul
Unlock the Power of Colour: Make Your Power BI Reports Pop
Colour is a powerful visual tool that can enhance the appeal and readability of your
Jul
Python vs. PySpark: Navigating Data Analytics in Databricks – Part 2
Part 2: Exploring Advanced Functionalities in Databricks Welcome back to our Databricks journey! In this
May
GPT-4 with Vision vs Custom Vision in Anomaly Detection
Businesses today are generating data at an unprecedented rate. Automated processing of data is essential
May
Exploring DALL·E Capabilities
What is DALL·E? DALL·E is text-to-image generation system developed by OpenAI using deep learning methodologies.
May
Using Copilot Studio to Develop a HR Policy Bot
The next addition to Microsoft’s generative AI and large language model tools is Microsoft Copilot
Apr