One challenge I have faced recently is to automatically delete files which are over X days old. Below I have documented how I overcame this using a simple For Each Loop container in SSIS to loop through files which contained a date stamp in their file names.
What we need in SSIS
- A variable – used to handle the names of the files we are looping through to delete
- A file connection manager – used to connect to the file(s) we wish to delete
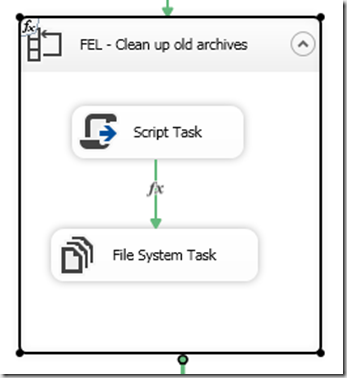
- A For each loop container – this will be used to loop through all the files in a directory
- A script task – this is a blank script task, that serves no purpose other than to allow us to set a precedence constraint on the file system task
- A file system – task to actually delete the relevant files
Firstly create a simple variable with an example file name to get you started
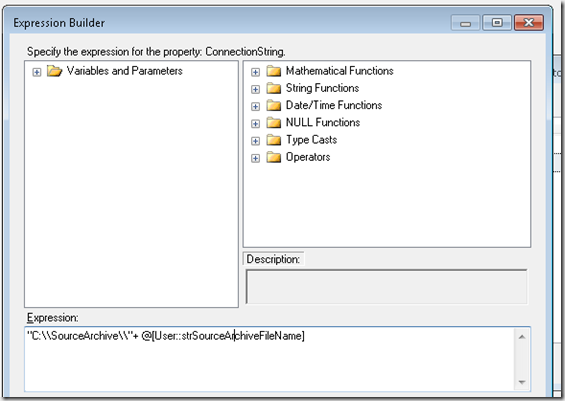
Once you have created a variable which contains an example file name, right click on your file connection, select properties and then click the ellipses next to the Expressions property. Next select “ConnectionString” from the property drop down menu and then in the expression builder add the folder path, plus your variable name, as shown in the screenshot below. If you wish, you can also add the folder path into your variable or, you could have a separate variable for your folder path.
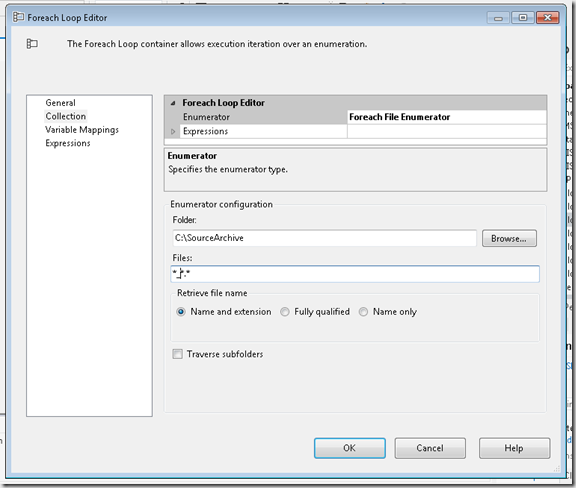
After creating your variable and setting up a connection to an example file you will need to go into your for each loop container, and specify the folder containing the files we wish to delete. I have also specified under files that I am looking for files containing a “_” and a “.” in the file name/extension. Under retrieve file name I have selected Name and extensions as my directory won’t change, so I do not need to bring back the fully qualified path.
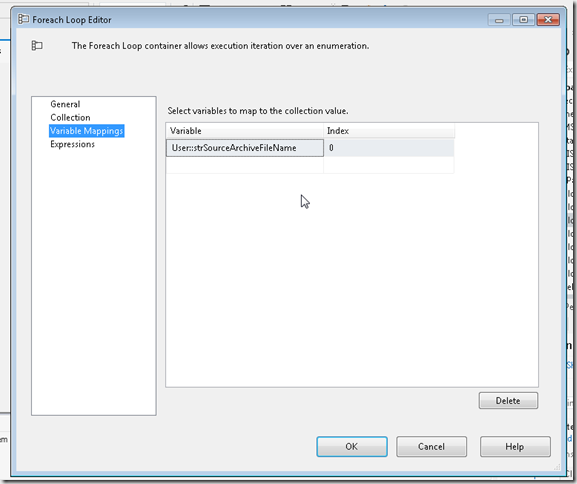
Still in the for each loop editor, click on Variable Mapping pane and select your variable created earlier.
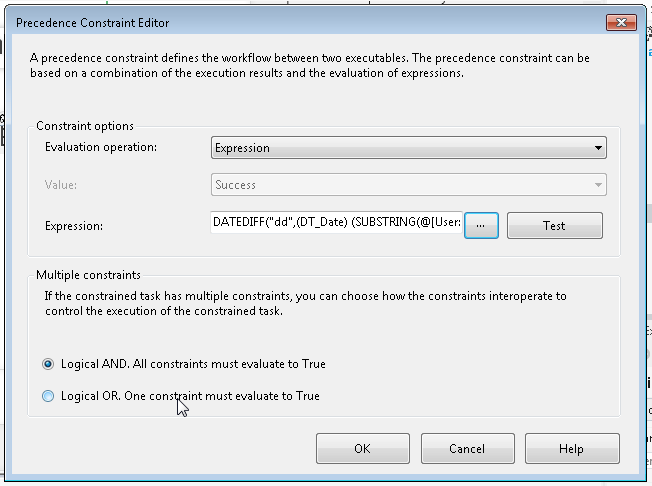
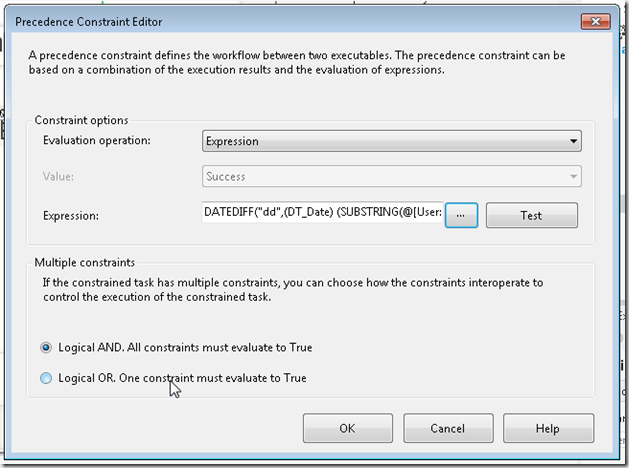
The next step is to double click the precedence constraint (arrow) between the blank script task, and the file system task. Next change the evaluation operation to expression, and insert the code below – tweaked to use your variable name, and adjusted for any differences to your date format. This script is currently working for files with a date suffix of _YYYYMMDD
The full code used:
DATEDIFF("dd",(DT_Date) (SUBSTRING(@[User::strSourceArchiveFileName],FINDSTRING(@[User::strSourceArchiveFileName] ,"_" ,1)+1,4) + "-" +SUBSTRING(@[User::strSourceArchiveFileName],FINDSTRING(@[User::strSourceArchiveFileName] ,"_" ,1)+5,2) + "-" +SUBSTRING(@[User::strSourceArchiveFileName],FINDSTRING(@[User::strSourceArchiveFileName] ,"_" ,1)+7,2)),GETDATE()) > 30
What the code is doing:
The code compares todays date against the date found in the file names eg: File1_20161030.txt and if the difference between todays date and the date in the file is greater than 30 then the expression returns true and the file is deleted in the next step. Otherwise the file is left alone.
The way it obtains the date is by using the findstring function to identify the underscore in my filenames.
A substring function is then used to identify the various elements of the date in the file name. Eg: Year can be found in the 1st character after the underscore and has a length of 4, month the 5th character after the underscore with a length of 2 and day the 7th character after the underscore with a length of 2.
This information is then concatenated together separating the various elements using a “-” and compared against todays date.
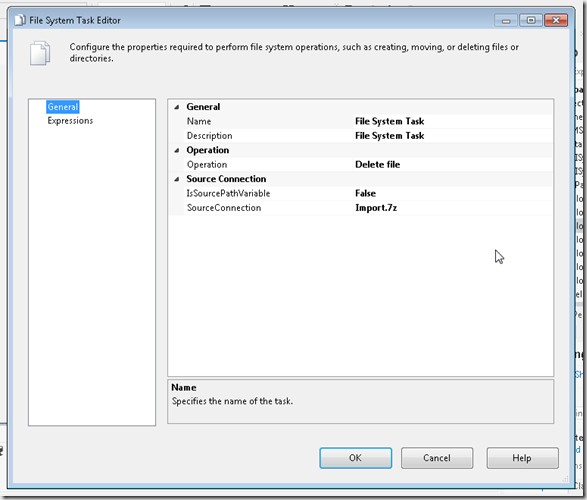
After setting up the precedence constraint, all that is left is to set up the File System task, setting the Source Connection to our file connection created earlier, and changing the operation to “Delete File”.
As mentioned previously, the solution does require you have a character such as an underscore to split the file name and the date stamp within the filename, and for your date stamps to be delivered in a consistent format, be that YYYYMMDD or any other format.
These final two screenshots are to show the before and after results of running the above tasks by executing the SSIS package.
Before:
After:




Introduction to Data Wrangler in Microsoft Fabric
What is Data Wrangler? A key selling point of Microsoft Fabric is the Data Science
Jul
Autogen Power BI Model in Tabular Editor
In the realm of business intelligence, Power BI has emerged as a powerful tool for
Jul
Microsoft Healthcare Accelerator for Fabric
Microsoft released the Healthcare Data Solutions in Microsoft Fabric in Q1 2024. It was introduced
Jul
Unlock the Power of Colour: Make Your Power BI Reports Pop
Colour is a powerful visual tool that can enhance the appeal and readability of your
Jul
Python vs. PySpark: Navigating Data Analytics in Databricks – Part 2
Part 2: Exploring Advanced Functionalities in Databricks Welcome back to our Databricks journey! In this
May
GPT-4 with Vision vs Custom Vision in Anomaly Detection
Businesses today are generating data at an unprecedented rate. Automated processing of data is essential
May
Exploring DALL·E Capabilities
What is DALL·E? DALL·E is text-to-image generation system developed by OpenAI using deep learning methodologies.
May
Using Copilot Studio to Develop a HR Policy Bot
The next addition to Microsoft’s generative AI and large language model tools is Microsoft Copilot
Apr