This is the first post in a series on Introduction To Spark.
For those wanting to learn Spark without the overhead of spinning up a cluster in the cloud or installing a multi-node cluster on-prem, you can get started relatively easy by creating a local mode installation on Windows. There are a number of posts available that outline steps to achieve this. Hopefully this one will provide you with all you need to get up and running.
Software Requirements
There are five main components you will require in order to successfully setup Spark with Jupyter notebooks. You can download the installers/archives from the following links:
I mention Anaconda because it is basically the easiest way to get your hands on all you need for the Jupyter and Python side of working with Spark. It also makes managing Python environments straight forward and comes with a whole bunch of packages already included, saving you having to install these. You can run Spark without this if you prefer, you’ll just have to download Python (recommended 3.6 but min. 3.5 for Windows) and configure environments using the Python native functionality, none of which is particularly difficult. I’ll leave you to Google that one as there are plenty of articles on this.
Updating Environment Variables
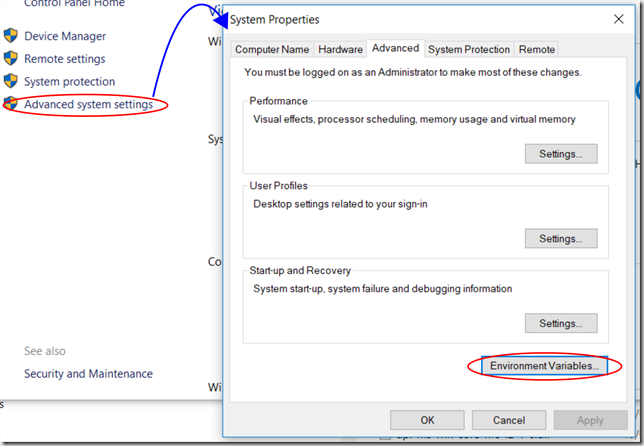
Just a quick note around this, as we’ll be making some changes to these. Before editing your path environment variable it is advisable to save the current value safely to file, in case you make unwanted changes and need to revert. You can set environment variables using either SETX “” /M (you will need to run your command prompt with Administrator privileges) or via the System Properties dialogue.Note that the SETX method will truncate your path variable to 1024 characters, so if you have a longer path variable I’d suggest using the System Properties dialogue method below.

It’s worth mentioning that if you use SET rather than SETX from the command line, your changes will only be scoped to the lifetime of that command window. SETX will persist them to the master environment in the system registry, as will the System Properties dialogue approach. Another alternative is of course PowerShell, and there is a code snippet on StackOverflow here that should help.
The permanent changes to the environment variables will not be visible within any open command windows, so if you want to test them you’ll need to open an new window.
Installing Anaconda
Anaconda has an automated installer, which you should run, accepting the defaults as required. As you may want to be creating multiple Python environments on your machine, it is best to not add the default Anaconda install path to your Path environment variable, as advised in the installer as this can cause unwanted executables to be found.
Creating a Python Environnment
Once installed, it is advisable to create a Python environment for use with your Spark installation. Although not strictly required, this will allow you to make changes to the environment in isolation, without fear of breaking other Python development projects you may be working on.
If you are using Anaconda, this is easily achieved using Anaconda Navigator. From there, go to Environments | Create, then in the dialogue, name your new environment and choose your Python version. I would recommend Python 3.6 for our Spark installation.
With your environment created, add the following Jupyter packages:

Your versions may differ slightly, but targeting these version or higher is recommended. You may experience Anaconda Navigator misbehaving, occasionally hanging when trying to resolve the package dependencies. If this happens, close it down, restart the application and try again. You may also want ot include other packages that are not installled by default, such as numpy, matplotlib and pandas as these will be of use within your environment.
Installing the Java SDK
Run the installer, accepting the required installation parameters
Add the path to the respective Java JDKbin directory to your Path environment variable. This is not strictly required as we have set JAVA_HOME via the installer, but will make the various executables accessible without requiring an explicit path. So in the case of installing to C:Javajdk1.8.0_151, we can run
SETX path “%%path%%;C:Javajdk1.8.0_151bin;” /M
or in the case of a path environment variable approaching 1024 characters, using the System Properties dialogue method above.
Installing Scala
Run the windows installer downloaded and accept the defaults. Install Scala to a suitable location on your machine (I use C:Scala for simplicity). The defaults will add some useful directories to your path environment variable.
Add the following environment variable
SCALA_HOME = bin
Add the SCALA_HOME environment variable to your path environment variable.
And that’s it.To confirm you’re up and running with Scala, simply run “Scala” from your favourite command prompt. You should get a prompt returned as below:

To exit from the Scala environment shell and return to the command prompt, type :q
Installing Spark
This is very straight forward. Simply unzip to a suitable location (I use C:Spark for simplicity). I prefer to use PeaZip for this as it can handle pretty much any archive format, but 7Zip is also a popular choice.
Add the following environment variable
SPARK_HOME =
Add the following to your path environment variable.
%SPARK_HOME%bin
%SPARK_HOME%python
%SPARK_HOME%pythonlibpy4j-0.10.4-src.zip
%SPARK_HOME%pythonpyspark
To test all is well, at the command prompt, type spark-shell and you should be greeted with the following.

Your version of Spark will of course depend on the specific build you acquired. Again we’re taken into a Scala prompt, so we can type :q to return to the command line.
Installing WinUtils
WinUtils provides a number of HDFS-emulating utilities that allow us to run Spark as though it were talking to an HDFS storage system (at least to a certain degree). Without this you will get all manner of file system-related issues wit Spark and won’t get off the launchpad.
Within the WinUtils archive you may have a number of Hortonworks Data Platform versioned folders. For the version of Spark I’m using, being 2.2.1, I have chosen hadoop-2,7,1bin for my files. Unzip and copy the contents of the bin directory to a directory of your choice. It must however be called ‘bin’ in order to be located by the calling programs. I actually placed mine in the C:Sparkbin directory together with the other executables that Spark uses but this is not essential.
Once done, you will need to set the following environment variable:
HADOOP_HOME =
Note we don’t include the bin, so for my example this is C:Spark.
Setting Folder Permissions Required by Hive
Eh? Who said anything about Hive? Well, Spark will make use of certain parts of Hive under the covers such as for the SparkSQL Hive metastore and the like, and as such needs to have access in place for writing files that Hive uses. The first thing you will need to do with the WinUtils tools is change some permissions on a temporary file store used by the Hive Session driver.
Create a directory hive under you windows tmp directory (C:tmp by default).
You will need to assign some Posix permissions to the folder, to allow read write execute for owner, user and group. You will need to open a command prompt with administrator permissions and ensure you are connected to any domain that the computer belongs to in order for this to be successful. At the command prompt, type the following:
winutils chmod -R 777 c:tmphive
To confirm this has been applied, type winutils ls -L c:tmphive
If your permissions have been successfully applied you should see something like the following, signifying read write execute permissions on the directory for all users.

Running a PySpark Shell
As well as Scala, you can also work with Python. You should be able to start a PySpark session from an Administrator-elevated command prompt by simply issuing
pyspark
Note: Failure to use an elevated command prompt will result in an error relating to the inability to start a HiveSession, due to an access denied issue.
py4j.protocol.Py4JJavaError: An error occurred while calling o23.sessionState.
: java.lang.IllegalArgumentException: Error while instantiating ‘org.apache.spark.sql.hive.HiveSessionStateBuilder’:
This returns a similar output to that for the spark-shell command above, with the difference being that you will have a python ‘>>>’ prompt rather than the ‘scala>’ one.
This should be all you need in order to have a working environment for developing locally with Spark.
Coming Soon…
In the second post in this series we will be looking at working with Jupyter Notebooks, a popular all-encompassing environment for conducting Data Analytics using Spark.
Introduction to Data Wrangler in Microsoft Fabric
What is Data Wrangler? A key selling point of Microsoft Fabric is the Data Science
Jul
Autogen Power BI Model in Tabular Editor
In the realm of business intelligence, Power BI has emerged as a powerful tool for
Jul
Microsoft Healthcare Accelerator for Fabric
Microsoft released the Healthcare Data Solutions in Microsoft Fabric in Q1 2024. It was introduced
Jul
Unlock the Power of Colour: Make Your Power BI Reports Pop
Colour is a powerful visual tool that can enhance the appeal and readability of your
Jul
Python vs. PySpark: Navigating Data Analytics in Databricks – Part 2
Part 2: Exploring Advanced Functionalities in Databricks Welcome back to our Databricks journey! In this
May
GPT-4 with Vision vs Custom Vision in Anomaly Detection
Businesses today are generating data at an unprecedented rate. Automated processing of data is essential
May
Exploring DALL·E Capabilities
What is DALL·E? DALL·E is text-to-image generation system developed by OpenAI using deep learning methodologies.
May
Using Copilot Studio to Develop a HR Policy Bot
The next addition to Microsoft’s generative AI and large language model tools is Microsoft Copilot
Apr