A couple of weeks ago I wrote a blog post detailing how to process a tabular model from a stored procedure. The challenge there was to have a way of processing a tabular model on demand from a web application. The challenge still exists, but how do you achieve the same in Azure using Platform as a Service (PaaS) objects which do not have the benefit of a full server and items, such as msdb and SQL Agent, to aid in the process?
In this post, I’m going to show you how to process a tabular model only using Azure PaaS offerings. Not only am I going to show you how to do process a tabular model on-demand, but also how to process a tabular model on a schedule. This post has taken inspiration and part of the code base from the a Microsoft blog: Automating Azure Analysis Services processing with Azure Functions.
Azure Functions
Before we begin properly, it’s worth spending some time introducing Azure Functions. According to Microsoft, Azure Functions are:
…a solution for easily running small pieces of code, or “functions,” in the cloud. You can write just the code you need for the problem at hand, without worrying about a whole application or the infrastructure to run it. Functions can make development even more productive, and you can use your development language of choice, such as C#, F#, Node.js, Java, or PHP. Pay only for the time your code runs and trust Azure to scale as needed. Azure Functions lets you develop server less applications on Microsoft Azure.
They are super useful for extending the capabilities of any solution and not just limited to what we’re going to cover here.
On-Demand Refresh
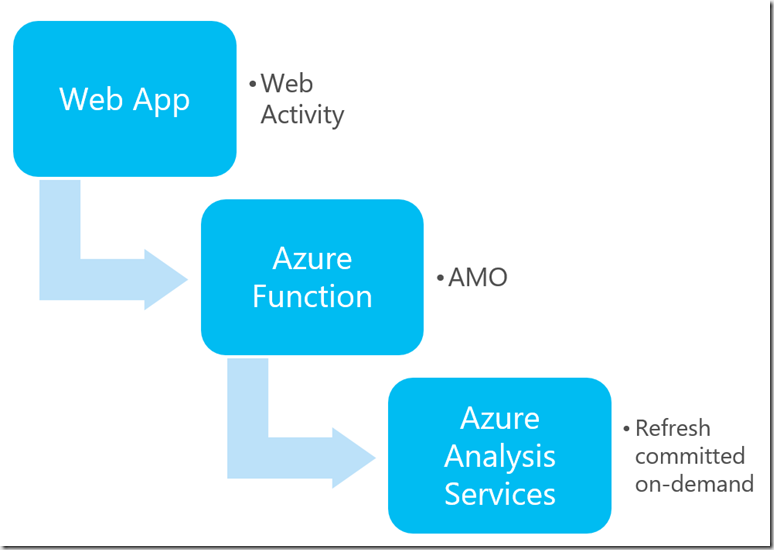
The use of Azure Functions creates a trigger for the on-demand refresh of a tabular model from the web application or web hook, this is to make sure that selected elements of data in a tabular model, for example hot partitions, are always up to date. The following describes the process that Azure Functions will be involved in this scenario:

The steps that are needed to create an Azure Function for On-Demand Refresh are as follow:
1) Create an Azure Function App
Navigate to the Azure Portal and create a Function App (the name changes quite a bit, so don’t be concerned if it’s not exactly displayed as it is below)
2) Create a new Function
After you’ve created the Function App, we need to add a new Webhook + API function, which we’ll use as the basis for our on-demand refresh. Click on the + button next to Functions, select Webhook + API, choose C# as your language and click Create this function.
3) Configure the Function
Download the latest client libraries for Analysis Services. This needs to be done to your local machine so you can then copy these files to your Azure Function App. After you’ve downloaded the client libraries, the DLLs can be found in C:Program Files (x86)Microsoft SQL Server140SDKAssemblies. The two files you need are:
C:Program Files (x86)Microsoft SQL Server140SDKAssembliesMicrosoft.AnalysisServices.Core.DLL
C:Program Files (x86)Microsoft SQL Server140SDKAssembliesMicrosoft.AnalysisServices.Tabular.DLLThe documentation references the 130 assemblies, which is not correct and will not work. You need the assemblies in 140.
In order to add these assemblies to your function, you’ll need to add a folder called “bin”. To do this, select your Function App, click Platform features, and under Development Tools, click Advanced tools (Kudu).
In Kudu, click Debug console and select Cmd. Navigate to the sitewwwrootOnDemandHttpTrigger folder and add the “bin” folder here by clicking the + button.
Once you’ve added the “bin” folder, go back over to the Azure portal and select your function OnDemandHttpTrigger.
On the right under View files, navigate to the bin folder. Then click the Upload button to add the two previously mentioned DLLs to the bin folder.
You should see the two DLLs in your bin folder now.
4) Add Azure Analysis Services Connection String to the Function App
This step is going to add the connection string to the Azure Analysis Services (AAS) service to the entire Function App, not just individual functions.
Click the name of your Function App, then select Platform features. Select Application settings under General Settings.
Now we need to add our connection string under the Connection strings section. You’ll need your AAS server name and a user ID and password that has access to the AAS database.
You can find your AAS server name by navigating to your AAS database in the Azure portal and copying the value constructed after clicking Show server connection strings:
Your connection string should look like this:
Provider=MSOLAP;Data Source=; Initial Catalog=;User ID=;Password=
Back in the screen for the Function App, fill in the Name textbox with a name for your connection string and paste your connection string in the Value text box:
Click Save at the top to save these settings for your Functions.
5) Time for Code
Our Function App has been configured, now we need to add code to the function. The function comes with a working function, for which to test out the functionality, but we don’t need everything that is on offer.
We’re going to programmatically process the tabular model. In doing so, we’ll leverage Analysis Services Management Objects (AMO). If you’re new to AMO, start here.
Paste in the following code (all code referenced can also be download from my GitHub Repo):
#r "Microsoft.AnalysisServices.Tabular.DLL"

#r "Microsoft.AnalysisServices.Core.DLL"

#r "System.Configuration"

using System;

using System.Configuration;

using Microsoft.AnalysisServices.Tabular;

using System.Net;

public static async Task<HttpResponseMessage> Run(HttpRequestMessage req, TraceWriter log)

{

log.Info("C# HTTP trigger function processed a request.");

// parse query parameter

string status = req.GetQueryNameValuePairs()

.FirstOrDefault(q => string.Compare(q.Key, "status", true) == 0)

.Value;

if (status == null)

{

// Get request body

dynamic data = await req.Content.ReadAsAsync<object>();

status = data?.status;

}

if (status == "execute")

{log.Info($"C# trigger function started at: {DateTime.Now}");

try

            {

Microsoft.AnalysisServices.Tabular.Server asSrv = new Microsoft.AnalysisServices.Tabular.Server();

var connStr = ConfigurationManager.ConnectionStrings["AASTabular"].ConnectionString;

asSrv.Connect(connStr);

Database db = asSrv.Databases["azureadventureworks"];

Model m = db.Model;

//db.Model.RequestRefresh(RefreshType.Full);     // Mark the model for refresh

m.RequestRefresh(RefreshType.Full);     // Mark the model for refresh

//m.Tables["Date"].RequestRefresh(RefreshType.Full);     // Mark only one table for refresh

db.Model.SaveChanges();     //commit  which will execute the refresh

asSrv.Disconnect();

            }

catch (Exception e)

            {

log.Info($"C# trigger function exception: {e.ToString()}");

            }

log.Info($"C# trigger function finished at: {DateTime.Now}");

}

return status == "execute"

?req.CreateResponse(HttpStatusCode.OK, "Successfully Processed Tabular Model ")

:req.CreateResponse(HttpStatusCode.BadRequest, "Please pass a status on the query string or in the request body");

}
Click the Save button at the top.
6) Test, Test, Test
Click the Run button at the top to test the function
The function can also be tested in a web browser, and be called by a Web App using the POST HTTP method.


Now we have a fully functioning method of refreshing an Azure Analysis Services tabular model on-demand.
Scheduled Refresh
The use of Azure Functions creates a trigger for the scheduled refresh of a tabular model, this is to make sure that the entire tabular model has the latest data and is always up to date. The following describes the process that Azure Functions will be involved in this scenario:
The steps that are needed to create an Azure Function for Scheduled Refresh are as follow:
1) Create a Function
We’ve created our Function App, and now we need to add a new Timer Trigger function, which we’ll use as the basis for our scheduled refresh. Click on the + button next to Functions, select Timer, choose C# as your language and click Create this function.
2) Configure the Timer
What use is a timer without a schedule? To give the timer a schedule, click Integrate, set the schedule and click Save.
The Schedule text box expects a CRON expression to define the days and times that the function should execute. Click the little Documentation button on the screen above to read about CRON expressions. The schedule I’ve set is to run once everyday at 09:30AM.3) Configure the Function
See step 3 of the On-Demand Function for detailed steps. You’ll need to create the bin folder and upload the DLLs to the bin folder.
4) Time for Code
We’ve configured our function, so now it’s time to add the code. The code base is much simpler than the On-Demand code base, mainly because it’s doing fewer tasks. But the AMO section is exactly the same. Paste in the following code:
#r "Microsoft.AnalysisServices.Tabular.DLL"

#r "Microsoft.AnalysisServices.Core.DLL"

#r "System.Configuration"

using System;

using System.Configuration;

using Microsoft.AnalysisServices.Tabular;

using System.Net;

public static async Task<HttpResponseMessage> Run(HttpRequestMessage req, TraceWriter log)

{

log.Info("C# HTTP trigger function processed a request.");

// parse query parameter

string status = req.GetQueryNameValuePairs()

.FirstOrDefault(q => string.Compare(q.Key, "status", true) == 0)

.Value;

if (status == null)

{

// Get request body

dynamic data = await req.Content.ReadAsAsync<object>();

status = data?.status;

}

if (status == "execute")

{log.Info($"C# trigger function started at: {DateTime.Now}");

try

            {

Microsoft.AnalysisServices.Tabular.Server asSrv = new Microsoft.AnalysisServices.Tabular.Server();

var connStr = ConfigurationManager.ConnectionStrings["AASTabular"].ConnectionString;

asSrv.Connect(connStr);

Database db = asSrv.Databases["azureadventureworks"];

Model m = db.Model;

//db.Model.RequestRefresh(RefreshType.Full);     // Mark the model for refresh

m.RequestRefresh(RefreshType.Full);     // Mark the model for refresh

//m.Tables["Date"].RequestRefresh(RefreshType.Full);     // Mark only one table for refresh

db.Model.SaveChanges();     //commit  which will execute the refresh

asSrv.Disconnect();

            }

catch (Exception e)

            {

log.Info($"C# trigger function exception: {e.ToString()}");

            }

log.Info($"C# trigger function finished at: {DateTime.Now}");

}

return status == "execute"

?req.CreateResponse(HttpStatusCode.OK, "Successfully Processed Tabular Model ")

:req.CreateResponse(HttpStatusCode.BadRequest, "Please pass a status on the query string or in the request body");

}
Click the save button at the top.
5) Test, Test, Test
Click the Run button at the top to test the function


Now we have a fully functioning method of refreshing an Azure Analysis Services tabular model on-demand.
Conclusion
I have shown you how simple it is to invoke two methods of refreshing a tabular model using Azure Functions: an On-Demand refresh and a refresh by Schedule. I hope that you take inspiration and use these methods in your use of both Azure Analysis Services and Azure Functions.


Will this approach work if processing takes a long time to complete? My understanding is that Azure Functions time our after 5-10 minutes.